 |
| This is a sponsored post but all opinions are my own |
Good ol' Online Labels not only has a ton of different types of sticker paper, they also have free downloadable designs - including free printable planner stickers!
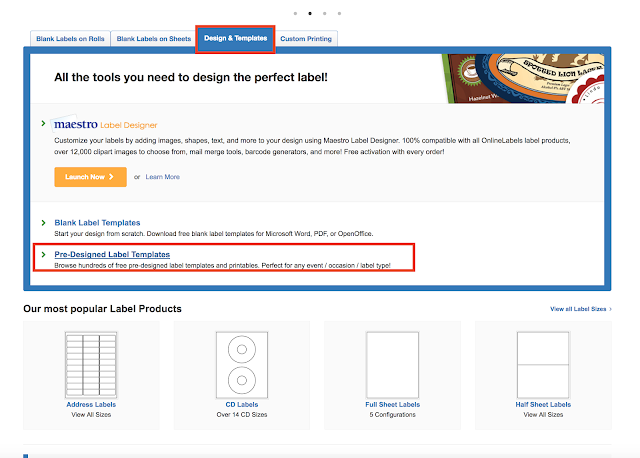
First things first - head over to Online Labels. Click the tab that says "Design and Templates". Then click "Pre Designed Label Templates."
There are literally thousands of pre-designed shapes for every occasion - which we talked about in this Silhouette tutorial. To easily find the printable planner stickers, type "planner stickers" in the search box.
Now click on one of the free printable labels to open it. Under option 2 click "Print Myself Using My Labels".
Clicking "Print" will save the day planner sticker set as a PDF on your computer.
Head over to Silhouette Studio and from the File menu click "Open." Navigate to the PDF file to open.
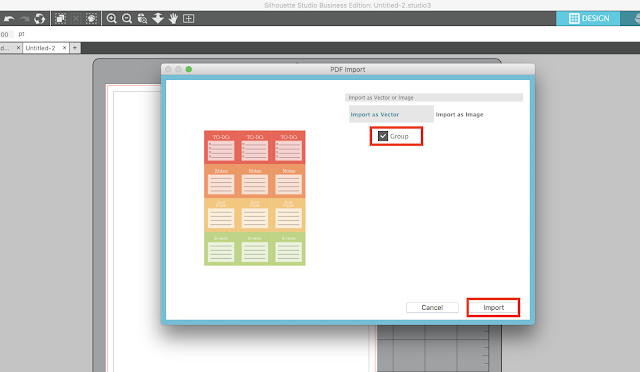
You can decide if you want to import the design into Silhouette Studio as a single group or with all of the elements ungrouped. I wanted them to come in ungrouped since I knew I would eventually need to turn off the internal cut lines.
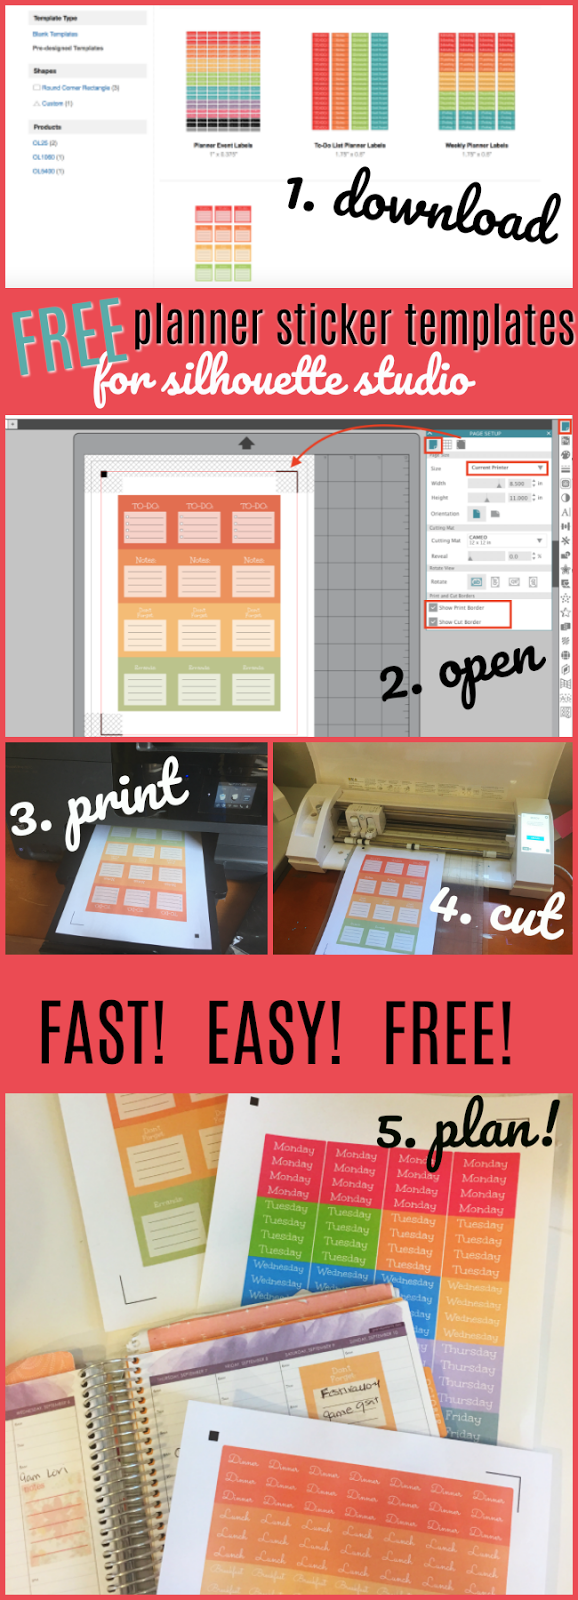
Once the printable planner stickers from Online Labels are in your work area, open the Page SetUp panel and change the page size to Current Printer. Turn on the Print Border and the Cut Border along with Registration Marks (click M on your keyboard for the Silhouette Studio Keyboard shortcut). If you're new to Silhouette print and cut this beginner tutorial will walk you through step by step.
You can customize the planner stickers if you'd like by changing the fill color, adjusting the size of the stickers, or adding different text. Just get creative!
From the Send panel you want to check the cut lines. If any internal cut lines are on - as you can see they are - you want to turn them off by selecting them and clicking "No Cut."
The easiest and fastest way to do this is to use the Designer Edition tool Select By Color. Pick all the colors of objects you don't want to cut then return to the Send panel and click "No Cut."
Now with only the cut lines on around the edge of each sticker, you are ready to print and cut!
Load your favorite Online Labels sticker sheets into your printer and send the planner sticker set to print. I am using the Standard Mate White Full Sheets with no back split, but the glossy sticker paper from Online Labels is awesome, too!
Place the printed sheet onto your Silhouette cutting mat and load it into the cutter.
Back in Silhouette Studio open the Send panel. For this Online Labels matte printable sticker sheets, the default cut settings for the material "Sticker Paper, White" worked perfectly for me - but of course the type of sticker paper you are cutting and the sharpness of your blade may require you to tweak the settings.
Click "Send" to begin the cut.
The Silhouette CAMEO or Portrait should cut them perfectly and leave you with a set of awesome stickers for your planner!
You can place them in your planner and you're all set to go!
With the free printable planner stickers from Online Labels, stickers have never been easier!
Note: This post may contain affiliate links. By clicking on them and purchasing products through my links, I receive a small commission. That's what helps fund Silhouette School so I can keep buying new Silhouette-related products to show you how to get the most out of your machine!
Get Silhouette School lessons delivered to your email inbox! Select Once Daily or Weekly.


.png)


No comments
Thanks for leaving a comment! We get several hundred comments a day. While we appreciate every single one of them it's nearly impossible to respond back to all of them, all the time. So... if you could help me by treating these comments like a forum where readers help readers.
In addition, don't forget to look for specific answers by using the Search Box on the blog. If you're still not having any luck, feel free to email me with your question.