 |
| This is a sponsored post but all opinions are my own. |
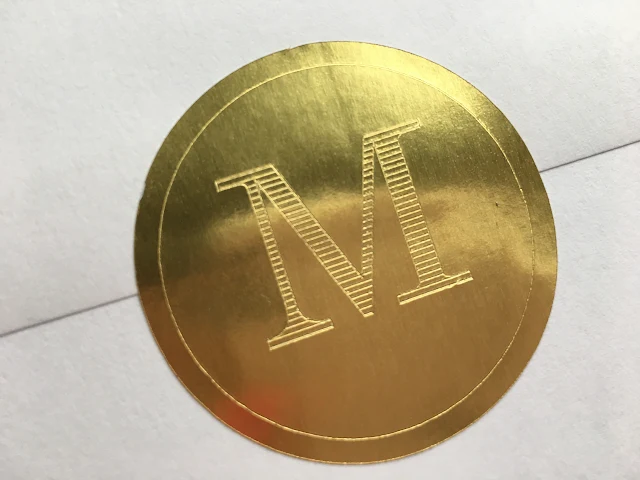
I was playing around with some printable gold foil sticker paper from Online Labels when I had this light bulb moment thinking...I bet I could etch - or even emboss - on these sheets. Sure enough...it was a huge success.
So not only can you use the gold and silver foil sticker sheets (available for inkjet or laser printers) to print on, you can use them to create etched or embossed stickers which are really elegant!
The process is simple if you have the right tools. First grab yourself a pack of the silver and/or gold printable foil sticker sheets from Online Labels. To etch you'll need the Amy Chomas etching and engraving tip. To emboss I used my fine Curio embossing tip in the Silhouette CAMEO.
Now you can do this with the Silhouette CAMEO 3 or with any of the other machines (you'll just have to swap out the cutting tool to cut the edge of the sticker). I'll show you both options when we get to that point....but first let's set up this design in Studio.
I'm making round single letter monogram stickers. Start by drawing out a circle.
Use the Offset tool to make an external offset. The offset will be the cut line. The original circle will be an embossed or etched frame.
Add your design or text inside the circle. I am going with just a single letter.
To get the lines through the design I used the Sketch function with the Grill fill. The Angle and Spacing bars were set all the way to the left.
Now it's time to set up to etch/emboss and cut. This will be slightly different depending on the Silhouette cutting machine you are working with.
Embossing and Etching Stickers with Silhouette CAMEO 3 Users
Now select the inner circle and the monogram with Tool 2. Those cut lines should now turn blue. Pick Sketch Pen from the list of tools and "Silhouette Sketch Pen" from the Material Settings list. Increase the thickness to 26. Double cut ONLY if you are using an embossing tip. (If you get any type of shredding - or what looks like eraser shavings - back off the thickness.)
Place the AutoBlade in the left (red) carriage and lock it into place.
Place the etching or embossing tip in the right (blue) carriage and lock it into place. Place a piece of the gold or silver printable foil sticker paper onto your Silhouette Cutting mat and load it into the Silhouette cutting machine.
Click Send to Cut in Silhouette Studio. The outer edge of the stickers will first be cut and then the machine will begin embossing or etch those parts of the design.
Embossing and Etching Stickers with Silhouette CAMEO 1, 2, and Portrait users
From the Cut Settings window set the outer circle to "No Cut" and the inner circle and design to Cut. From the Material Settings list pick "Silhouette Sketch Pen." Increase the thickness to 26. Double cut ONLY if you are using an embossing tip.
Place the etching or embossing tip in the carriage and lock it into place. Place a piece of the gold or silver printable foil sticker paper onto your Silhouette Cutting mat and load it into the Silhouette cutting machine.
Click Send to Cut in Silhouette Studio.
When the embossing or etching on the sticker paper has completed DO NOT UNLOAD THE MAT FROM THE CAMEO. Replace the etching or embossing tip with the cutting blade.
Go back into Studio and from Cut Settings set the inner circle and monogram to "no cut" while turning on cut lines for the outer circle that you want to cut. Pick White Sticker Paper from the Material List.
Send to Cut again. This time the machine will cut the edge of your etched foil stickers.
While you can make etched foil stickers with a Silhouette embossing tip or the Chomas etching tip, personally I like the look of the etching tip better. I think it results in a much more crisp design. Above is the results with the etching tip and below is the fine emboss tool.
I think the etching tip just works better because of how sharp it is and it literally scratches the foil sticker sheet giving a really defined effect.
Want to try out making your own foil etched stickers? Grab the printable gold and foil sticker paper from Online Labels and try it for gift tags, envelope sealers, invitation or scrapbooking embellishments!
Note: This post may contain affiliate links. By clicking on them and purchasing products through my links, I receive a small commission. That's what helps fund Silhouette School so I can keep buying new Silhouette-related products to show you how to get the most out of your machine!
Get Silhouette School lessons delivered to your email inbox! Select Once Daily or Weekly.


.png)


No comments
Thanks for leaving a comment! We get several hundred comments a day. While we appreciate every single one of them it's nearly impossible to respond back to all of them, all the time. So... if you could help me by treating these comments like a forum where readers help readers.
In addition, don't forget to look for specific answers by using the Search Box on the blog. If you're still not having any luck, feel free to email me with your question.