 |
| This is a sponsored post, but all opinions are my own |
I am working with a couple of baseball-themed blanks from My Vinyl Direct. I have a canvas baseball tote bag, a garden flag and an etched baseball acrylic keychain. These blanks are oh-so-adorable, but since they're not completely blank - they come with the red baseball threads - I need to figure out the best placement, design, and size for each of these blanks.
To get started, take a picture of your blank. Try to make sure as many wrinkles are out of the item as possible by ironing it. The first picture I took of the baseball tote was a wrinkled mess...
...so I stuck it in the heat press for 30 seconds to press out the wrinkles and took another picture.
Now email yourself the pictures of the items. Open the email on your computer and download the images to your desktop.
Open up Silhouette Studio and then open up the photos of your blanks. You can do this by going to File > Open and navigating to the downloaded image.
Once the photo is in Silhouette Studio it will probably be pretty large. Select the photo and grab onto the corner nodule with your mouse. Resize the image so it's more manageable to work with.
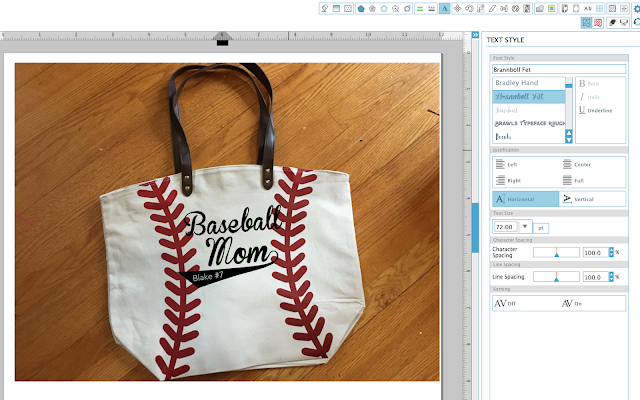
Now you can either create or open a design. (To open a design in the same work area go to File > Merge and then find the design to open.) I am working with this set of baseball mom designs - also from My Vinyl Direct. I can't decide which one I want to use so I open them all up in the same work area as the picture of my tote.
By ungrouping the set of designs (right click > ungroup) I can move one of the designs on top of the picture of my tote.
TIP: Use the Fill Color tool to fill in the designs using the same color HTV (or vinyl) as I will be cutting on. I also like to change the line color to 'transparent' or to match the fill color.
Adjust the sizing of the designing and play around with the placement until you get it how you like it.
You can make multiple copies of the photo of the customizable blank so you can decide which design and layout you like best. On a few of them I added elements - like the baseball player's number.
Once I decided which design, size, and layout I liked best, I measured the actual blank. In this case the baseball tote is: 20.5" x 16.5". In Silhouette Studio I used the Draw a Rectangle tool to draw out a rectangle with those same dimensions.
Then I adjusted the size of the image (grouped with the design) to (approximately) the same size as the rectangle (outline bolded green to make it easier for you to see). This helps make sure my heat transfer vinyl design is the appropriate size when it's cut.
When you have everything sized, you can delete the image and the rectangle and just keep the design to be cut. Don't forget to mirror the image before cutting.
Here's the finished baseball tote bag with customization.
I used the same process for the garden flag.
What this mock up/design process helped me realize for this baseball garden flag design was that I really needed to add an offset if I was going to have the black HTV cover the baseball threads on the flag.
The offset makes the black design pop and not get lost on the threads.
Without laying out the design like this in Silhouette Studio first, I probably wouldn't have realized until I had already cut and applied the single layer of black HTV - and by then it would have been too late. Here's the garden flag with the layered HTV applied!
The great thing about these blanks is you can really customize them however you want - or however your customers want.

If customers can't make up their mind on layout or customization, send a few screen grabs of your Silhouette Studio mock ups to help them 'see' their options before you actually create it.
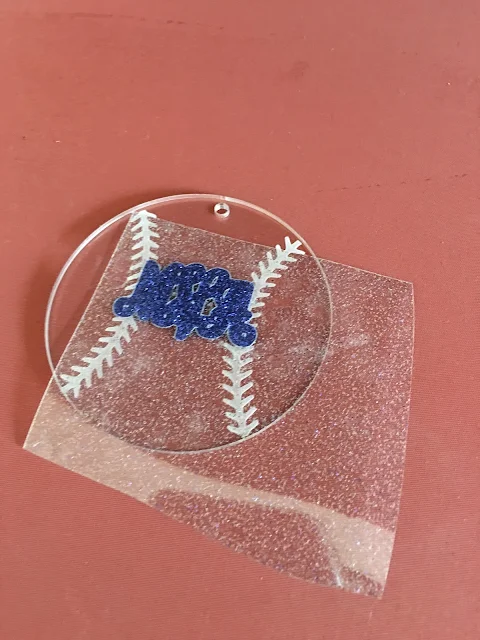
And while I'm on a baseball kick here - I also picked up this 3" Etched Baseball acrylic from My Vinyl Direct. It came pre-etched with the threads so all I had to do was cut the HTV and apply!
Yup...you read that right, I cut glitter heat transfer vinyl and heat pressed HTV onto the blank acrylic keychain.
Note: This post may contain affiliate links. By clicking on them and purchasing products through my links, I receive a small commission. That's what helps fund Silhouette School so I can keep buying new Silhouette-related products to show you how to get the most out of your machine!
Get Silhouette School lessons delivered to your email inbox! Select Once Daily or Weekly.


.png)


I hit a snag with my canvas baseball tote. I am guessing my heat setting was to high because whatever material was behind the canvas shrunk and cause my blank tote to wrinkle. What heat setting should I use for my press and what other options are there to prevent this from happening to other totes? Can you please respond to jsauceda17@gmail.com? Thank you.
ReplyDelete