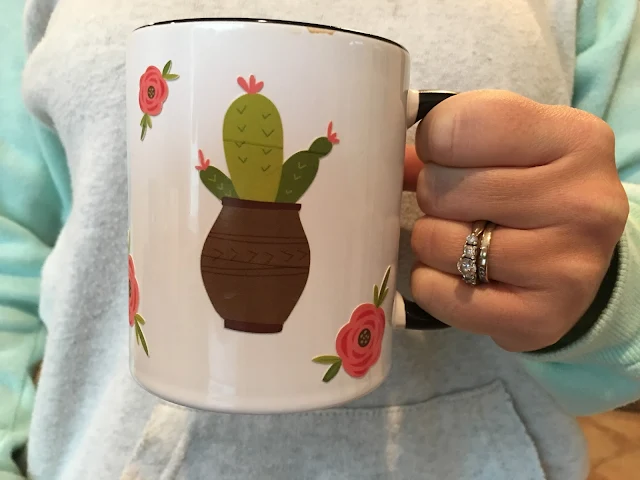
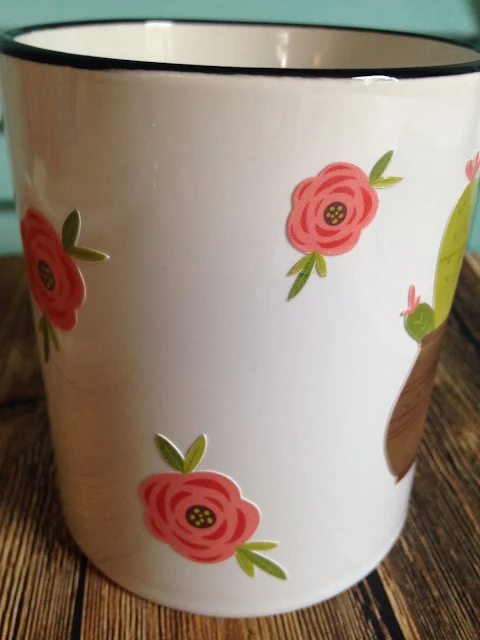
You guys...I was introduced to this stuff several months ago and now I'm hooked. I literally have been dying to tell you about this printable permanent vinyl ever since. Before I did though, I wanted to make sure I had really put it to the test to make sure 1) the color didn't bleed or fade and 2) the vinyl stayed stuck.
Here I am about 2 months, 40 cups of coffee and a 40 dishwasher cycles later...(don't tell anyone I put my vinyl in the dishwasher...this girl doesn't have time to hand wash!)
Yup it looks exactly the same as it did the day I made it....that's the awesomeness of this printable vinyl! It's permanent vinyl which makes for a super sticky adhesive AND it has a clear laminate cover sheet that protects the printed vinyl keeping it from fading, bleeding and scratching.
I have to admit I intentionally did not put laminate on two of the flowers and while they faded slightly they still exceeded my expectations!
So here's how you use this inkjet printable vinyl with clear laminate with your Silhouette CAMEO.
The first thing you want to do is open up your design in Silhouette Studio. I am using this adorable cactus and flower set that I got a while back from The Hungry JPEG.
I set up my work area for a print and cut by adding the registration marks and turning on the cut lines. When it was time to print, I printed on the printable vinyl.
Here's where the important part comes in! Before you cut with your Silhouette cutting machine, you need to cover the printed designs with a piece of the clear vinyl laminate which comes with the Inkjet Printable Vinyl Starter Pack from Expressions Vinyl.
Don't feel like you need to layer an entire sheet of the clear vinyl over the printed sheet - you can just cover the printed areas to avoid wasting materials.
Once you've cut the laminate sheet down to size, remove the clear laminate from the backing.
Carefully laying the clear laminate down onto the printed sheet avoiding any wrinkles or bubbles.
Now place the printed sheet onto your Silhouette cutting mat and prepare to cut.
In Silhouette Studio, I found the best Silhouette cut settings for printable vinyl with laminate to be:
Speed 8, Thickness 16, Blade 6 Double Cut
Once it's finished cutting, unload the mat and material and place your decals. You can pick up the decals like stickers if you'd like...

... or weed them like any other vinyl design and use a sheet of transfer tape to move the decals.
I honestly can't tell you how impressed I am with this printable vinyl.
Look how tiny those leaves are....all those cycles through the dishwasher and they haven't moved! Plus the color is exactly the same as the day I originally made this mug!
I think this inkjet printable vinyl might be a great solution for cell phone case decals which tend to fade and scratch from so much handling. I haven't tried it yet - but I bet it would also be perfect for making printable car decals!
Note: This post may contain affiliate links. By clicking on them and purchasing products through my links, I receive a small commission. That's what helps fund Silhouette School so I can keep buying new Silhouette-related products to show you how to get the most out of your machine!
Get Silhouette School lessons delivered to your email inbox! Select Once Daily or Weekly.


.png)


Did I miss something, or was there never a mention as to which printable vinyl you used?
ReplyDeleteWhen I click on the red links for the printable vinyl, I just get a blank page to something called sharesale.com. I was interested in finding the brand name for this product. Thanks
ReplyDeleteDid you use the economy or premium laminate sheets over your design?
ReplyDeleteWow - That looks great! I can't wait to try this printable vinyl. Thanks for sharing this find! Would the images be easy to cut out if you don't have the print & cut feature?
ReplyDeleteDepends on how detailed your cuts are and your scissors...but in short, its really not that hard. Ive had to hand cut many laminated stickers like these..no issues.
DeleteHello! Do they sell the clear laminating sheet separate? Is there a laser printable vinyl?
ReplyDeleteI do not own a heat press. Do you need to use heat to adhere this vinyl? How would I do it without a heat press if you do need heat?
ReplyDeleteThis printable vinyl in the blog post is a 651 style adhesive vinyl. Like sticker paper or regular sticker vinyl but you can print on it with an inkjet printer
DeleteLooks great! What is the name of the printable vinyl (is it Expressions BRAND or another brand name) and the laminate? Since it is sold out as a starter pack, we may be able to find it as a stand-alone product if we know what the name of it is.
ReplyDeleteMaterial is out of stock, any other suggestions where we may purchase this?
ReplyDeleteWhat printer did you use for this project?
ReplyDeleteIt would be nice to get the name of the printable permanent vinyl.... My anti virus does not like what pops up when I click on your link for it. Tracking stuff. Thanks.
ReplyDeleteoh, the possibilities!
ReplyDeleteI bought this from Expressions (my favorite resource for Vinyl) but the laminate did not come with it for some reason. HMMM??
ReplyDeleteI read this article twice but didn't see what the brand of printable vinyl you used. Did I just miss it? Thanks for the great tutorial!
ReplyDeleteHi! I was just inquiring about printable vinyl today and happened to check my email and saw your blog post. It was fate! Do you know if this could be covered with epoxy for use on glittered tumblers? Thank you!
ReplyDeleteYes. the laminate and printable vinyl is all 100% waterproof/liquid proof. The ink is protected by the laminate. Applying epoxy on top of it will not be a problem at all.
Deletewith this printable new vinyl. When you are weeding and using the design does the CLEAR LAMINATE you used to cover the design, does it STAY ON THERE when you apply the designs to your cup or does it stay on there?
ReplyDeleteThe clear laminate is applied to the printable paper prior to cutting..when cut with your machine, it cuts through the laminate and vinyl. It weeds just like any other cut vinyl from your machine. The laminate sticks very well to the printable vinyl and will stay on it even after cutting and weeding the unnecessary material.
DeleteDo they have any laser printable vinyls?
ReplyDeleteHi, This sounds awesome, but you didn't mention what the brand of the vinyl is. Where can I buy some?
ReplyDeleteETA: Never mind, found the link! thanks
Kate
Love this idea! Does this work for those of us with laser printers?
ReplyDeleteYou have to buy the printable vinyl for laser printer but YES it's possible.
DeleteThank you for this! What about HTV? I'm looking to do the same thing but on a tshirt.
ReplyDeleteWhich laminate sheet did you use for this project ... the Economy or the Premium?
ReplyDeleteHi! Your work is very beautiful, i wanted to ask what type of printer donyo use for this project. Thank you
ReplyDeleteThe links I followed did not take me to the printable polyvinyl, can you tell me brand and where topurchase
ReplyDeleteI've been doing some reading into using printable vinyl on outdoor applications, and I wanted to add my two cents for everyone who seems confused about what to buy. I don't think it matters what type of printable vinyl you use for your designs. Cricut, Silhouette... it's all relatively similar. It seems that the author's intention is not to tell you about a particular kind of printable vinyl, but to share information and a link to the actual laminate she buys to apply over the vinyl after printing.
ReplyDeleteOracal makes a product called ORAGUARD that is essentially a strong laminate film that you apply over your design to protect it from UV damage, water and fading. Sign shops and decal stores use it to protect their outdoor stickers/decals.
If you are printing on vinyl and planning on doing anything with your design, you need to protect it. If you search for Oracal ORAGUARD products, you will only find it sold in large rolls. The company she has a link to, Expressions Vinyl, will actually sell you this Oracal vinyl by the sheet in two finishes, economy (matte finish) or premium (gloss finish). Aside from one Etsy seller I found on a Google Shopping Search, who you can message to sell you this ORAGUARD by the sheet, you are not going to find this laminate vinyl by the sheet online.
Anytime I use printable vinyl for any design that involves complicated cutting or has an outdoor, glassware or decal application (basically anything but a simple paper sticker) I always use laminate vinyl. It protects the paper finish on the printable vinyl from fading and water. Personally, I'm an Amazon Prime addict, but I order the laminate from Expressions Vinyl, simply because its the only place I can find it in small quantities. No luck on sheets from Amazon or any other vinyl stores.
One last thing based on other questions above, my understanding is that you must use an ink-jet printer for printable vinyl. I don't think that there is such a thing as printable vinyl for laser printers. I haven't researched this much, but I did not have much success with my own laser printer. The design did not print well on the vinyl (odd colors, but did just fine on regular paper) and my Cricut could not read it to cut the design.
Thank you Lauren for the clarifications on the printable and laminate vinyls. With so many choices it is tough to determine which product to utilize.
ReplyDeleteI'm going to try using the Oracal 651 transparent vinyl over my printable vinyl to see if it provides the necessary durability (unfortunately I had already purchased a roll of this so I'm sort of committed). It seems to have a nice finish but time will tell if it is durable enough.
What blade are you using? Deep cut or another one? Also, I've found the cricut printable vinyl to be of better quality than the expressions as well as a better price point when getting off Amazon for around $10 for 10 sheets and pairing them with my 50 count single side premium gloss laminate sheets. Overall it's been a better price per sheet completed and better quality. I have the expressions set as well but I did not favor it as much as what I now use.
ReplyDeleteare you using the Deep cut blade? I've used auto blade on my highest cut setting of 10, force 33, speed 6 and 5 passes but it still needs a little more to full cut out my laminate decals.
ReplyDelete