 |
| This is a sponsored post but all opinions are my own. |
Yup...if you're wondering how to cut tiny vinyl designs without tearing or you're wondering about that a spice rack on my desk - you're in luck. It all comes down to Online Label's Clear Sticker Paper!
For years Silhouette School readers have been asking me about the spice rack tucked on the corner of my desk. Whether they spot it over my shoulder during a Facebook Live or notice in one of the behind the scenes posts or on the Shop My Office page - I get question after question about that thing. Yes...it's an old spice rack that I emptied out and now I use to hold...stuff. Stuff like rhinestones (lots of them), stuff like glue sticks, stuff like cutting blades, sketch pens, and thumb drives. It's an easy way to organize the 'stuff'.
I've also get tons of desperate emails, usually with an attached picture ,about how to cut tiny vinyl designs without tearing. Super small designs - especially text can be tough to cleanly cut on vinyl and equally tough to weed.
So the other day while I stared at my spice rack wanting to (finally) label the glass jars (yes, I know I can just 'see' what in there - but there's something about a label #amiright?) it hit me!
Trying to cut the tiny little script letters in (black) vinyl is possible, but it can be challenging. I wasn't up for a challenge at the moment - I've got too many other challenges on my
Instead..why not use clear sticker paper and print and cut for a vinyl-look? When applied to glass the clear stickers look very much like vinyl...oh and the Online Labels Clear Sticker Sheets for Inkjet won't smear!!
Within five minutes I had not only designed, but print and cut, and labeled my spice jar containers.
The first thing you want to do is open up Silhouette Studio and type out your text. Make sure to fill it with a solid color and change the line color.
Then you'll want to re-size the text or designs so it fits on the surface where they'll be applied. I needed these designs to be no bigger than an inch and a quarter wide and half an inch high. That's super small when you're cutting a script text on vinyl, which is why this clear sticker paper is such a great alternative.
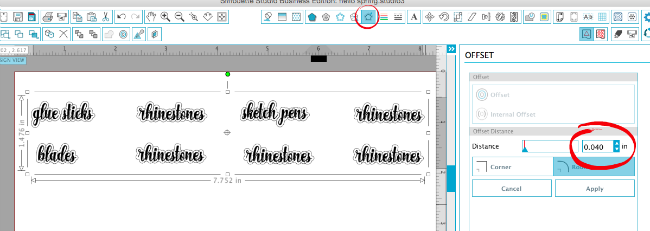
After I had typed out all my labels, I selected them all and created a small offset around each design.
With all the designs still selected, go to the Cut Settings window and tell the software to "Cut Edge." This will turn off the internal cut lines and only turn on the offset cut line (it also means you don't necessarily need to weld your text for print and cut, keeping the Text status in Studio!)
Add the registration marks to your work area and adjust the page size for Current Printer.
Place the Online Labels Clear Sticker Sheet into your printer with the clear side oriented so it will be printed on.
After it prints, wait just a minute or two before placing the sheet onto your cutting mat. I like to press the sheet onto my cutting mat in the areas where it's not printed - just to guarantee it won't smear.
In Studio, from the Cut Settings window change the material type to Clear Sticker Paper and then adjust the blade if necessary or select "Autoblade" if you're using you auto blade on a CAMEO 3. Send to Cut! The default settings worked great for me.

That's it - you're all done and you've just created clear stickers that are not only easy to pick up and apply on any surface - including paper or glass, but they're easily re-positionable!

For anyone worried about the fate of the rest of the sticker sheet - I did not waste it! I'm saving it to use later...a Silhouette print and cut hack I shared here to use partially print and cut sheets.
And here's how the clear stickers look on my newly labeled spice rack desk organizer!
Love making stickers? Be sure to check out my ebook The Ultimate Silhouette Sticker Guide!
Note: This post may contain affiliate links. By clicking on them and purchasing products through my links, I receive a small commission. That's what helps fund Silhouette School so I can keep buying new Silhouette-related products to show you how to get the most out of your machine!
Get Silhouette School lessons delivered to your email inbox! Select Once Daily or Weekly.


.png)


Small vinyl lettering is best removed from warm vinyl around 110 to 130 deg.Fahrenheit. You can purchase a weeding table but I just set it on my heat press until I am ready.
ReplyDelete