They're a fun little surprise that are perfect for things like baby reveals or discount codes maybe even an advent calendar. I decided to use the scratch off sticker sheets as a way to incentivize my kiddos....for things like chores around the house and random acts of kindness (RAK). And I'm sharing the basic printable Silhouette Studio design with you so you can try it out!
Let's start in Studio to work through making your own DIY scratch off designs. Start by creating or opening a design in Silhouette Studio that you will print. Like I said, I am working on a chore chart-ish project. Once printed, the top half of my box will remain visible, while the bottom will be covered with the scratch off sticker.
If any part of your printed sheet will need to be cut make sure you add registration marks to set up like a Silhouette print and cut.
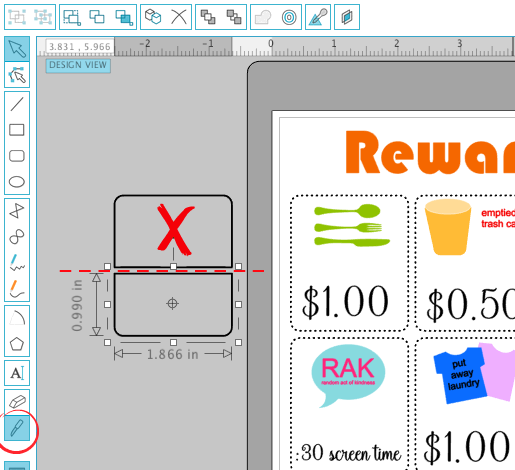
After your printed design is set up in Silhouette Studio you'll need to work on making the shape that will be cut out of the scratch off sheet. You can draw something simple like a circle, oval or rectangle with the drawing tools found on the left sidebar.
In this case, I copied one of the boxes and then used the knife tool to splice it. The top half can be deleted while the bottom half will become the cut file for the scratch off piece.
I filled it in with gray here just to visualize what it will look like once it's all put together.
Replicate the shape for as many scratch off stickers as you need.
Move the scratch off designs to the side and print out your printable on card stock or sticker paper (this is not include with the Silhouette Scratch Off Sticker Sheets). Set it to the side while you work on cutting the scratch off sticker sheets.
Move the scratch off design onto the virtual mat now. From the Cut Settings window turn on the cut lines and pick "Scratch Off Stickers" from the Material List. The default cut settings work really well.
Load the scratch off sheet onto the cutting mat and into the machine.
Cut the design by clicking "Send to Cut" in Silhouette Studio. When it's finished cutting, unload the mat and material.
If you are going to manually move the scratch off stickers, you do not need to weed away the excess. You can simply peel the stickers up and place them over your printables.
I wanted to move the entire set of scratch offs together so I weeded away the excess scratch off material and used a clear transfer tape - the same transfer material that I use for vinyl - to move the stickers onto my printed paper.
If you use this process it's best to lay the transfer tape down onto the scratch off stickers then peel the backing away from the stickers.
Use the backing to protect the other surface while you line up the transfer. Then you can fully commit.
The only downside I see to the scratch off sticker sheets is they smell - and not just a little bit. There's a very strong chemical smell to them as soon as you open the package. Otherwise, I give the Silhouette Scratch off stickers a thumbs up!
If you're interested in making your own chore chart or some variation with the basic design, you can download the Silhouette Studio scratch off sticker cut file below. Please remember, this is for personal use only. If you would like to share it -I'd love that! I just ask that you please share the link back o this tutorial rather than the direct link to the file or the file itself.
Note: This post may contain affiliate links. By clicking on them and purchasing products through my links, I receive a small commission. That's what helps fund Silhouette School so I can keep buying new Silhouette-related products to show you how to get the most out of your machine!
Get Silhouette School lessons delivered to your email inbox! Select Once Daily or Weekly.


.png)


No comments
Thanks for leaving a comment! We get several hundred comments a day. While we appreciate every single one of them it's nearly impossible to respond back to all of them, all the time. So... if you could help me by treating these comments like a forum where readers help readers.
In addition, don't forget to look for specific answers by using the Search Box on the blog. If you're still not having any luck, feel free to email me with your question.