 |
| This is a sponsored post, but all opinions are my own. |
I am using the white gloss printable sticker paper from Online Labels which is my favorite - and why I hate to waste it. Even when moving the registration marks as far out as possible, there's still wasted space. Enter Pixscan! That's right...by using a Silhouette CAMEO size Pixscan mat you can accurately cut printed stickers on sticker paper without registration marks. This is a pretty advanced Silhouette technique that assumes you have a good handle on the basics of Silhouette print and cut, stickers, and Pixscan.
Here's what you're going to do. Set up your stickers in Silhouette Studio. I am working on a set of planner stickers for my 2017 planner. I bring them all into a work area, size them, and line them up.
Set all of the them to "cut edge" just like you normally would.
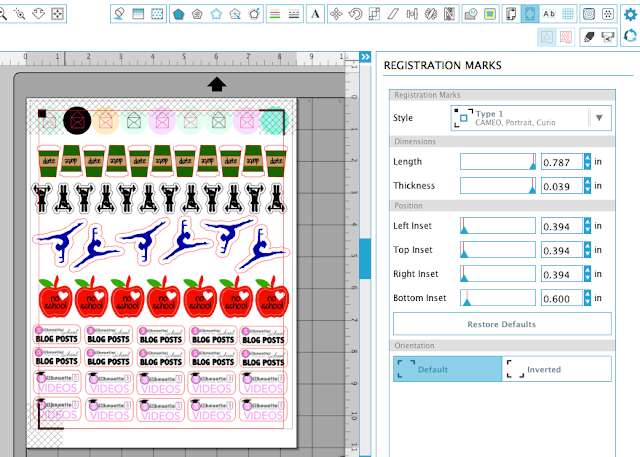
At this point I would normally add registration marks. But you can see if that if I do that, I have a lot stickers that are outside the safe printing and cutting area. So I'm going to skip that step. I want to maximize the number of stickers I can print on my sticker sheet so I'm minimizing waste.
Instead, I'm going to place the Online Labels printer paper into my printer now and click the Printer icon in Silhouette Studio to print out the sheet.
Take the printed sticker sheet and place it on your CAMEO Pixscan mat (a full standard size sheet of printer or sticker paper won't fit on a Portrait size Pixscan mat). Take a picture of your Pixscan mat and email it to yourself.
Then open the image in Silhouette Studio like you normally would with the Pixscan tool. This is when you would normally trace...but I'm going to tell you NOT TO TRACE!
Instead, go back to your original work area and select the sticker designs. Change the fill color to White. With those stickers still selected, copy them to your clipboard using your keyboard shortcut.
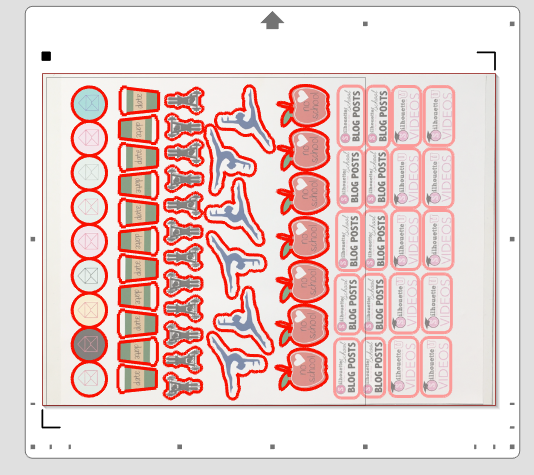
Now go into the second work area with the Pixscan image and paste the cut lines. You're going to have a mess that looks something like this. Don't worry.
Click "Cut Edge."
TIP: I don't know why...but for some reason Cut Edge doesn't always want to work. If it doesn't - weld your designs and then click "Cut Edge."
Rotate the entire set of cut lines using the green circle at the top or using the Rotation tool.
Line up the cut line with the designs on the Pixscan sheet.
Optional Step: You don't have to do this - but if you'd like to see the color set, change the white Color Fill to slightly transparent so you can see through the white layer.
Position the cut lines directly over the Pixscan image so the cut lines match up with the edge of the designs. It's helpful to zoom in closely to line them up as accurately as possible.
At this point, you are ready to send your Pixscan mat with the sticker sheet on it - to cut. Load it into the machine, adjust the Cut Settings to pick the correct material (White Sticker Paper in this case) and adjust the blade.
For this Online Labels printable glossy white sticker paper I found the perfect cut settings to be: Blade: 3, Speed 8, Thickness 14.

Then Send to Cut.
When your stickers are finished cutting, remove the excess sticker paper by 'weeding' to reveal your perfectly cut stickers using the Pixscan mat!
I would say this Silhouette Pixscan method for stickers, while it saves materials, takes more time than a traditional print and cut. One way to save time using this method is to save both the cut lines and the full color sticker design. That way the next time you cut the same sticker set, all you'd have to do is print the sheet and import the Pixscan image. The cut lines would all be taken care of with a simple copy/paste.
Note: This post may contain affiliate links. By clicking on them and purchasing products through my links, I receive a small commission. That's what helps fund Silhouette School so I can keep buying new Silhouette-related products to show you how to get the most out of your machine!
Get Silhouette School lessons delivered to your email inbox! Select Once Daily or Weekly.


.png)


No comments
Thanks for leaving a comment! We get several hundred comments a day. While we appreciate every single one of them it's nearly impossible to respond back to all of them, all the time. So... if you could help me by treating these comments like a forum where readers help readers.
In addition, don't forget to look for specific answers by using the Search Box on the blog. If you're still not having any luck, feel free to email me with your question.