 |
| This is a sponsored post but all opinions are my own. |
For my first project with DecoFoil I decided to create a printable with 3D foiled elements. I created the design in Silhouette Studio. (Does that whale look familiar? I designed it originally for this project....and gave this printable away as a freebie.)
Certain elements of this design I wanted to cover in foil, but I do not have a laser printer which is necessary to pick up most foils, However, the DecoFoil foam adhesive is a great substitute especially since it can be cut with Silhouette.
Supplies Needed:
Deco Foil White Foam Adhesive
DecoFoil Foil Sheets (26 colors available)
Silhouette Deep Cut Blade
Cardstock
The first thing you want to do after you have your design is select the elements that you want foiled. In this case, it's the O and the whale. Use the offset tool to create an internal offset of those elements.
Move the original piece to the side. Don't delete it, you'll need to cut it. The internal offset you've just created is basically going to be your guide for where to place the foil so it's correctly aligned with the rest of your design.
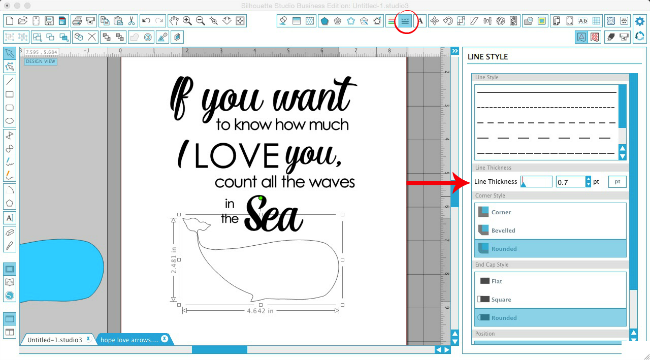
Select the offset, give it a line color and then go into the Line Style tool and give that line a weight of about .3. This will ensure the line prints.

Now print your design on your printer using the Print tool from the top tool bar. I have an HP PhotoSmart 5520 and it never disappoints!
Set your printable aside for right now, as we work on the foil elements.
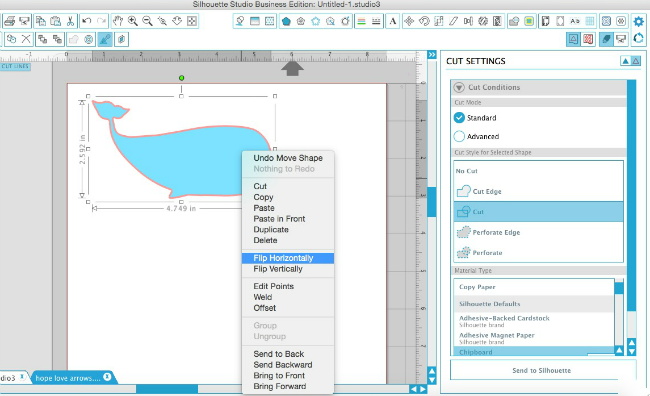
Go back into Silhouette Studio and grab the original design elements to be foiled - again the O and the whale. You don't want the internal offset line, you want the original. Bring them onto a blank work area and mirror them by right clicking > flip horizontally.

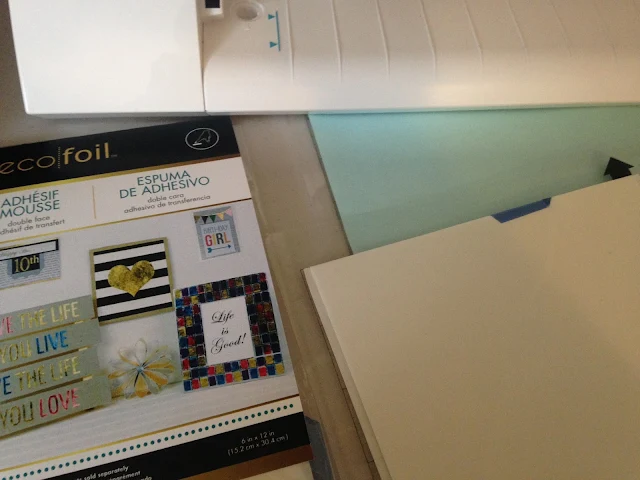
Now grab your Deco Foil Foam Adhesive sheet and place it with the paper liner side onto the mat. The foam is between two sheets, but the liner side is the one that's kind of hanging over the edge a little bit. You may need to tape the foam adhesive onto your mat to keep it secure while you're cutting.
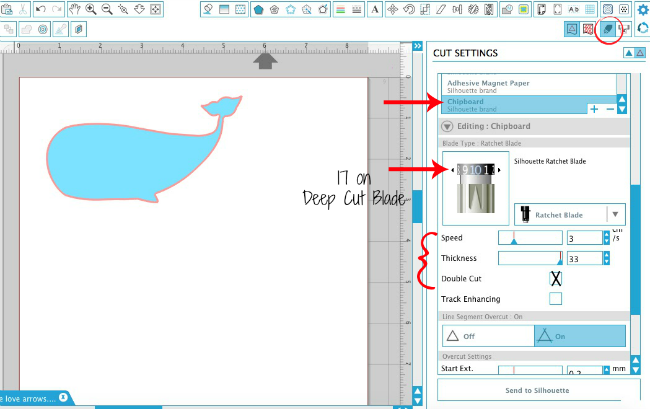
You'll also need a Silhouette Deep Cut blade. Set the blade to 17 and lock it into your Silhouette CAMEO or Portrait. If you're new to the Deep Cut Blade check out this Silhouette beginner tutorial.

In Studio select "chipboard" or another thick material from the material list. Adjust the cut settings so the thickness is 33, speed 3 and check the box to double cut. I would suggest a test cut...when you're ready Send to Cut.
Once the foam adhesive is cut you should be able to peel the design off. If you have a kiss cut that's great, if you cut all the way through, that's fine too. However it cut, just peel the design up and remove the paper backing if it's still on there.
NOTE: Large solid pieces, like the whale, seemed to cut far better than detailed designs and text on the adhesive foam


Flip a DecoFoil foil sheet over so the silver side is facing up. Then flip the foam adhesive design you just cut out onto it. Press down firmly, but gently.
Flip the whole thing over and rub smoothly and gently from the top of the foil.
Peel the foil up off the foam adhesive....which should now be covered with foil.
On the back side of the foam, you can peel the other piece of paper off to remove the second adhesive side.
Place the foiled foam directly onto your printable, using that internal offset line that printed as a guide. We did it as an internal offset, so it would be completely covered by the foiled design.
And there you have it!
I love the dimension the foam adhesive gives the Deco Foil, too!
You can also use this same foil sheets on fabric by cutting the Hot Melt Adhesive instead of the foam adhesive and then applying the foil on top of the hot melt and setting with heat!

And now for what you've all been waiting for....a chance to get a whole prize pack of DecoFoil products in your hot little hands!! I've teamed up with Therm O Web to give one lucky Silhouette School reader a whole pack of DecoFoil goodies including 1 pack of Deco Foil Foam Adhesive, 1 pack of Deco Foil Peel n' Stick Toner Sheets, 1 Deco Foil Adhesive Pen, 2 Deco Foil Designer Stencils (winner can chose) and 5 tubes of Deco Foil Transfer Sheets (winner can chose their colors). I mean....I wish I could enter!!
Note: This post may contain affiliate links. By clicking on them and purchasing products through my links, I receive a small commission. That's what helps fund Silhouette School so I can keep buying new Silhouette-related products to show you how to get the most out of your machine!
Thanks for coming to class today at Silhouette School. If you like what you see, I'd love for you to pin it!

Get Silhouette School lessons delivered to your email inbox! Select Once Daily or Weekly.


.png)


No comments
Thanks for leaving a comment! We get several hundred comments a day. While we appreciate every single one of them it's nearly impossible to respond back to all of them, all the time. So... if you could help me by treating these comments like a forum where readers help readers.
In addition, don't forget to look for specific answers by using the Search Box on the blog. If you're still not having any luck, feel free to email me with your question.