One thing to keep in mind with tracing layered images is you need to combine a lot of Silhouette Studio tools and build on the basics that you know about compound paths, fill colors, grouping and ungroup, edit points and the Modify tools to successfully trace a layered image. For this reason - please know this should be considered an advanced Silhouette tutorial.
Why not just use trace and detach? Trace and Detach is one of my favorite tools - for print and cut. But when you want to layer vinyl or heat transfer vinyl or give paper dimension, as many Silhouette Crafters do, trace and detach literally falls flat.
While this Silhouette tutorial will lead you through tracing a multi-colored layered design, please
know the process will not be exactly the same for every image you try to trace - the techniques, however will be.
Let's walk through this multi-layered tracing tutorial using this cupcake as an example. While you're tracing this image make sure you do not re-size any of the layers or the original at all! If you download the PNG (because you don't have Silhouette Studio Designer Edition and can't use the SVG) you will need to trace to break up the image into parts.
Start by bringing your design into Silhouette Studio and opening up the trace tool. What you are going to do is trace several times. What you are NOT going to do is try to trace this entire thing in one foul swoop. It will never work.
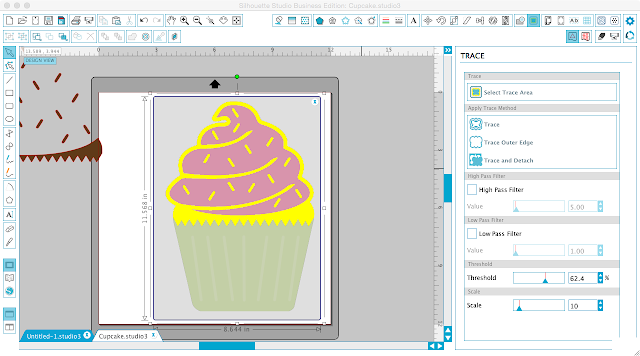
Click "Select Trace Area" and draw a box around the design. Just part of the design gets a yellow line around it right off the bat. In this case it's the brown areas with a little of the green. If I uncheck "High Pass Filter" as I almost always do, now only the brown areas are filled in yellow. This is exactly what we're looking for.
Now click the "Select Trace Area" again and, again, draw a selection box around the design. This time we want to focus on another section: the icing. Again, uncheck High Pass Filter, but this time adjust the Threshold bar a little bit until another section is filled in yellow. Click "Trace" and move the layer away from the original design.

This was actually a two for one...and this is where your knowledge of how other Silhouette Studio tools work will come in handy.
If you right click > release compound path you will gain access to two layers. First, delete the sprinkles - you already have them.

Then separate the two icing layers and fill each with color.
Select only the bottom brown part and the pink icing at the same time. Go to the Modify window and click "Subtract all."
Move the icing layer away and ungroup it. Delete what you can.
Whatever is still attached to the main icing piece can be deleted by deleting individual edit points. Double click the design to access the edit points and then start deleting them. If you're not sure how to delete multiple edit points in out foul swoop, check out this Silhouette Studio shortcut!
Now you should have something that looks like this...
Repeat the tracing process again, this time focusing on the wrapper area. Uncheck high pass filter, and adjust the threshold until you get another good trace! (1)
Click 'Trace' and again, repeat the process as necessary: release compound path (2) > ungroup > separate > modify (3) > delete (4). Remember, you may not need all of these steps depending on the image you're tracing.
And finally, after you've traced all of the sections of your design, you should have something like this...which can be now used to cut on vinyl, paper, heat transfer vinyl or whatever layered design you're going for!
Note: This post may contain affiliate links. By clicking on them and purchasing products through my links, I receive a small commission. That's what helps fund Silhouette School so I can keep buying new Silhouette-related products to show you how to get the most out of your machine!
Thanks for coming to class today at Silhouette School. If you like what you see, I'd love for you to pin it!


.png)


Thanks so much for the instructions and the video! I have struggled with this and spent HOURS doing what you have accomplished in minutes.
ReplyDeleteThank you! This was great!
ReplyDeleteI can't wait to get back to my PC and try this!! Thanks for the step by step instructions. Tracing is one of my weaker skills when using the design software. Thanks so much!!
ReplyDeleteHave been afraid to try this. You make it look so easy that I am gonna try this! Thank you!!
ReplyDeleteI know this probably a dumb question. However, how do you get get it to cut the vinyl in all those colors? Because when I purchase vinyl it is a sheet with one color. I don't follow.
ReplyDeleteMelissa may have another way, but here's what I do. For example, if you lay out all the pieces on one 8 1/2 x 11 page for a small cupcake and have grid marks on, you can see exactly where you want each color. I think it helps to print a copy as well to figure out the positioning. Cut pieces of different colored vinyl a bit larger than what is needed and position them on the cutting mat. You need to leave a bit of space between the design pieces to allow space for the extra vinyl around each piece to be cut. Hope that makes sense.
DeleteI'm a newbie and I just put each piece on separate pages to cut. When I'm done cutting, I put it all back on one page to save it as one doc.
DeleteMove all but one color off of the 'page' where it cuts and over in the margin around the cut area. Cut that one and rearrange so only the next color is inside the cut area.
DeleteTo make sure I don't lose a piece I always keep an 'original' over the left of my cut area. I copy everything over to the right of the cut area and as I move each color on to the mat and cut it then I delete it from the mat and move the next one over. That way you still have all the original design to the left in case you accidentally resize something or delete it before you realize it didn't cut properly, etc.
You lost me a little at "bring the brown layer to the front". I duplicated the brown layer and then lined it up as best I could on the dark pink. Is it hard to deal with such tiny pieces like the sprinkles or did the cupcake just make good tutorial for learning this technique? Also, for the question above about using different colors, there is another tutorial on how you pause the Silhouette to change vinyl colors. Or is it easy enough to stick the different colored vinyl to sections of your mat and cut it all at once?
ReplyDeleteThank you!
ReplyDeleteThis clears up so many of my problems. Thanks so much for the tutorial.
ReplyDeleteWow this was great.I've never understood how to use"subtract all".
ReplyDeleteI learned a lot on this one.Thanks\.
This is a great tutorial. Thank you! I think it's intermediate - not advanced. By touching on so many features it helped me understand how they can be used together. This gave me a big boost to get to advanced level ;-)
ReplyDeleteGreat tutorial! I've been working my brain on this one for a while, and your timing couldn't be better :) (P.S.: No biggie, but the phrase is actually "one fell swoop", from Shakespeare, where "fell" means ruthless)
ReplyDeleteWonderful! I really needed this tutorial : ) Thank you soooo much!!! xoxo
ReplyDeleteIt is hard to read the blog with the pink bar saying "Have a Silhouette based business". How do I move it from the screen?
ReplyDeleteAwesome tutorial! Thank you!
ReplyDeleteI would simplify the layering by making the brown all one big piece and cutting the sprinkle shapes out of the pink frosting. Layer the pink, with holes in it, over the brown for quicker layering!
ReplyDeleteThank you so much! I really needed this lesson. Finally, I was able to trace a design that I have spent hours trying to trace.
ReplyDelete