Start by opening Silhouette Studio and opening up your file. To start, I downloaded the SVG (pick PNG or DXF if you don't have Silhouette Studio Designer Edition) to my computer.
Open up Silhouette Studio and go to File > Open and navigate to the file you just downloaded.
To score and emboss, the design must have two sets of cut line: score lines and emboss lines.
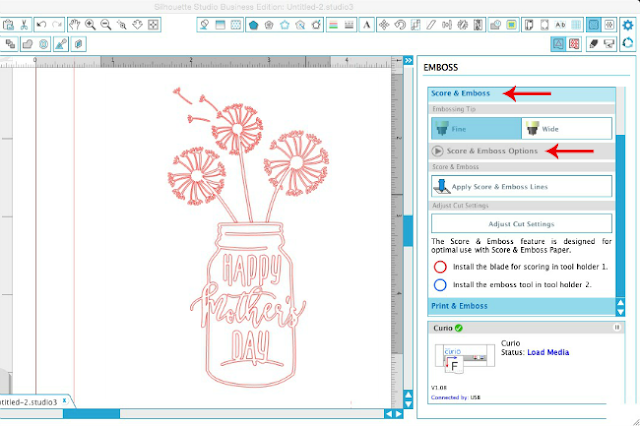
Click
the Emboss tool icon along the top tool bar.
Make sure the USB from the Curio is either plugged into your computer or that the Curio was the last Silhouette machine connected to your computer or the Emboss and Stippling tools will not be accessible.
In
the Embossing window click “Deboss” at the top. Scroll down the window slightly and click the arrow to the left of "Score & Emboss Options" to open up the full panel.
On the Passes bar, up the number to '2' to indicate two passes.
Also select "Fine Tip" for the embossing tip - the fine embossing tip provides a more defined emboss.
Click 'Apply Score and Emboss Lines'.
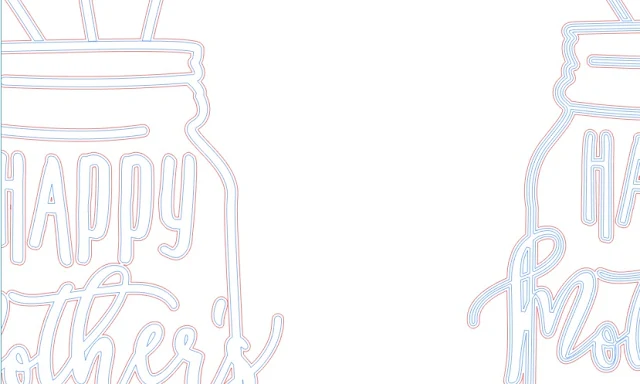
This will put two (blue) embossing lines around the design and one cut/score line (red) around the design.
For this example, I also embossed with just one pass, so you could see the difference in the end result. Here's a close up of how the one pass vs two pass emboss looks in Studio. You can see there are two sets of blue embossing lines in the design on the right which will get two passes.
Once your design has both score and emboss lines, click “Adjust Cut Settings.” Clicking it, will open up the Cut Settings Window.
In
the Cut Settings Window, Tool 1 (red) should automatically select Scoring
and Tool 2 (blue) should be defined as Fine Tip Embossing. Double check
that's the case.
Scroll
down the Cut Settings window to find the recommended platform
height.
Over on your Silhouette Curio, set
the ratchet blade to '0' for embossing using the built in ratchet on
the Curio base.
As
is suggested in the emboss window, place the cutting blade into
the Red housing compartment on the Curio machine and place the fine
embossing tip into the blue housing compartment. Lock both into
place.
Build
the platform and place a piece of card stock onto the embossing mat. Use the plastic tabs to help keep the paper in place on the
embossing mat. Lock down the platforms onto the base using the four
locks
Push
the platform into the Curio until it is sticking out the back side.
Press the load/unload button and the Curio will automatically adjust
the base to the correct starting position.
Click
"Send to Silhouette" in the Cut Settings window. Scoring
and embossing will begin.
The
design will be scored first. It may appear nothing has happened as the paper will not appear cut most likely. Once scoring is complete, the Curio will reset and begin embossing. When it's finished you can remove the platform, and your design, by pressing the Load/Unload button on the side of the Curio.
Here's a side by side of the single pass emboss vs the double pass emboss. (I apologize for the lousy photo, you would not believe how difficult it is to photograph white paper!)
And to show you just how important both the score and the double pass are when embossing with Curio, I've embossed another design three times.
The image on the left is just embossed with the Fine Embossing Tip (no score). The middle is scored once and embossed with a single pass. The third is scored once and given two passes with the embossing tip. You can see it's undeniable the way to get the best emboss with Curio is to score first and make two passes with the fine embossing tip.
So now you know the secret to getting a better emboss with Silhouette Curio is to actually score and emboss and emboss!
Note: This post may contain affiliate links. By clicking on them and purchasing products through my links, I receive a small commission. That's what helps fund Silhouette School so I can keep buying new Silhouette-related products to show you how to get the most out of your machine!
So now you know the secret to getting a better emboss with Silhouette Curio is to actually score and emboss and emboss!
Thanks for coming to class today at Silhouette School. If you like what you see, I'd love for you to pin it!

Get Silhouette School lessons delivered to your email inbox! Select Once Daily or Weekly.


.png)


my life it's indispensable.
ReplyDeletegame of thrones | glory | armor | yepi 2
Amazing lesson. Please check here for Review pack and play or top cheap pack and play for baby
ReplyDeleteAnalysis actually helps to figure out the problem. How to find the problem and their solutions you actually solve all this all hassle. Egyptian Embroidery Design
ReplyDeleteReally an important information. I know custom essay writing service for few years. It is an awesome organization they are helping the people for writing works.
ReplyDeleteOutstanding information it is really. My friend has been seeking for this content.
ReplyDelete