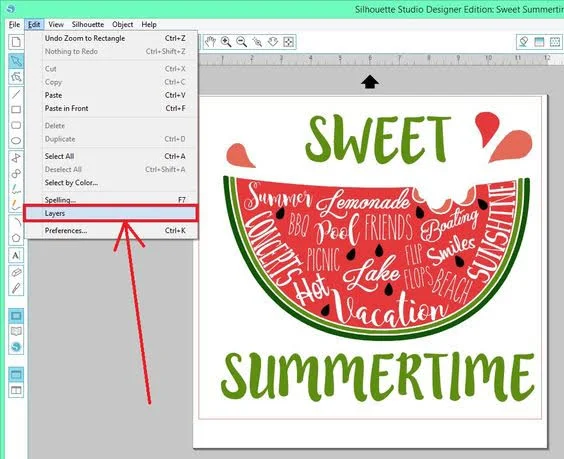
While you can use it for layering vinyl, the Layers function is layering within your design inside the software, before the actual cutting takes place. Utilizing layers is beneficial when you have a multi-layer project that will be cut from different materials or different colors (pretty similar to Cut by Color).
Here's the run-down. To access Layers, go to the EDIT menu and select Layers. There is also a shortcut at the bottom of the software screen. (Or along the top towards the left if you have Business Edition). The icon looks like two diamonds.
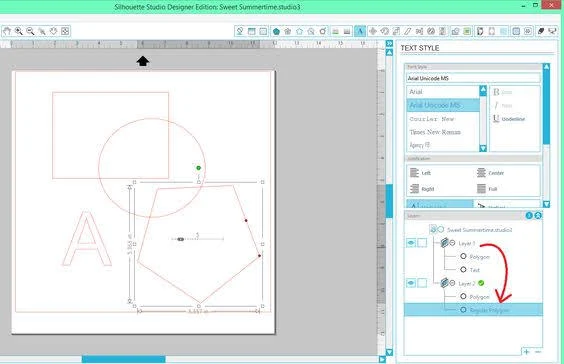
 When you open the Layers tools, the dialog window will actually display at the bottom right of the Silhouette Studio screen.
There are a few options to look for when utilizing layers.
First, find the "lock" and "eye" icons. These represent the ability to lock a layer and the visibility of a layer. These are useful for several reasons.
One: Locking a layer prevents it from being moved, selected, or changed in any way.†You literally cannot click on the objects in that layer at all. So if you are trying to get something lined up, you can lock the other layers to prevent the headache of moving them by mistake.
Two: Depending on the complexity of your design, it could be beneficial to temporarily remove a top or middle layer, without actually moving it. You can turn off the visibility, make changes, then turn it back on when you're ready.
The Layers tool will also allow you to move, add, or remove layers, as you need. You can also see that a description is listed for each shape in your layer.
You can click on these names to rename them more appropriately. This can be useful for identifying which shapes are in which layer.
As you're sorting layers, you can drag and drop shapes where you need them, without actually moving or changing anything in Silhouette Studio.
When it comes to cutting, the Advanced Cut Settings allow you to choose various materials and settings based on layers. As stated before, this is pretty similar to Cut by Color.
The benefit of cutting by layers instead of colors is you don't have to change your design in any way. For example, if I had a design with 10 colors that I wanted cut from two different materials, that could be a headache to change my design colors, then coordinate colors with cut settings 10 different times. With layers, I can choose my settings by layer and incorporate more than one shape or object color.
The benefit of cutting by layers instead of colors is you don't have to change your design in any way. For example, if I had a design with 10 colors that I wanted cut from two different materials, that could be a headache to change my design colors, then coordinate colors with cut settings 10 different times. With layers, I can choose my settings by layer and incorporate more than one shape or object color.
We hope some of that makes practical sense for you. Layers isn't a tool that you will use every day, but it's a nice addition to your Silhouette Studio design arsenal for when you have those complex designs that need a little extra care.
If you're interested in more information about the Advanced Cut Settings, check out How to Cut By Color in Silhouette Studio!
Note: This post may contain affiliate links. By clicking on them and purchasing products through my links, I receive a small commission. That's what helps fund Silhouette School so I can keep buying new Silhouette-related products to show you how to get the most out of your machine!
Thanks for coming to class today at Silhouette School. If you like what you see, I'd love for you to pin it!

Get Silhouette School lessons delivered to your email inbox! Select Once Daily or Weekly.


.png)


Great information!! Thank you!
ReplyDeleteThe tools information http://everydaypowerblog.com/2016/04/02/becoming-superhero-8-steps-personal-strength/ is very interesting to me see, with the information in here could make me greater insight, nice post.
ReplyDeleteStill not clear on how to move an object to a new layer. For example, I would love to move my fold lines to their own layer and lock them down before I alter my main shape.
ReplyDeleteTo move the fold lines you’ll have to open the layers panel, then click the + sign at the bottom right. This will open up a new layer (layer 2) on top of the previous layer. Then select the fold lines you’d like to move (make sure everything is ungrouped first, if necessary) by clicking on them in the drawing area. They’ll be highlighted in the layers pane. In the layers pane, drag those highlighted items down to the new layer you created. You can select items to move by clicking on them directly in the layers pane as well, if it’s easier for you.
DeleteI would really love to see a video tutorial on this where you are using an actual file with layers. I "think" I understand the concept, but when you switched from the summertime file to the polygons it wasn't clear cut. (does that even make sense?)
ReplyDeleteI am unsure what I am missing, but I do not have a layers option under the edit menu. Is there more than one version of Silhouette Design Studio?
ReplyDeleteI don't either... somebody help us!!! LOL
DeleteIt's only on the designer edition so if you just have basic then you won't have that option
DeleteI use the layers almost every time I cut, because I have different cut setting for different layers. What's annoying is that Silhouette won't save those different cut settings. Every time I open up the file, the layers are all set to the same cut settings and I have to go and change the cut settings for each layer again. Is this a problem you have too? Or is it just me? (I have the latest version of the software and firmware).
ReplyDeleteI ENJOY the attitude... we do not home-school (for a variety of reasons), but they have been Living area Leaders for 13 years in Scouts, and have found the same thing. Make it fun, for both you and the kids, and the training comes a lot easier. Thanks for sharing this perspective...
ReplyDelete