Looking through all the Silhouette Tutorials I shared this month on Silhouette School I'm tempted to say it was my favorite month ever on the blog!
So You Can Make Word Art in Silhouette Studio!
Monday, May 30, 2016
Silhouette Studio is a powerful editing and design program - one I'm not afraid to say is pretty much all you need. When it comes to making word art, however, it leaves much to be desired.
For more complex word art I have always suggested using Powerpoint or another similar program and then tracing the design in Silhouette Studio. But recently I discovered you can actually make simple word art designs in Silhouette Studio.
For more complex word art I have always suggested using Powerpoint or another similar program and then tracing the design in Silhouette Studio. But recently I discovered you can actually make simple word art designs in Silhouette Studio.
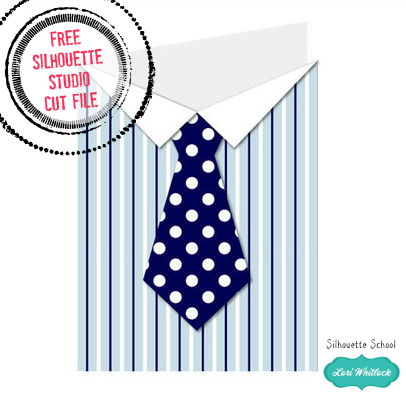
Free Father's Day Tie Card Cut File from Lori Whitlock
Friday, May 27, 2016
With Father's Day around the corner, this week's Freebie Friday is an nod to dear ol' dad!
Just like we do the last Friday of every month, Silhouette School is partnering up with designer Lori Whitlock to give away a free cut file.

Just like we do the last Friday of every month, Silhouette School is partnering up with designer Lori Whitlock to give away a free cut file.

Labels:
Cards,
Father's Day,
free,
Free Studio Files,
Freebie Friday,
Holidays,
How to,
How to...,
Lori Whitlock,
Paper,
Paper Crafts
How to Use the Layers Tool in Silhouette Studio
Thursday, May 26, 2016
One little known tool in Silhouette Studio Designer Edition is the Layers function. Now before you think of layering, such as for vinyl, this is a slightly different concept.
While you can use it for layering vinyl, the Layers function is layering within your design inside the software, before the actual cutting takes place. Utilizing layers is beneficial when you have a multi-layer project that will be cut from different materials or different colors (pretty similar to Cut by Color).
While you can use it for layering vinyl, the Layers function is layering within your design inside the software, before the actual cutting takes place. Utilizing layers is beneficial when you have a multi-layer project that will be cut from different materials or different colors (pretty similar to Cut by Color).
Why Isn't Text Printing from Silhouette Studio? (Troubleshooting Tutorial)
Wednesday, May 25, 2016
It's one of the most common Silhouette Print and Cut problems: text that's in Silhouette Studio but isn't printing. This can happen with any type of unfilled text or design.
Let's take this example using the beautiful Amigirl Scrip and Azzura fonts from The Hungry JPEG's Crafters Font Bundle. As you can see I have the typed out the text in Silhouette Studio....
...but when I go to print it, as is, this happens. A whole lotta nothin'.
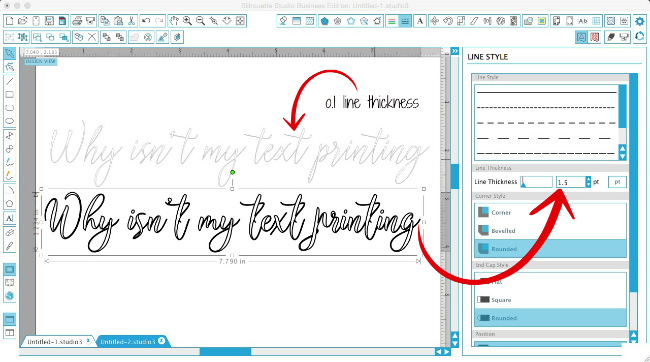
The problem is not the font or your printer, it's actually the weight (or lack thereof) of the line. In Silhouette Studio, the default line thickness is 0.0 because typically you'll be cutting a line with your blade and it will simply splice a line that has no weight.
BUT when you want to print from Silhouette Studio, you need to give those lines a weight if you want them to actually show up on the paper.
To do that click the Line Style window. With the text selected, increase the Line Thickness. Any increase will produce a printed line, but the higher the number, the thicker or bolder the line.
A line thickness of .1 will produce a very faint line when printed, while a line thickness of 1.5 will produce a bold line.
NOTE: Also, if your text or design has line weight but it (or part of it) is not printing, it's because it's outside the print area - as is the case with the missing 'W'. Check the box for Show Print Border in the Design Style window to see the safe printing area.
If your text or design is filled in with a solid fill color it will print the solid color. It will not print the line around the border of each character unless the line has a line weight. This is ONLY important to remember if you want the line color and the fill color to both show and both be different colors.
For example below, the top line of text is red with a barely visible black line (weight 0.0) around it in Silhouette Studio.
The second line of text is filled with red with a black line with a weight of 1.5.
Because the weight of the black line on the top row is 0 it will not be printed at all. The bottom row has a line thickness of 1.5 and therefore you get text that is red with a bold black outline.
The bottom line is - if you don't have a line weight nothing will print on your print and cut designs.
And finally, I couldn't let you go without sharing where I got these two fabulous fonts! They're just two of the eight fonts in the $15 Crafters Font bundle from The Hungry JPEG. What I LOVE LOVE LOVE about this bundle is all eight of the fonts included are specially coded for Silhouette crafters so all the extra characters and glyphs are accessible in Silhouette Studio without the need for any other programs! And of course the commercial licenses are included!
Note: This post may contain affiliate links. By clicking on them and purchasing products through my links, I receive a small commission. That's what helps fund Silhouette School so I can keep buying new Silhouette-related products to show you how to get the most out of your machine!
Thanks for coming to class today at Silhouette School. If you like what you see, I'd love for you to pin it!

Get Silhouette School lessons delivered to your email inbox! Select Once Daily or Weekly.
Replicate Shortcut in Silhouette Studio
Tuesday, May 24, 2016
There are nearly half a dozen ways to replicate a design or text in Silhouette Studio. You can copy/paste, you can right click, you can use the Fill Page function, you can use the functions in the Edit menu, you can use the Replicate tool, you can use the replicate shortcut...but the easiest of them all is a simple click and drag of the mouse.
Silhouette CAMEO vs Cricut: Which Is Best For You?! (Honest Pros and Cons from the Pros!)
Monday, May 23, 2016
I get asked a decent amount about the differences between the Silhouette vs Circut. I'm always kinda like, "I can talk to you all day (every day) about Silhouette, but, um, I hear that the Circut Explore does this but..."
Let's just be real here for a second: I.don't.know.enough. I may know the Silhouette machines like I know my kids' bad habits, but I don't know a darn thing about the Cricut machines other than what people tell me. That's not very useful for someone who's trying to answer the question: "Should I buy a Silhouette or Cricut?"
While I have absolutely no doubt I could give you a 100% honest answer about the pros (powerful software, works offline, cuts up to 10') and cons of Silhouette (lacking customer support, some accessories and supplies are poor-ish quality), that's not what we're talking about here. We're talking about major differences between the Silhouette CAMEO and the Cricut... and who better to ask than those who have both machines?
Silhouette CAMEO 3 with (Optional) Bluetooth and AutoBlade Coming in 2016 (& Full List of New Products)
Saturday, May 21, 2016
Silhouette America announced Friday it will be releasing the Silhouette CAMEO 3 which can be used with a new Silhouette AutoBlade (auto-adjusting cutting blade) later this summer! The CAMEO 3 will also come with optional Bluetooth. Both products are scheduled to be released in August 2016.
The AutoBlade technology, which allows the Silhouette cutting blade to auto adjust its depth depending on the material being cut, can only be used with the new CAMEO 3. The Silhouette AutoBlade is a huge step for Silhouette as it will compete directly with Circut's SmartBlade. A group of bloggers I interviewed recently, who use both the Cricut and the Silhouette, all mentioned the Cricut SmartBlade as one of the biggest (and only) advantages Cricut has over the Silhouette CAMEO.
The Silhouette CAMEO 3 Bluetooth bundle will include the new cutting machine, power adapter, USB cord, cutting mat, AutoBlade, and Bluetooth adapter (for the CAMEO 3 Bluetooth edition).
The CAMEO 3 Bluetooth Bundle will retail for $299. The MSRP on the Silhouette AutoBlade is $12.99.
Silhouette America also announced a long list of new and newly improved products all of which are slated to be released between August and October 2016.
In addition, Silhouette America announced several upgrade and add-ons to the design software including Silhouette Studio 4.0 which will be used with the new CAMEO 3, Silhouette Studio 3D and updates to the Silhouette mobile app.
Note: This post may contain affiliate links. By clicking on them and purchasing products through my links, I receive a small commission. That's what helps fund Silhouette School so I can keep buying new Silhouette-related products to show you how to get the most out of your machine!
Thanks for coming to class today at Silhouette School. If you like what you see, I'd love for you to pin it!

The AutoBlade technology, which allows the Silhouette cutting blade to auto adjust its depth depending on the material being cut, can only be used with the new CAMEO 3. The Silhouette AutoBlade is a huge step for Silhouette as it will compete directly with Circut's SmartBlade. A group of bloggers I interviewed recently, who use both the Cricut and the Silhouette, all mentioned the Cricut SmartBlade as one of the biggest (and only) advantages Cricut has over the Silhouette CAMEO.
The Silhouette CAMEO 3 Bluetooth bundle will include the new cutting machine, power adapter, USB cord, cutting mat, AutoBlade, and Bluetooth adapter (for the CAMEO 3 Bluetooth edition).
The CAMEO 3 Bluetooth Bundle will retail for $299. The MSRP on the Silhouette AutoBlade is $12.99.
Silhouette America also announced a long list of new and newly improved products all of which are slated to be released between August and October 2016.
In addition, Silhouette America announced several upgrade and add-ons to the design software including Silhouette Studio 4.0 which will be used with the new CAMEO 3, Silhouette Studio 3D and updates to the Silhouette mobile app.
Thanks for coming to class today at Silhouette School. If you like what you see, I'd love for you to pin it!

Get Silhouette School lessons delivered to your email inbox! Select Once Daily or Weekly.
New Silhouette Products 2016 (Live Updates)
Friday, May 20, 2016
Silhouette America announced today dozens of new products will be released later this year. I have no other details than what is included here. But, of course, I will share what I know when I know it.
Confirmed:
CAMEO 3- with dual carriage, easy slide rollers, storage for tools, improved touch screen, 2 MM cut depth, blue tooth connectivity
Auto Blade -will adjust to cutting depth based on material selected in Silhouette Studio by user
Paid Upgrade Software: Silhouette 3D ($39.99 for the software upgrade) - Users will be able to create or download designs and can send them to third party 3D printers
Silhouette Studio 4.0 - New design program interface (Scheduled for released this summer at no additional cost)
Silhouette Studio Mobile App 2.0 - All mobile apps will be free
Read more about the Silhouette CAMEO 3 and other new Silhouette products coming out in 2016 here.
Note: This post may contain affiliate links. By clicking on them and purchasing products through my links, I receive a small commission. That's what helps fund Silhouette School so I can keep buying new Silhouette-related products to show you how to get the most out of your machine!
Thanks for coming to class today at Silhouette School. If you like what you see, I'd love for you to pin it!

Confirmed:
CAMEO 3- with dual carriage, easy slide rollers, storage for tools, improved touch screen, 2 MM cut depth, blue tooth connectivity
Auto Blade -will adjust to cutting depth based on material selected in Silhouette Studio by user
Paid Upgrade Software: Silhouette 3D ($39.99 for the software upgrade) - Users will be able to create or download designs and can send them to third party 3D printers
Silhouette Studio 4.0 - New design program interface (Scheduled for released this summer at no additional cost)
- Floating panels will allow for multiple areas to be open at the same time
- Jumping between store and library and studio will be easier
- Will include walk-through tutorials
- Improved tracing tools
Silhouette Studio Mobile App 2.0 - All mobile apps will be free
- Insta-trace via mobile phone
- Pixscan mobile
- Mint Studio mobile
- Sticker Kit
- Chalkboard Starter Kit (includes chalkboard vinyl, chalk pencils and pen holder)
- Jewelry Making Starter Kit
- 4 New Washi Sheets (12" with 4" strips)
- Printable Duct tape sheets (gray and white sheets)
- Wood paper sheets with adhesive backing (light, dark and gray wood options)
- Cork Sheets
- Leatherette Material (black, cream and champagne colors)
- Wash Away Fabric Stabilizer (washes away once the backing is removed)
- Printable Window Cling Material (will work with inkjet printers)
- Printable Vinyl - will work in any inkjet printer
- New Whiteboard Vinyl (not sure, but sounds like dry erase)
- Sketch pens will include double the amount of ink
- Two new color packs of sketch pens - neon and natural
- New foil sticker sheets and scratch off sticker sheets (printable and gold)
- New metallic heat transfer
- New clear transfer tape replacing the old transfer material
- New Light Tote with padding - it will fit the machine, cords and blades
Read more about the Silhouette CAMEO 3 and other new Silhouette products coming out in 2016 here.
Thanks for coming to class today at Silhouette School. If you like what you see, I'd love for you to pin it!

Get Silhouette School lessons delivered to your email inbox! Select Once Daily or Weekly.
Class of 2016 Free Silhouette Studio Cut File
The end of the school year is upon us...so this week I'm sharing a free Silhouette Studio cut file for all those who are in the Class of 2016!
Genius Freezer Paper Hack for HTV Design Placement! (Silhouette Tutorial)
Thursday, May 19, 2016
Basically what you are going to do is cut the design on freezer paper first so you can iron it to your shirt and use it as a template to line up your HTV design accurately! While today's hack has a few extra steps, it can really come in handy if you don't have a natural eye for alignment.
11 Year End Teacher Gifts (You Can Make with Silhouette)
Wednesday, May 18, 2016
It's hard to believe the end of the school year is right around the corner! I've been getting requests nearly every.single.day to share some easy, fast, and Silhouette-friendly teacher gifts for the year end So, I must oblige!
Today
I'm sharing 11 End of School Teacher Gifts - all that you can make a
little extra special, extra personal and extra awesome by using your
Silhouette.
Labels:
Craft Ideas,
DIY,
Gift Ideas,
Gifts,
How to,
How to...,
Kids Stuff,
Paper,
Personalized,
Print and Cut,
Stamps,
Vinyl
How to Add HTV to a Camera Strap (Guest Post by Olivia, 7)
Tuesday, May 17, 2016
For two and a half years my children have watched as my third baby, Silhouette School, has grown into this awesome thing. They reap many of the benefits...including a whole lot of shirts, a craft room they can find pretty much color vinyl in, and in the case of this Instax Mini 8 Camera and Heidi Swapp camera strap, some awesome blog conference swag!
So when my second grade daughter asked if we could add some HTV to the strap, I told her I'd be here to help if she needed me, but she's been around Silhouette stuff long to enough to know how to do it on her own! And then I threw out the idea that she write up a tutorial for the blog...she couldn't resist my offer! So here's Liv...
Hi. I'm Olivia.This is my first blog post so today I'll show you how to make a camera strap with heat transfer vinyl.
Secret to the Best Emboss with Silhouette Curio
Monday, May 16, 2016
Many Silhouette owners
purchase the Curio to use to cut and emboss paper for scrapbooking and card
making. To get the most defined emboss on cardstock, the trick is to
score first, then emboss...twice. The Silhouette Curio's dual carriage make this two-step processes one.
Subscribe to:
Posts (Atom)


.png)


