I've discussed the headache of single line rhinestone text before, but using the sketch fonts essentially eliminates all the work. You can actually design single line rhinestone fonts in just three easy steps!

1) Buy a Thin Font
Obviously if you already have a few thin fonts you can just skip that step and use one you have.
2) Type Out Your Text
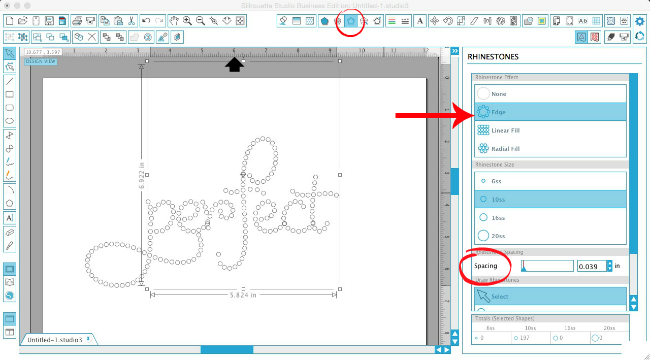
3) Convert to Rhinestone Template
Select the "edge" option and your text lines will turn into circles/rhinestone templates. Pick the size of your rhinestones. Make sure you pick a size you actually have on hand.
Now if any of the circles are overlapping you can do either or both of the following: 1) Adjust the spacing between the rhinestones in the rhinestone window 2) adjust the character spacing in the Text Style window.
And you're all set to cut out your rhinestone text! It's seriously as easy as that.
I've shared many tutorials on how to cut and apply rhinestone designs including this Silhouette Rhinestone 101 tutorial so I won't re-hash it all here but just remember, you need to cut on rhinestone flock, use my secret weapons to spread and flip the rhinestones, use rhinestone transfer material to pick up the rhinestones and then press them onto the shirt!
Note: This post may contain affiliate links. By clicking on them and purchasing products through my links, I receive a small commission. That's what helps fund Silhouette School so I can keep buying new Silhouette-related products to show you how to get the most out of your machine!
Thanks for coming to class today at Silhouette School. If you like what you see, I'd love for you to pin it!

Get Silhouette School lessons delivered to your email inbox! Select Once Daily or Weekly.


.png)


Took your advice and bought this font on sale... Love it!
ReplyDeleteWould this work with the LW Block Sketch Font? Thank you!
ReplyDeleteReally great article, college paper thank you!
ReplyDelete