Silhouette School contributor Becky Dykes is here with the answer to all your torn, ripped, and tattered paper problems!
As a papercrafter, snagged and ripped corners quickly became the bane of my crafting existence. When I first began, I actually avoided sharp corners altogether because my Silhouette just seemed to destroy them, especially when cutting cardstock.
I tried new blades, I tried point editing, I tried offsets... pretty soon I just accepted the fact that I wasn't going to get nice, sharp corners with my (cheap) cardstock. I had heard that the secret was purchasing the more expensive cardstock, but the truth is, this was happening on some of my more intricate vinyl projects, too.
Well, thankfully, Silhouette America heard our pleas and gave us an updated cutting function along the way with Version 3: Line Segment Overcut.
At first glance, it doesn't look that complicated. BUT, see those holes along the top of the notebook paper and the small triangles for the tip of the pencils? I just knew those were going to give me a headache, so I almost avoided the project altogether. But I decided to try using the Line Segment Overcut and it saved my project and sanity!
To put it simply, turning on Line Segment Overcut from the Cut Settings window tells the blade to slightly overcut the corner by picking up the blade, rather than turning (hence dragging the paper). So instead of a 'v', the blade is almost cutting an off-centered 'x'. The blade will cut past the connecting line (such as at a corner) by a very minimal and unnoticeable amount.
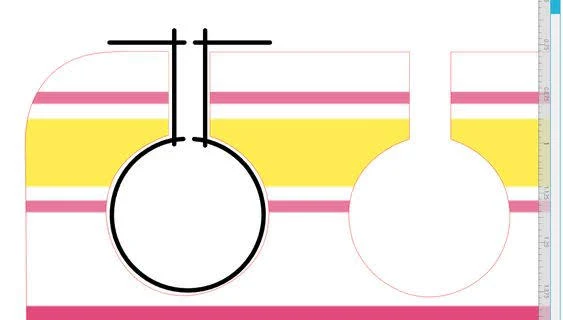
For example, let's look at a closeup of the top of that notebook paper for the front of the card. The black lines represent the cut lines, see how the cut is just past the edge of the corner? Then the Silhouette will pick up the blade, place it back down on the connecting line, and continue cutting. So instead of forcing the blade to cut a corner and by turning, the machine will make a corner by cutting the two intersecting (overlapping) lines while picking up the blade at that corner.
Now that you see the beauty in the Segment Overcut Tool...how do you access it?
To turn on Line Segment Overcut, you first set up your design (of course). When you are ready to cut, go ahead and select the Cut Settings menu and select the Material Type.
Once your Material Type has been selected, scroll down to access the other options, under the blade settings. You want to change Line Segment Overcut from OFF to ON by checking the box.
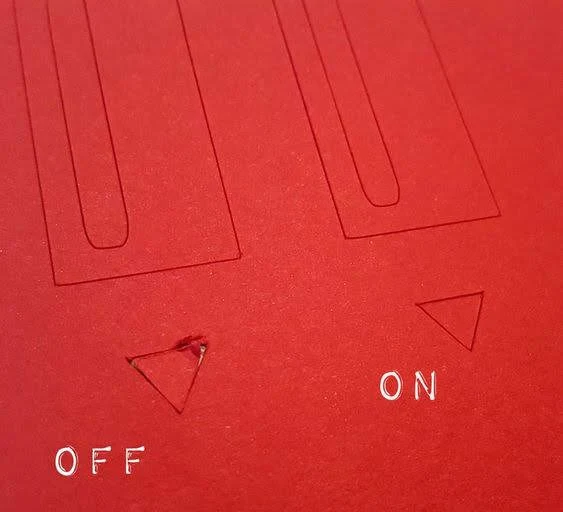
For the next example, I bumped up the Start Ext. and the End Ext. to 0.6, not because I needed it, but to more easily show you what is actually happening when you have Line Segment Overcut turned ON. This is a "real life" example of the diagram I produced earlier, where the lines are cutting slightly past the intersection or corner.
So with my Line Segment Overcut turned on, my card turned our perfectly, with no ripped corners or recuts.
Note: This post may contain affiliate links. By clicking on them and purchasing products through my links, I receive a small commission. That's what helps fund Silhouette School so I can keep buying new Silhouette-related products to show you how to get the most out of your machine!
Thanks for coming to class today at Silhouette School. If you like what you see, I'd love for you to pin it!

Get Silhouette School lessons delivered to your email inbox! Select Once Daily or Weekly.


.png)


Thanks for sharing this. I am sure it will take some of the headaches away from getting frustrated at the machine.
ReplyDeleteThis is fabulous information but how can you avoid the tearing on an inside corner? I get them frequently when I try to cut something like a doily that is very detailed and delicate. I know part of the problem is that some of the image designers make their image for a scrapbook layout and when you scale it down for a card, as I do, that detail gets tighter and tighter making it much more difficult to cut.
ReplyDeleteI was experiencing this problem when cutting "veins" inside leaves. After I set the overcut to 0.1 at the start and end, it cut perfectly. As this detail was inside the cut piece, I expect it would work the same for doilies. I have struggled with some sentiments and will be giving them a try this weekend.
DeleteGOOD LUCK Cec :)
Another reason why your blog is a must read. I have to try this tip out.
ReplyDeleteDid you try it on vinyl?
Another reason why your blog is a must read. I have to try this tip out.
ReplyDeleteDid you try it on vinyl?
Brilliant. Thanks
ReplyDeleteI was wondering if it would work on vinyl as well.
ReplyDeleteWould this help with cutting out script fonts on cardstock?
ReplyDeleteI sure hope so.
Delete... it worked for me when cutting "veins" inside leaves earlier today and I will be trying it with sentiments this weekend.
This is amazing when printing small quantinty. For bulk sizes I recommend to AllStickerPrinting. They are amazing.
ReplyDeleteThank you so much for this information. I had no idea what "line segment over cut" meant, but I did read somewhere on the Internet to just turn it off for a better cut and so I did. I will now be turning it on when I try to cut sharp corners on paper, cardstock, or even vinyl. I love the information you share.
ReplyDeletewhere is the "line segment over cut" option? I cannot find
DeleteTHANK YOU SO MUCH!!!
ReplyDeleteTHIS tutorial has saved the day with a project I've been struggling with all week, I even went out and bought new cardstock from two different stores with the same poor results and had given up by deleting the cut vein detail from inside the leaves and cutting them as solid pieces. As soon as I saw this I set my overcut and ~~~ YAY ~~~ it worked a treat!!!
THANK YOU for ALL you do to help us get better results and USE our Silhouettes!!! ... I have had times when I totally understood how some crafters could pack their units away out of frustration. NOW I know to try to work things out myself and if I can't do it, I come straight here and LEARN exactly what to do :)
Like others, I didn't know what the feature was. I've struggled with corner cuts, too and had (sometimes) resolved the problem by doing a double cut. I will give this a try. I love your tips!
ReplyDeleteAMAZING! I learn so much from your blog. Thank you, thank you, thank you!
ReplyDeleteI'm sooooo glad I found silhouetteschool! When I first bought my Cameo a few months ago I had literally no idea what to do as I had never used a cutter before. For a whole week I looked at it sitting there on the desk, and it looked back at me with a sneer that seemed to say "Go on, you wuss, try me!"
ReplyDeleteI did eventually (after a lot of cussing and wasted vinyl) manage to get it working for my t-shirt business but this blog has made me realise what an absolute gem I've got, and how much more the machine can do. My business is now branching out into personalised cards and ... whatever else I learn.
Thank you, thank you, thank you for giving me the knowledge and confidence to leap forward!
I can't tell you how much I appreciate this post! I'm trying to make over 100 lattice cut wedding invits for my daughter and the corners are driving me nuts!! I'll surely give this a try :)
ReplyDeleteGenius! Thank you for sharing this most useful tip!
ReplyDeleteThank you, thank you, thank you.
Genius! Thank you for sharing this most useful tip!
ReplyDeleteThank you, thank you, thank you.
This comment has been removed by the author.
ReplyDeleteOh I wish I would have known about this years ago!!! Yet another amazing tip - thanks!
ReplyDeleteMerci Mélissa pour cette astuce qui va me sauver plusieurs projets.
ReplyDeleteAmitiés de France
This comment has been removed by the author.
ReplyDeleteMelissa your so very kind to share your tips with us. Thank you!
ReplyDeleteThank you soooooooo much!!!!
ReplyDeleteAwesome! I was wondering what that option was! Thanks so much!
ReplyDeleteMelissa, you're awesome!! Thanks so much!!
ReplyDeleteMelissa! You just saved the life of my Silhouette! Ingenious! I've had this problem a LOT (inexpensive cs, expensive cs, everything in between). I'm going to use this for almost everything! Thank you!
ReplyDeleteTHANK YOU, THANK YOU, THANK YOU for this tutorial. I've regularly had this issue and just couldn't figure out how to fix it. I changed the setting and tried it yesterday and the cuts were PERFECT!(can you tell I'm excited?)
ReplyDeleteWow this has always been one of my biggest problems. Cant wait to try it out in my next project!
ReplyDeleteFabulous information. Thank you!
ReplyDeleteI knew I could find an answer to my problem here. Melissa you are the best!!
ReplyDeleteThis is Great!!! makes such a big difference!! Thank you!! I love clean cuts!!
ReplyDelete