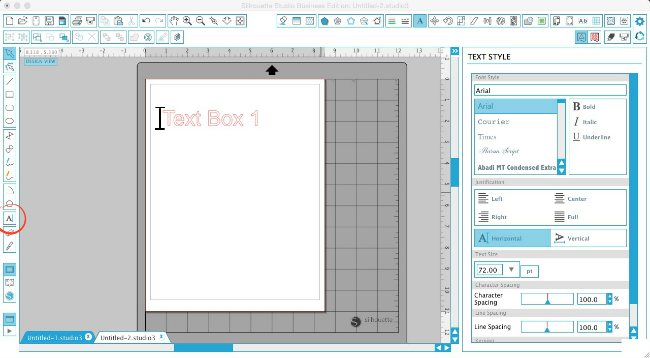
My secret to easily designing subway art in Silhouette Studio is giving each word it’s own text box. When you do so, you give yourself a whole lot more editing and design freedom than if you were to type everything - or even several words - in a single text box.
To get started, open up Silhouette Studio. First decide on the dimensions of your subway art. Let’s say we want to create a design that will print on a standard 8.5 x 11 piece of paper. Go to the Design Page Setting tool. From the drop down menu click “Current Printer.” Further down the window click “Show Print Border.” This will bring up a gray box indicating the safe print area. You don’t want any of your text or designs outside of this area or they will be cut off. Same goes for if you plan to export as a PDF. Only what’s inside that box will print or export.
TIP: If you want to design subway art for a smaller piece, use the Draw a Box tool and draw out a box with the exact dimensions (enter them manually in the Scale tool). Use the box as a guide as you design and then delete it when you're finished or print the design and cut only out the box area.
Now click the Text tool from the left side menu. You will get a cursor. When you click in the work area you will be able to type in the text box. Only type 1 word in the box.

Select the box and duplicate it as many times as necessary. The easiest and quickest way to duplicate the box is to select it > hold down COMMAND + Down Arrow at the same time. Repeat until you have several text boxes. Don't worry about font style, sizing, alignment or color right now.
Go into the second text box and change the wording to the second word or character. Repeat for all of the boxes.
Once you have a general layout, start changing the font styles. I usually pick three or four fonts and use them throughout the entire pieces. You may even opt to stick with one font.
Finally, add the details. This could be anything from a line of polka dots to arrows made up of several basic shapes to a piece of clipart.
If you plan to print the subway art or export it as a PDF make sure all designs are either filled with a solid color or the lines have a "weight". You can gives lines a weight from the Line Style window. Lines without a weight will not print or show up on an exported PDF.
Note: This post may contain affiliate links. By clicking on them and purchasing products through my links, I receive a small commission. That's what helps fund Silhouette School so I can keep buying new Silhouette-related products to show you how to get the most out of your machine!
Thanks for coming to class today at Silhouette School. If you like what you see, I'd love for you to pin it!

Get Silhouette School lessons delivered to your email inbox! Select Once Daily or Weekly.


.png)


Very good post! Now to try it out. (insert mad scientist laughing)
ReplyDeleteWhat would be the next step (other than printing) if I wanted to use the subway art to stencil on a canvas? I assume cut the subway art design on vinyl, weed out the appropriate areas then use the vinyl as a stencil? Any tips for prepping the canvas first?
ReplyDeleteCheck out her article on making stencils with lamination sheets or you can do it with contact paper which would be cheaper than using your good vinyl :).
DeleteI didn't get ANY instructions!! Please repost with instructions!!
ReplyDeleteThanks! Another great lesson!
ReplyDeletethanks for the great lesson and ideas!
ReplyDeletethanks for the great lesson and ideas!
ReplyDeleteI've never created my own subway art - I appreciate these instructions - thanks!
ReplyDeleteHow do you "shear" the rectangles? Still a beginner. Thanks.
ReplyDeleteI've been dying to create subway art, but was dumbfounded by the complexity. Thanks for making it simple!!!
ReplyDeleteWhat kind of enclosure makes an incredible guinea pig environment? What are the must-have includes while selecting a guinea pig confine? Furthermore, generally as essentially, what are the properties of an awful enclosure? Subway scurriers
ReplyDelete