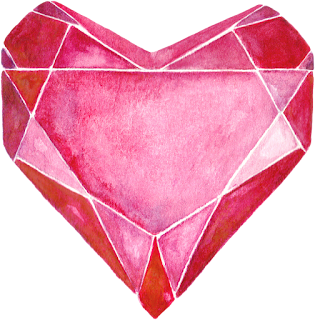
 The first thing you want to do is find your design. This can be a print and cut design from your Silhouette Studio library that already has cut lines around it or it can be a JPEG or PNG graphic that you import into Silhouette Studio. I'm going to use this adorable gem heart design from the February Bundle from The Hungry JPEG.
The first thing you want to do is open or import your design. If you are using a library design, you know the drill. If you're like me, and using this gorgeous heart or some other awesome design from the new Hungry JPEG bundle (and there are a lot to pick from...take note below), save the image to your computer (preferably your desktop).
From the desktop (or wherever you saved your design) drag and drop the design directly into a new Silhouette Studio work area.
Click the Trace tool along the top tool bar. Click "Select the Trace Area" > Draw a box around the design to be traced > Uncheck High Pass Filter > Move Threshold to the right until entire design is yellow > Click Trace and Detach.
Delete the unwanted background.
Select your design by clicking on it. This will be the front of your card...but we also need a back side so click the Replicate tool along the top tool bar and pick "Mirror Above".
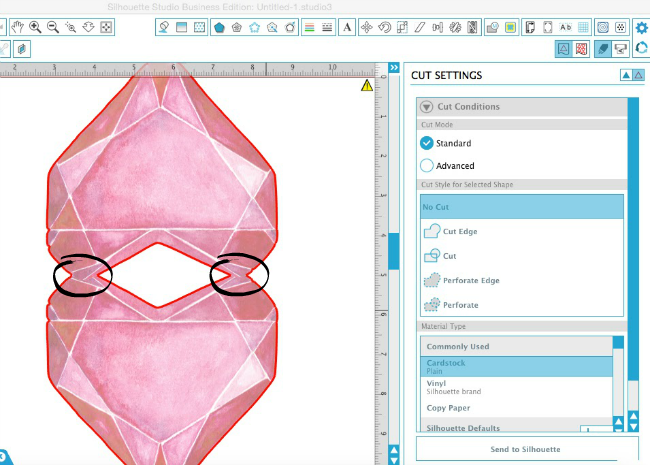
Before you move either of the hearts, click on the Cut Style window. Select both of the hearts and from the Cut Style select "Cut Edge." You see they each maintain their own cut line around the edge. But when we move one of the hearts so they are slightly overlapping the "Cut Edge" line will go around the full design and will be a good indication of when the hearts of touching.
Stay in the Cut Style mode so you can easily see the cut lines and select the top heart. Using the arrow keys on your computer, nudge the top heart down...but only enough that both top sides of the heart overlap to form one cut line.
OPTIONAL: If you don't want the back side of the card to be patterned like the front and would prefer it just be white (or another color), select the top heart > pick the Fill Color tool along the top tool bar > select transparent or white
It will look like the top half of the design disappeared, but it didn't. You can confirm this by clicking the Cut Style window again and you will see the cut line is around the top white heart and the bottom patterned gem heart.
To create a fold line, click on the Draw a Line tool from the left sidebar. Draw a line across where the card will be folded. It will be a solid line to start which would cut the two hearts apart. That's bad news! So with the line still selected, click the Line Style tool along the top tool bar and pick one of the perforated line options. Group the perforated line with the rest of the card.
If you'd like to add any type of sentiment to the front of your card go ahead and do that now too. Just be sure to set the text as "No Cut" for your print and cut card.
And...since I know you'll ask, I used the font "Raffiator" for "you're a real gem" which is also part of the February Bundle from The Hungry JPEG. It has lots of options for extra characters - all accessible in Silhouette Studio using this method for PC and this method for MAC- which I always love!
Now you can move forward with setting up your work area for a print and cut by adding registration marks.
Then simply print on cardstock on your home printer...and then cut your card on your Silhouette!
Remove the excess paper and fold your card to create a perfectly shaped print and cut card.
Don't forget - to grab this month's $29 bundle from The Hungry JPEG. Like all of their awesome bundles, the February bundle includes the commercial licenses for all the fonts and graphics, but hurry because it will only stick around through the end of the month!
Note: This post may contain affiliate links. By clicking on them and purchasing products through my links, I receive a small commission. That's what helps fund Silhouette School so I can keep buying new Silhouette-related products to show you how to get the most out of your machine!
Thanks for coming to class today at Silhouette School. If you like what you see, I'd love for you to pin it!

Get Silhouette School lessons delivered to your email inbox! Select Once Daily or Weekly.


.png)


Thank you Melissa! Always wanted to know how to make my own shaped card. Awesome directions. Again, thanks for sharing.❤️
ReplyDeleteAwesomsauce!!! Love this. Gonna try to find a clover for st pats day and use this method!
ReplyDeleteIs there a way to do this with an svg file? I have a snoopy valentine that I would like the back to match the front shape...even if the front is piecing of cardstock I want to be able to match back please
ReplyDeleteThank you admin for this wonderfull complement through this blog.Thank you very much.
ReplyDeleteholi wishes
Happy Holi songs
Happy Holika Dahan wishes
Happy Holika Dahan Images
Christmas Day 2016 Quotes
Happy New Year 2016 Special
Electrical Engineering Education Hub
Single Phase Stepdown Auto-transformer
Do you have any recommendations on a home printer? I'm in awe of all of the print & cut options but my aging home printer is no good in the color department.
ReplyDelete