I'm sure now that you know you can can do this - you'll find other ways to use this awesome little know trick. For instance, adding an 8x24" size for when you tape two Portrait mats together, or a custom print and cut size mat (more on that in a tutorial tomorrow) or adding the Curio mats (because as you may know you can't access the Curio mats if your CAMEO was the last machine plugged in and vice versa).
Alright so to add custom page sizes in Silhouette Studio, open up the software.
Click on the Design Page settings window along the top tool bar.
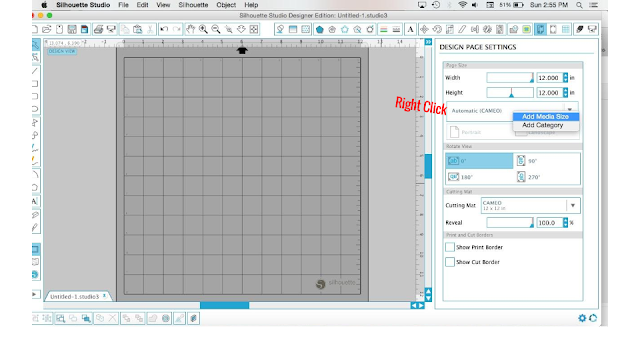
If you click on the drop down menu where it says 'Automatic' (CAMEO) you'll see the list of defaults.
Now if you right click on Page Size you'll get another small menu. Click "Add Media Size".
Now you can create your own name for the custom media/page size. Remember, this is the size of the material you are cutting - not the size of the mat you are cutting on. The mat sizes are in the Cutting Mat window. Where it says Title: Untitled create an obvious name for your new mat size. Then input the correct dimensions for your custom page size.
In this example I wanted to add a custom page size for when I'm cutting a long vinyl design on my Portrait. When I tape two mats together, I can cut a piece of vinyl that's 8x24". But everytime I go to cut this long I have to manually adjust the page size. By creating a custom page size, I can simply click my Portrait 8x24 page size from the drop down menu.
Note the Cutting mat option in the pane below does not change. If you were to use your new Portrait 8x24 option, you would simply pick CAMEO 12x24 as your mat.

Once you've added your custom page size you can find them to by scrolling to the bottom of the drop down menu.
This custom option is very useful for those who are both CAMEO and CURIO owners. Since the software only shows the material size of the most recent machine plugged in, it's difficult to design for the other if you don't know the material size. However, you can add the Curio mat sizes to your custom list so you'll always have access to them no matter what machine you last used.
Tomorrow I'm going to show you how to use this same trick for full page print and cuts. This makes cutting full sheets of designs very fast!
Note: This post may contain affiliate links. By clicking on them and purchasing products through my links, I receive a small commission. That's what helps fund Silhouette School so I can keep buying new Silhouette-related products to show you how to get the most out of your machine!
Thanks for coming to class today at Silhouette School. If you like what you see, I'd love for you to pin it!

Get Silhouette School lessons delivered to your email inbox! Select Once Daily or Weekly.


.png)


This is amazing tutorial. I was searching for it, was unable to find it anywhere else. Thanks again.
ReplyDeleteIs there an update on this Melissa, I only have Media size, I go to Custom and there is nowhere to change the name? OR am I not seeing it?
ReplyDeleteSame! I'm missing this feature! :(
DeleteHey there, unfortunately this isn't available in newer versions of Silhouette Studio.
Delete