I got the idea for this project while in Barcelona this spring, where
the doors and architecture are stunning. You certainly don’t need to go
to a foreign city to do it though. I’m sure you can find some inspiring
scenes in your own hometown. Or find a cute graphic design that has a door and use the same technique as I did here with a little
camper that I turned into a retirement card.
Start by import the photos into Silhouette Studio by dragging and dropping. Then resize and crop the photos in Silhouette Studio as I described in the first part of this tutorial which can be found here.
Alright now this next step is going to vary depending on how large you want your printed photos to be and how many you want on a page. I’m working with an 8x10 shadow box frame so I decide to put 3 rows of 4 photos for a total of 12 doors in design.
Let’s start by drawing out a box using the Draw a Box tool (in blue on the left sidebar). Using the scale tool (or the corner selection boxes to drag in or out) to enter in the exact dimensions of your frame. If it’s matted, take that into account. The box is there is a border and to help us know how large the photos need to be to fit in the frame. You can delete the box eventually if you want to, but for now keep it.
Place the first photo into the box you drew and size it. Repeat with the rest of the photos.
 Use the align tool, if necessary, to make sure your boxes are aligned at the top or bottom left or right. If you want the photos evenly spaced, use the space vertically and/or horizontally to do so. If you need a more details on using the align tool, check out this tutorial.
The final step in positioning the photos is to put them right in the center of the page. Select all of the rows again and group them all together (select photos > right click > group).
Use the align tool one more time (this is a powerful tool, I tell ya!) and with large group selected AND the box you drew selected click “align > center”. This puts the group right in the middle of the box (which is imitating your frame).
At this point, it’s time to do the 3D effect where we make the doors open. You are going to be adding all these cut lines so that after you print and cut you can “open” the doors giving the image a 3D effect with open doors.
You may need to zoom in a bit on each door to see precisely what you are doing. Click the zoom in tool until you can clearly see the outline of the first door.
There are a few different technique you'll need to use for this depending on the shape of the door. I'll go through each of them separately and you can apply the best method depending on the door. I used all of the techniques when adding the door cut lines to my design.
Rectangle Door:
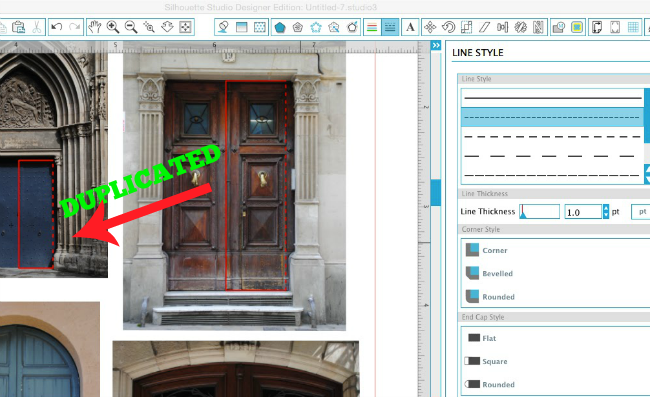
- Use the Draw a Box tool to draw a box around the door. If there are double doors, just draw a box around one of the doors. I thickened the line so you could more easily see it here.
2. Select the box > open Edit Points tool *
3. Click small gray square at the top of line that is on the hinge side of the door > click "break path" (The gray square will turn into a red dot.)
6. Select ONLY the line on the hinge side of the door.
7. Go to the Line Style tool (in blue below along top tool bar) > change line to perforated line (this will be the side where the door will fold out)
8. Group the door cut lines and the door together so they stay perfectly in place
TIP: If you have other rectangle doors you can use that same hinged rectangle you just created and copy and paste it over other doors. Simply stretch it one way or the other to fix exactly!
Curved or Odd Shaped Door:
Option 1:
- Use the trace tool to trace the area of the door to create an initial cut lines around the border of the door.
- Follow steps 2-8 from the Rectangle Door instructions *
- Click the Draw a Curve Shape tool. The tool allows you to drop edit points wherever you want.
- Start dropping points, by clicking, along the door frame.
- Add more points as you work your way all the way around. I have circled some of the points I dropped.
- The edit points don't need to be evenly spaced. They may be closer together on a curve and further apart across the bottom of the door or another straight line.
5. Once you have gone all the way around the photo dropping edit points, connect the first and last edit points to create a closed design. At this point the outline will turn red.
6. Zoom in really close...
7. Click on the 'Edit Points' tool this time and slightly move any of the points that need to be adjusted in or out by fractions of an inch.
8. Follow steps 2-8 from the Rectangle Door instructions breaking the path on the hinge side*
Repeat the cut line process for all of the doors using one of the above methods until you have something that looks like this...
At this point you want to double check where your cut lines are. You ONLY want cut lines around the doors...not the full images. So if you have cut lines around the outside of each image, you want to turn them off by going to Cut Settings > No Cut.
Once you've gotten to this point, it’s time to add registration marks. To save room on your page and fit more doors - or make them larger - use the sliders to move the registration marks as close to the edges of the page as possible. Check out this tutorial for more details on how to enlarge the print area in Silhouette Studio.
If you want to delete that box you drew initially drew do so now. I kept the the frame box because I needed my design to fit into a frame that's smaller than the full size of the cardstock I print and cut on.
Now you’re ready to print so go ahead and send the design to the printer.
After you’ve printed, place the printed paper onto your Silhouette cutting mat (you don’t want to use a mat that’s overly sticky or it will curl or worse the paper when you try to remove it from the mat after cutting). Adjust your Studio settings to the recommended settings for card stock. Load the mat with the paper on it into the machine and send to cut. HOLD YOUR BREATH!
CAREFULLY remove the paper from the cutting mat.
Fold out the doors along the perforated hinge lines...
Glue the edges of the paper onto another piece of paper as a backing or directly into the shadow box.
And here's a view from the top so you can see the 3D doors.
Note: This post may contain affiliate links. By clicking on them and purchasing products through my links, I receive a small commission. That's what helps fund Silhouette School so I can keep buying new Silhouette-related products to show you how to get the most out of your machine!
Thanks for coming to class today at Silhouette School. If you like what you see, I'd love for you to pin it!

Get Silhouette School lessons delivered to your email inbox! Select Once Daily or Weekly.


.png)


Great tutorial! I do have a collection of doors photos from Europe so I could do this! I learned several useful techniques along the way. Thanks
ReplyDeleteWould be cute to add little wreaths and make an Advent calendar
ReplyDeleteA link is missing. See this sentence... Then resize and crop the photos in Silhouette Studio as I described in the first part of this tutorial which can be found here.
ReplyDeleteGreat idea! I think I can put some photos behind open doors)
ReplyDeleteMake a great advent calendar! Thanks for the tutorial.
ReplyDeleteI am so excited to try this! We had the opportunity to visit Germany in 2012 and they had the most beautiful doors. I am so happy that I took pictures of those doors so I can do this project! :)
ReplyDeleteGreat tutorial! Thank you so much!!! I've learned a lot :)
ReplyDelete