We all know that crafting supplies aren't exactly budget-friendly, especially those wear-and-tear items like cutting mats and blades. Today we bring you a super easy tip to converting Cricut Cutting Mats (or other brands for that matter) to meet Silhouette parameters.
The question you may be asking is: Why would you want or need to use a Cricut or other brand cutting mat? First, they are cheaper than Silhouette mats by about 50% on Amazon (don't forget your free Prime shipping!). Second, Cricut products can typically be found at local craft stores to use in a pinch. And third, the thicker Cricut mats hold up better to abuse than thinner Silhouette mats.
You may also be thinking that a cutting mat is a cutting mat, they're all the same. And typically, yes, they are interchangeable. However, the mats are slightly different, which is especially tricky during precision cuts (like with vinyl scraps) and with print and cuts where the Silhouette needs to read the registration marks. But to use Cricut mats with Silhouette you'll need to do make some slight modifications.
Start by gathering your supplies. You'll need: 1 of each cutting mat (Cricut and Silhouette), painters or masking tape, a razor knife, a straight edge ruler (metal is better), a sharpie marker.
When you examine your mats, you know that they come with a clear protective layer. Luckily, I had a spare sheet from a prior Cricut mat. It's important to note that you need a clear sheet that cooresponds to the mat you are converting. If you are converting a Cricut mat, you need that clear sheet. Trust me, this makes it much easier.
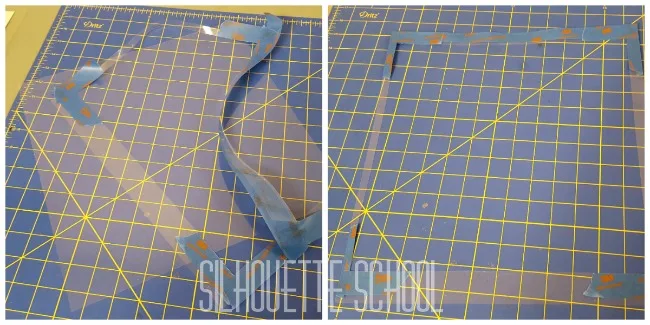
Now lay your Silhouette mat (with the blue cover sheet on it) on a safe cutting surface (I have a self-healing Dritz Cutting Mat to protect my work table). Lay your clear Cricut sheet on top of the Silhouette mat and line up the corners. You can see in the image below that the right side doesn't match exactly, but this doesn't matter as long as the left side and top are lined up. Tape both to your cutting surface using the painters or masking tape.
Once secured in place, use smaller strips of painters or masking tape to mark the OUTSIDE of the Silhouette cutting area (as denoted by the light blue protective sheet). The strips of painters tape will act as your boundaries.
Once all the corner boundaries are marked, REMOVE YOUR SILHOUETTE CUTTING MAT.
You should have excess painters tape on the edges of the clear protective sheet. Use this tape to secure the sheet to your cutting surface. The purpose of the next few steps is to cut out the MIDDLE ONLY of the clear Cricut sheet.
Align your straight edge ruler with the corners. Using the razor knife, cut along the ruler from corner to corner. DO NOT CUT INTO THE SIDES OF THE MAT.
Once the center is removed, you can trim the excess painters tape or remove it altogether. I left mine on because the clear plastic is a little flimsy. You now have a template for the Silhouette cutting mats.
Now grab your Cricut mat and align the clear plastic sheet. You can secure the corners of the template, if necessary, with painters tape. Once secured, feel free to grab your sharpie marker and mark your lines. I only mark the corners since those are the most vital, but you can technically draw the entire border. Save the template to use again and again!
And that's all there is to using a Cricut mat with Silhouette.
NOTE: Use Circut mats in your Silhouette CAMEO at your own risk. Silhouette School and our contributors take no responsibility for misuse or voiding the warranty.
Note: This post may contain affiliate links. By clicking on them and purchasing products through my links, I receive a small commission. That's what helps fund Silhouette School so I can keep buying new Silhouette-related products to show you how to get the most out of your machine!
Thanks for coming to class today at Silhouette School. If you like what you see, I'd love for you to pin it!

Get Silhouette School lessons delivered to your email inbox! Select Once Daily or Weekly.


.png)


Hi
ReplyDeleteCan i use a pen to mark the edges of the mat as see in the software on to a Cricut mat? or it won't work the same?
i mean drawing a square the size of the whole mat and drawing it with silhouette pen on the Cricut mat.
i hope i was clear.
:)
Hi there! You should be able to use any type of pen or marker to mark the Silhouette template onto the Cricut mat. I used a sharpie because it was handy and it worked well. You may want to test how well a pen writes (on a small area of the surface) before you start the process, just to make sure.
DeleteI put a sharpie in my pen holder and had the Silhouette draw a 12x12" square that was centered to the page onto my Cricut mats. Been using it that way for years now and I usually am able to forego the registration marks (which usually do not work properly for me) by just lining my paper up to the drawn lines.
ReplyDeleteBTW.. love this site and by no means am I 'poo pooing' Melissa tutorial ... just sharing what I did that works for me. :)
DeleteThanks! That sounds like something that would work for me. I just don't have the extra space to measure out the mat etc ATM and could see that being frustrating. Now to get a pen holder!
DeleteI just cut the Cricut mat with my rotary cutter. Lined up the sticky areas and cut the top and left side. Now they are a perfect fit. Though the Silhouette makes more noise with the cricut mats.
ReplyDeleteUne radiographie fait aussi bien l'affaire et est gratuite
ReplyDeleteGreat information, thank you for all your helps and hints. Why not tape the clear Cricut sheet to the Silhouette mat, mark your cutting area with a cutting line and let the machine do your cutting. The sheet can then be placed on the Cricut mat and mark the lines as you suggested.
ReplyDeleteThis is a great hint, Melissa. Thanks!
ReplyDeleteKris
Im using the Eclips mat, it doesn't need any adjusting.. its practical the same as a silhouette mat:)
ReplyDeleteWhat I do is simply line up the silhouette grid to correspond with the grid on the cricut mat, use a sharpie to draw all the way around the cricut mat, cut the circuit mat where I drew the lines. You end up with the cricut mat being the exact same size as the silhouette mat with the grid placed in the exact same place. This has worked every time and takes less than a minute. Ohh, I have done the same thing with YUDU mats when I found them on close out for $1.99 each.
ReplyDeleteBTW, not trying to say Melissa is wrong, just sharing another way that I have found successful.
ReplyDeleteOnce we have done this what setting should we use for vinyl since the Cricut mat is much thicker.
ReplyDeleteYour settings shouldn't really change as you are cutting through the vinyl not the mat.
DeleteI agree....I really prefer the Cricut mats too! I just stick my cutting edge directly to the mat, arm myself with my self-healing Dritz mat and exacto knife, and cut 1/4 inch off the top. I used to cut 1/8" off the left side, but later drew a guideline on my machine 1/8" to the left of the arrow guide for my Cricut mats. Works like a charm =)
ReplyDeleteWOW, why am I not getting this?
ReplyDeleteI did this and loved using it, but now my silhouette wont feed vinyl without slipping. I think the thicker mat spread my rollers and now they don't grip as tight. Proceed with caution!
ReplyDelete