I love Silhouette Studio’s Print and Cut feature, but my one gripe is
that the registration marks and the safe zone associated with them take
up much needed space on the printed page.
Did you know, however, that you can actually move the registration marks to custom positions which can give you as much as an inch more space on each side and the top and bottom the page? True story!
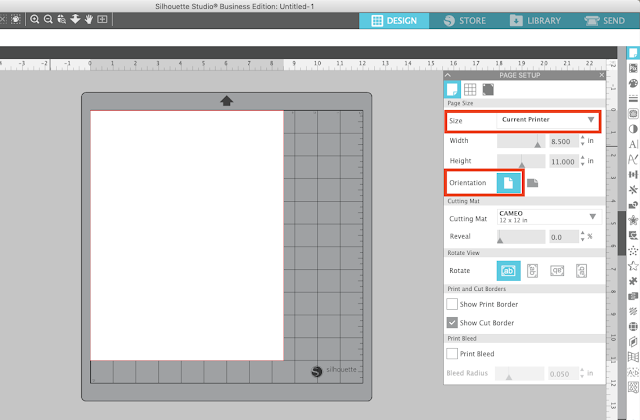
It’s best to start with a work area that’s actually the same size as you printable area so you know your printer can handle the design you want to print.Open the Page SetUp Panel and then from the drop down menu under Height/Weight click “Current printer.” If you have a standard size printer, this will make your work area the same size - most likely an 8.5” x 11. If you have a 12x12 printer - I’m jealous :) Also check the box to show the print border. You can't print all the way to the edge.
Now watch this - go to the Registration Marks tab and select Type 1 from the Style drop down menu. By default they’re placed .625" in from each side and up/down from the top/bottom. Plus, that area between them is grayed out because it’s an area that won’t be cut during a print and cut.
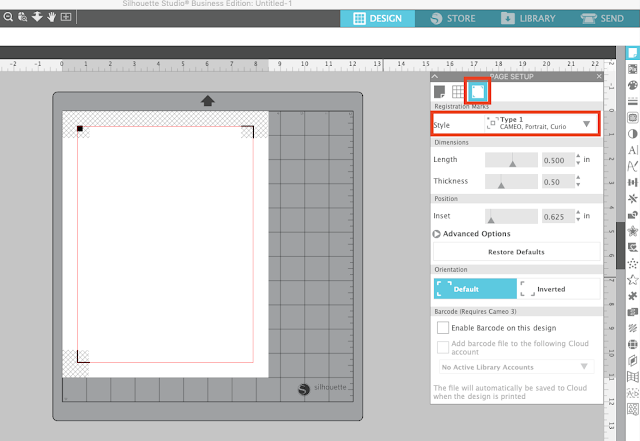
In this position, the largest work space I can print and cut on is 9.2” x 6.73” as indicated by the red box. That’s a lot smaller than the 8.5” x 11” page I’m going to print on.
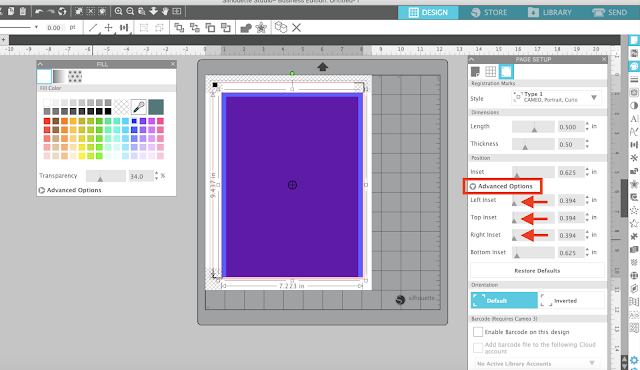
Open the Advanced Settings.
Start sliding the Left, Top, and Right to the left as far as you can and you’ll see the registration marks moving closer to the edge of the work space. Do NOT move the Bottom Inset or it will only partially print the bottom registration mark causing an error.
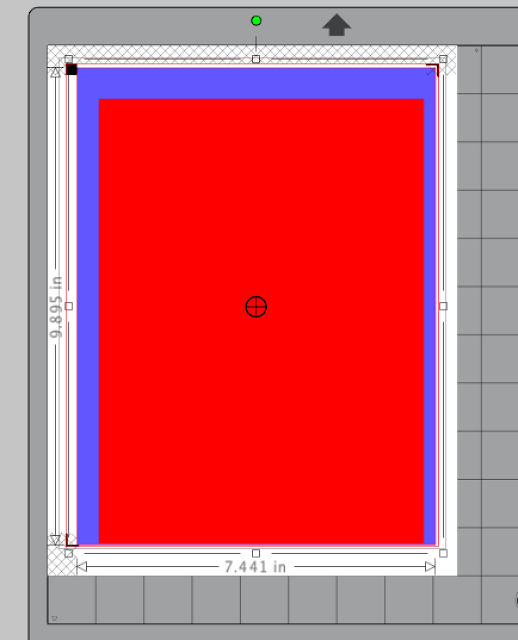
The blue box is now the size of the print area. You can see it's slightly larger than the original printable area.
By making the actual registration marks themselves smaller, as well, you can give yourself even more work space. In the same tab pane, move the Length slider bar to the left. That will allow you to make the actual registration marks smaller to give you a little bit larger of a work area.
The blue box - or printable area - is now even larger.
Note: This post may contain affiliate links. By clicking on them and purchasing products through my links, I receive a small commission. That's what helps fund Silhouette School so I can keep buying new Silhouette-related products to show you how to get the most out of your machine!
Thanks for coming to class today at Silhouette School. If you like what you see, I'd love for you to pin it!






.png)


Thanks -- but you're three days too late... ;)
ReplyDeleteNext project will most def benefit from your info. I appreciate it!
It drives me nuts that the default margins of print and cut are set so wide. I always adjust them to maximize print space. Is there a way to reset the default setting? Thank you for all you do! -Jamie
ReplyDeleteI've known this since the second or third time I made a print-and-cut, but it was a helpful article anyway. Now if someone could only figure out why Silhouette Studio crashes every single time I close the program. No one in tech support can seem to help me with a viable solution.
ReplyDeleteThis information is so helpful!! I had no idea. I do print and cuts all the time and lose so much space. Thank you!!!!!
ReplyDeleteWhen I adjust my registration marks to the settings shown in your tutorial, my Cameo won't read the marks because they're so close to the edge of the paper. I've tried loading my cutting mat as media as well, but that didn't work either. How do you get your Cameo to read the marks? Thanks!!!
ReplyDeleteI'm having this same problem. My machine couldn't read the marks either! Looks like I'm going to have to waste the extra space since I'm now wasting a whole sheet of paper that my machine won't even cut!
DeleteThis comment has been removed by the author.
DeleteI'm having the same issue! I've moved the registrations marks to the side so I can print and cut invitations on card. but the cameo won't read the registration marks now and fails to cut :( any ideas why? Also, I don't have that red line anymore showing the border. I don't know what happened to it!
DeleteSame here =( No matter what I do it won't read if it's set anywhere outside of the default. Any solution for this? I can't figure out the manual reg either =(
DeleteSame here. And the manual registration doesn't help either. Nor does shining a flashlight on it, or any of the other tips provided in helping to read the registration marks. Once you move outside the default, the cameo won't read it. I don't know if this is an issue with the latest version, because I know it has worked in previous versions. But with 3.6.57 de it won't work :-( and I have wasted more paper than I care to count trying to make it work. Such a same this feature of the software doesn't work anymore.
DeleteHave you tried cutting in those shaded areas? I think we are just assuming we can't. I've cut in them many times when I needed extra space. The first time the art had straight sides and I thought I would just make that cut by hand but to my surprise it cut! Just make sure you stay inside the lined rectangle.
ReplyDeleteYes, it will cut, but DON'T print in that area! Anything that's just a cut shape will cut, but printing there will prevent the cameo from reading the registration marks.
DeleteThank YOu , this enabled me to learn something I did not know. THANK YOU!
ReplyDeleteHappy Dussehra
ReplyDeleteHappy Navratri
Happy Dasara
Happy Navratri colours 2015
I can't make my Bottom Inset slide over at all. It's at 1.024 inches while the top goes to .625. So it's wasting part of my paper. Any suggestions?
ReplyDeleteIm having the same exact problem. Did you ever figure it out??
DeleteDoing the happy dance. I've been hating this limitation. So glad I can expand my print area. Yippee.. Thank you!!!!
ReplyDeleteThank you!! I just switched to a Mac and all of my settings are thrown off. Your post saved me from hating my new computer. You are wonderful!
ReplyDeleteTHANK YOU!! This just saved me from wasting sooo much paper for invitations. I can now fit two invites on one page instead of just one! YAY!
ReplyDeleteGreat article! When I place my insets at 0.394, my printer's natural border at the bottom is too big so the bottom registration marks won't print. If I try to print borderless from the silhouette, it stretches my image and the registration marks fall off the print area. Is there a solution? Or is there a feature if the designer edition that can help with this? Thank you!
ReplyDeleteJust starting to work with print and cut - this is very helpful info. I hate wasting materials.
ReplyDeleteIf most vinyl comes in sheets of 12 x 12, why can i not print to take up my entire sheet?
ReplyDeleteThe registration marks - and therefore smaller work area - does not apply to vinyl since you do not need print and cut registration marks for vinyl. You can cut the full sheet of vinyl.
DeleteIt doesn't matter how I set the printer margins in Silhouette software it stays at 8 by 10.4. It is the most FRUSTRATING thing I have seen. I want to print in a 8.5x14 paper, my printer can do it but silhouette cuts it off.
ReplyDeleteHi there! Is it cut off in the print preview? You could "print" to PDF and then print the PDF from your computer so that you're not directly printing from Silhouette Studio.
Delete