Making and releasing compound paths, however, are totally different than both grouping and welding - and equally (if not more) important when designing in Silhouette Studio.
There are a few BIG reasons it's important to understand how compound paths work in Silhouette Studio.
- Compound paths influence how a design is filled with color, therefore are important for print and cut designs
- Compound paths limit the designer's access to sections or pieces of a design so releasing compound paths becomes important when manipulating shapes.
- Compound paths make it possible to weld into a frame
When you think of compound path just remember it means the lines or pieces of a design are "compounded" into a single layer. For example, let's look at the letter P.
But if you release the compound path, as shown in the P on the right, the single layer letter will become two separated layers: 1) the main part of the P and 2) the counter. In some cases, after you release the compound path you will still need to ungroup (right click ungroup) to be able to separate the paths.
Why are Compound Paths Important for Print and Cut?
Let's say you have a tie design that you want to print and cut. If it's a solid tie you can simply fill it with color and the entire thing will print this way in the single color.
But if you want your tie to be on a white shirt and have white polka dots you want to make the tie and the dots a compound path. That will 'hollow out' those polka dots and essentially you'll be be able to see right through the dot so you'll be seeing white of the shirt through the tie.
Even if I do nothing but change the color of the shirt, the dot color would change as well. Again, because you're seeing through the dots. They are punched out.
But what if you want the polka dots on the tie to be a different color than the tie and a different color than the shirt? Well then you need to release the compound path (select > right click > release compound path) between the tie and the dots. This is what you'll get...
THEN select ONLY the dots and fill them with a new color.
At this point, you may want to group everything together so it stays together. If you attempt to make it a compound path again you'll lose the different colors because the paths will be 'hollowed out.'
Compound Paths and Manipulating Shapes
Since this tie is a compound path if I right click on it I am not even given the 'ungroup' option. That's because it's not a group it's a compound path.
If I release the compound path, however, the 'hollowed out' areas of the dots disappear and the dots take on their own layer to the design which allows me to move them away from the tie shape and/or manipulate them to my liking.
Compound Paths and Welding into a Frame
When you make a compound path you are essentially creating a frame. Just as a picture frame is hollowed out in the middle, so is a compound path. In order to weld into a frame you must make it a compound path first.
Let's use these two rectangles as an example. Right now it looks like you have a black frame around a red rectangle.
However, if the two boxes are not a compound path, the below image is what you actually have...just two boxes layered on top of each other. This is best demonstrated by slightly moving the top box so you can see the boxes are not 'hollowed out' into a frame.
If you make them a compound path, by putting them on top of each other > selecting both designs > right click > make compound path. You'll get this...which is a frame! (The white is not a white box but a 'window' that you can see through.
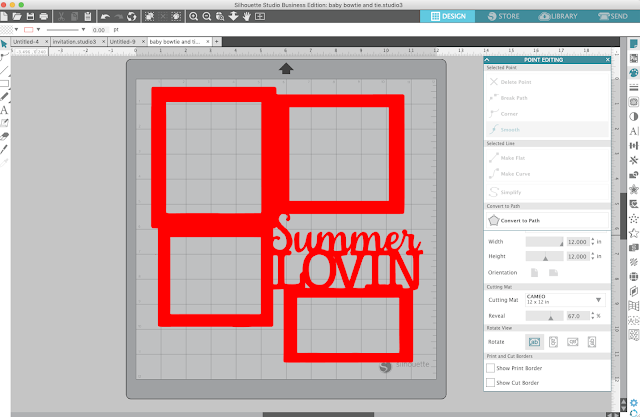
It's now able to be welded to....you can weld more boxes to it or even text.
If the frames were not made into a compound path, the end result would be this...which is essentially the top boxes welding into the bottom layer of boxes (and disappearing because they're smaller) and the text welding into the bottom layer of boxes as well.
Note: This post may contain affiliate links. By clicking on them and purchasing products through my links, I receive a small commission. That's what helps fund Silhouette School so I can keep buying new Silhouette-related products to show you how to get the most out of your machine!
Get Silhouette School lessons delivered to your email inbox! Select Once Daily or Weekly.


.png)


Thank you, very clear and concise instructions. I may ave to read it again for it to "sink in" but have a much better understanding now. Thank you
ReplyDeleteFinally an explanation of compound paths that you can understand! Thank you!!
ReplyDeleteFinally they are explained and I understand and will be able to do some of the projects I have in my head. Did not know how to do them before. A BIG thank you 😀
ReplyDeleteThankyou. Wonderful information in an easy to understand format.
ReplyDeletethis now makes sense. I think it has finally clicked for me. thank you for making it clear.
ReplyDeleteever consider doing this explanation in video form? I have learned a ton from watching AND listening to your videos (plus love to hear your voice!). Somehow that just helps me make sense of and understand my machine better than reading about it alone. Case in point: I've read through this once and still haven't "gotten it". So, I'll try again! thanks for your continued support and teaching to us!
ReplyDeleteok, reading through the additional time did the trick! thanks so much :-)
DeleteThat's an amazing explanation. I've been using compound paths quite extensively, but never knew how to explain it to fellow silhouette users. I've even read graphic design explanations that didn't do it as clearly and concisely as you have here. Thanks
ReplyDeleteI have to admit -- this is the most complicated aspect of Silhouette design for me to wrap my brain around. I am not there yet, but like others in previous comments, another run-through (hopefully not more) will help to cement it all. This is one of the best explanations I've read. Thank you.
ReplyDeleteWhat might life be similar to, if all of a sudden you understood that you've been strolling through life wearing blinders? All the more essentially, imagine a scenario where somebody then demonstrated to you generally accepted methods to take them off. Do you think you could see more open doors around you? http://www.mordocrosswords.com/2016/03/letter-shaped-shelf-support.html
ReplyDeleteThank you - love simple explanations with pictures. Great job.
ReplyDeleteVery good explanation Melissa. It took me a long time to understand compound paths. It just takes patience and practice, but once you get it it's really quite simple.
ReplyDeleteI am trying to separate components of an image and both Ungroup and Release Compound Path are grayed out. The file is an .svg file. What am I doing wrong?
ReplyDeleteThank you for your help!