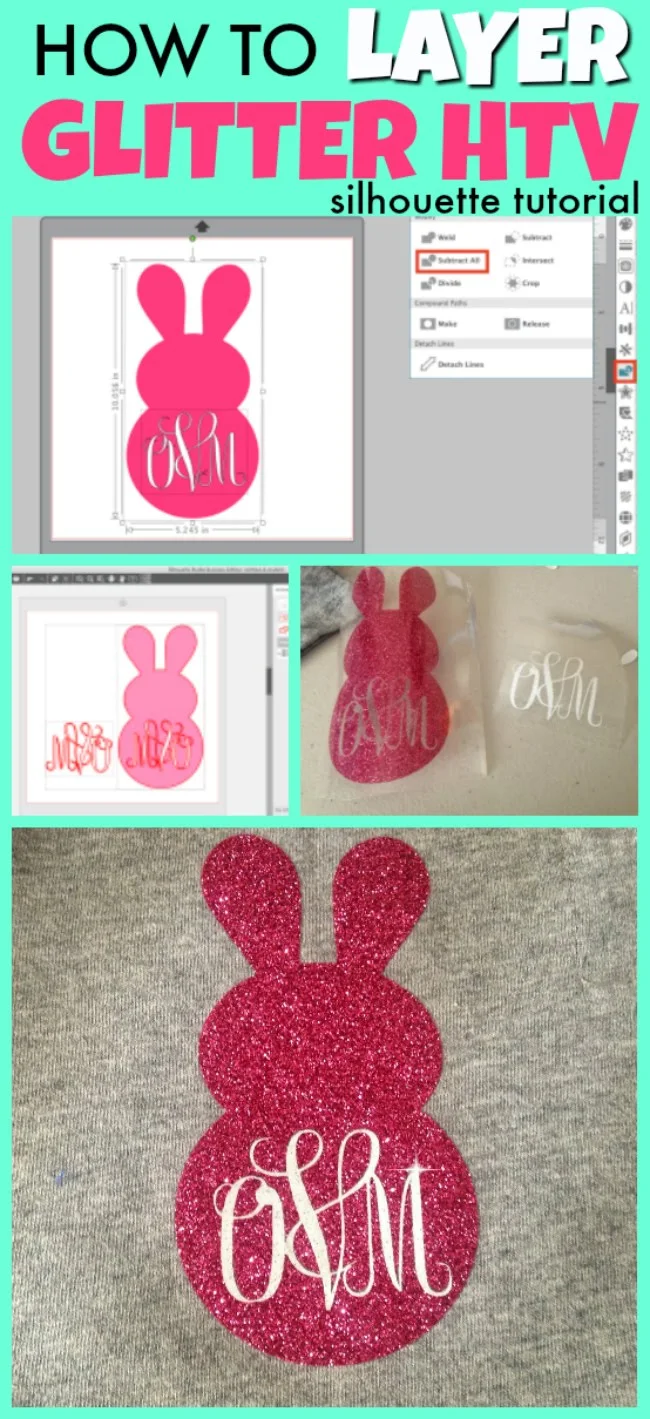
Open up Silhouette Studio.
Create your design or pull it in from the library. Obviously you want a design that is more than one color hence the layering. I am creating a bunny design with a monogram for a shirt for my daughter. The bunny will be the first layer and the text will be the second layer.
I think it's easiest to work with multi-color designs when you fill in each piece with the same color HTV than you're going to cut on.
If it's not already, drag the top layer over the bottom layer and position it EXACTLY where you want it.
Open the Modify panel from the right sidebar. With both layers selected, click "Subtract All."
Select the top layer (the monogram in this case) and move it out of the way. You can see, you've removed the shape of the top layer from the bottom layer. This will allow both layers to actually be put directly onto the shirt and will having the appearance of being layered on top of each other.
If you resize from here on out, select both the layers and resize at the same time or the overlay won't fit correctly in your cut out!
NOTE: If you were layering any other type of vinyl or HTV I would suggest you put a very small offset around the top layer so it covers any tiny gaps between the two layers, but if you do that with the glitter HTV it will be bulky and you risk it not fully adhering to the shirt - so skip that step when layering glitter HTV.Now you can mirror both of the layers by selecting both > right click > Flip Horizontally
Cut the glitter HTV as you normally would.
If you need a refresher on cut glitter HTV successfully, check out this tutorial.
I used Siser Glitter Heat transfer vinyl for this project. If you're looking to stock up, this is a great pack of the 10 most popular glitter HTV colors!
Weed and proceed to applying the HTV. It's easiest to apply with a heat press at a temperature of 320.
It actually doesn't matter which layer you put on first. I just went with the bunny because it was easier to center that on the shirt. I used my heat press to put the glitter HTV on. For the first layer of HTV you always want to tack the design on so there's no risk of shrinking.
To tack, just apply heat and pressure for 1-3 seconds.
Peel off the transfer sheet and then put the second layer into the cut out. Because there's no room for error when putting the designs on the shirt, you have to be extra careful to line everything up exactly so there are no tiny gaps between the two designs.
 | ||
| Apologies for the blurry picture....taking this with one hand and trying not to get burned by the top plate of the press was a little challenging. |
Note: This post may contain affiliate links. By clicking on them and purchasing products through my links, I receive a small commission. That's what helps fund Silhouette School so I can keep buying new Silhouette-related products to show you how to get the most out of your machine!
Note: This post may contain affiliate links. By clicking on them and purchasing products through my links, I receive a small commission. That's what helps fund Silhouette School so I can keep buying new Silhouette-related products to show you how to get the most out of your machine!
Get Silhouette School lessons delivered to your email inbox! Select Once Daily or Weekly.


.png)


Hi! I just got a silhouette cameo and would like to get into doing the monogram shirts. Where is the best place to get htv? I've looked and I'm finding single sheets of one color and it's slightly expensive. Is there anywhere that sells it wholesale in a bulk of different colors? Thanks!
ReplyDeleteThat was cool.
ReplyDeleteWhat font are you using for this project?
ReplyDeleteI have tried this, step by step to your instructions and it isn't working for me.
ReplyDeletedoesn't the vinyl shrink a bit when heating. Mine did
ReplyDeletedoesn't the vinyl shrink a bit when heated? Mine did
ReplyDelete