So I turned another one of my daughter's masterpieces into something more than just a piece of paper that will end up in a pile at the top of her closet for the next 20 years. I had this idea that I could turn the painting into a puzzle using my Silhouette...and then I thought 'Why not a magnet puzzle?'. And so...I did! This would also work with a favorite photo!
For this project you'll need printable magnet paper. I actually went with the Avery brand printable magnet sheets because they was less expensive than the Silhouette brand. The printable magnet paper is different than the adhesive magnet sheets - so just make sure you get the right thing. Also be aware the magnet sheets are rather thin so while they'll stick to your fridge without a problem, they're not going to hold up a gallery-worth of kids' art.
Okay we need to start by getting a digital copy of the original image onto the computer and into Silhouette Studio. I snapped a photo of my daughter's painting and then emailed it to myself so I could download it onto my computer. You could also scan the image...although mine was too large to fit on my scanner. Now we're done with the original..so go stash it in the top of the closet for the next 20 years.

NOTE: This tutorial builds off the basics of several beginner-level tutorials. If you'r enot familiar with importing and tracing, read these tutorials first.
Open up Silhouette Studio and and drag and drop the image you downloaded into the Silhouette Studio workspace.
I had a little bit of 'floor' around the painting so I used the knife tool to splice it off in Studio.
Now it's time to get ready to print the image on the printable magnet sheet. From the Page Settings window check the box to reveal the print border. Then enlarge your image to fit just within the border.
NOTE: I did these next few steps using PixScan, but it's really not necessary so just ignore my PixScan mat.
Now you have one big magnet. For the magnet puzzle we want to cut this into pieces. First, however, go ahead and turn off the print border, but keep the image the exact same size. Select the image and from the Cut Style window turn off the cut lines around the image.
Reveal the grid lines on your virtual mat and, if necessary, move the image so it lines up with the boxes. Put the printed magnet sheet on the same boxes on your cutting mat.
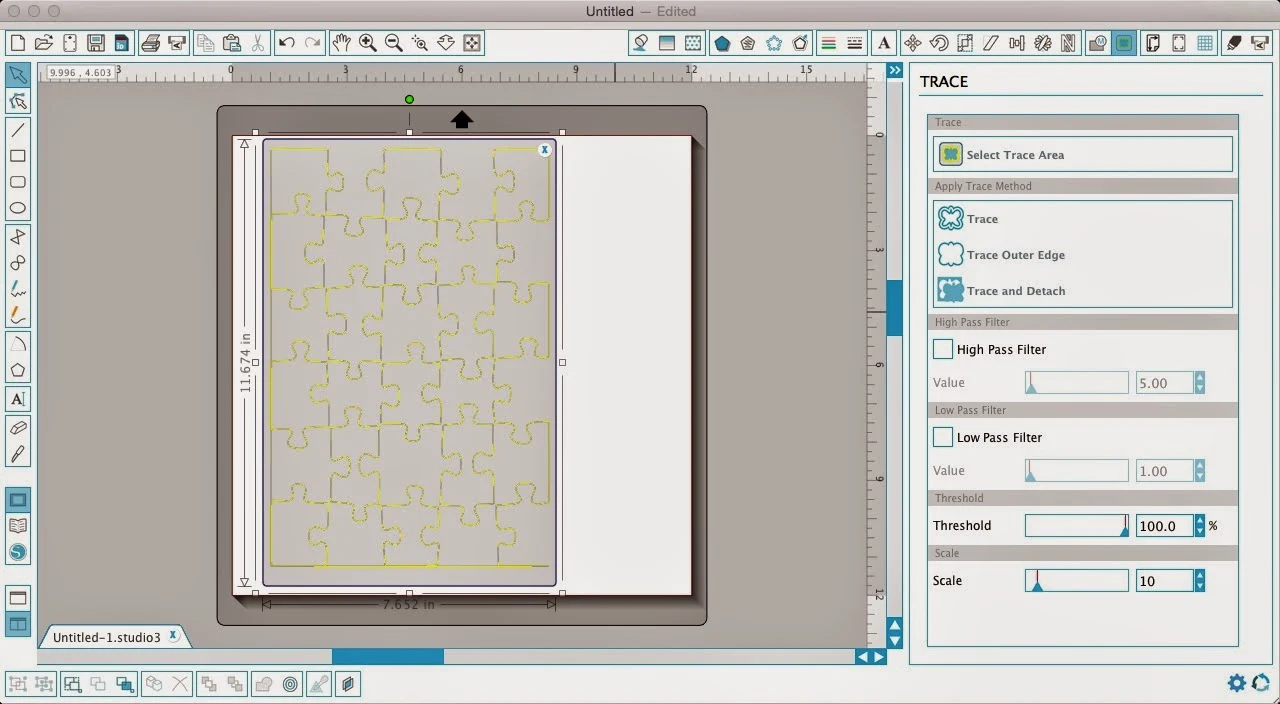
Now we need to work with the puzzle pieces. I did a google search for "puzzle overlay" and then brought it into Silhouette Studio to trace. I think it's easiest to save the puzzle overlay as a jpeg onto the desktop and then drag and drop it into a DIFFERENT studio workspace.
Trace the puzzle overlay > delete the original jpeg > copy and paste the traced puzzle into the same work space as the art piece or photo.
Put the puzzle piece overlay over the image and if necessary drag the corner of the puzzle overlay so it's the exact same size as the image.

From the Cut Style window select Printable Magnet Sheet. I cut on the suggested settings and my machine cut the sheet perfectly. Before you Send to Silhouette to cut, double check that the magnet sheet is on the EXACT same blocks on your mat as it is in Studio.
And that's all there is to making a custom puzzle magnet with your Silhouette!
Note: This post may contain affiliate links. By clicking on them and purchasing products through my links, I receive a small commission. That's what helps fund Silhouette School so I can keep buying new Silhouette-related products to show you how to get the most out of your machine!
Thanks for coming to class today at Silhouette School. If you like what you see, I'd love for you to pin it!


.png)


If you don't want to search for puzzle overlays, Silhouette store has various size puzzle cutouts you can buy. Might be a little easier for us Noobs.
ReplyDeleteI've enjoyed cutting puzzles out of cereal boxes; the highest setting on the knife just makes it through the cardboard.
how did you avoid the dabble lines?
DeleteI love the idea of magnetic sheets for the puzzle. I already have puzzle file. I will be making a few of these. Thank you for the post.
ReplyDeleteHiya. I just wanted to ask..any idea how to stop fraying of the puzzle pieces once cut? Do you use any special spray etc? Thank you!
ReplyDeleteYou could try ModgePodge!
Delete