So I have this blog...not Silhouette School...another blog. I know, I know. It's a DIY blog called Two It Yourself and it has taken a major backseat over the last 9 months or so since Silhouette School just kind of took on a life of its own...and, well, I only have so many hours in a day (and no clone...yet).
Anyway, this little blog is getting major traffic right now on one post about an over-sized wood Christmas sign that I made last year....before I had my Silhouette. It's kinda hard to believe I've only my Sil for a year, but it's true my dear husband gave it to me for Christmas in 2013.
Anyway back to the sign...my "Be Merry" sign was inspired by a similar one I saw in the Pottery Barn catalog that had a price tag I just couldn't swallow. So I rather painstakingly made my own...this would have been about 10 times easier and 10 times faster had I had a Silhouette at the time. Since I do now, I thought I'd re-post my Wood Christmas Sign tutorial making it Silhouette-friendly.
Whew..I told you this Wood Christmas sign had baggage....
Alright Pottery Barn sells their puppy for triple digits, I made mine for free because I had everything on hand, but even if you don't it won't cost you much more than a cup of Starbucks coffee.
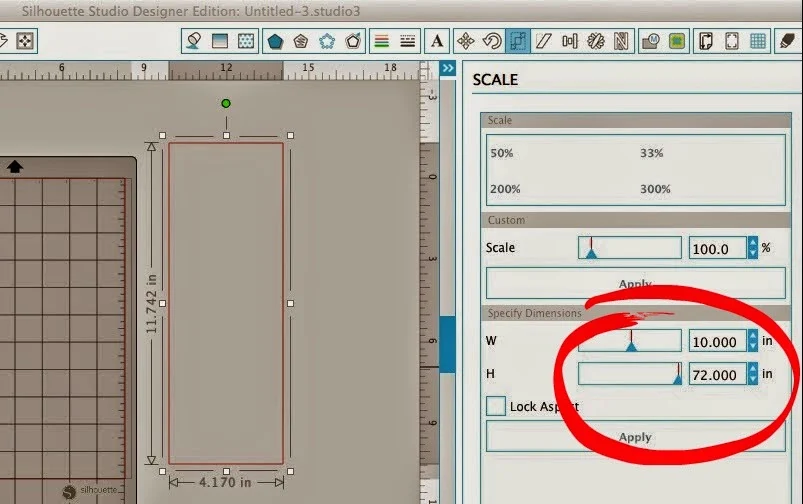
I used two pieces of pallet wood - each 72" tall - to create the sign. (Of course you can make it as tall as you'd like!) They pieces of wood are connected in the back with a few pieces of scrap wood.
To get this finish I first painted the wood with two coats of white DIY chalk paint (recipe here). After the paint was dry I used a rag to rub on a coat of MiniWax stain in Dark Walnut. Yes, I totally put stain over paint. I do it all the time and I love the look!
The point here is NOT to have the stain absorbed into the wood, like you would traditionally use stain. What you're going after is to give the finished piece an aged look and add some character. After a few minutes of letting the stain sit on the paint, I used a clean rag to wipe off the stain.
You can see - in the picture below - some of the stain is left behind and it gives this beautiful grayish finish. Once the stain was dry, I sanded it to distress the sign so the white paint would show throw in some places.
 |
| After the excess stain was wiped off and it's been distressed |
Now type out your word. Remember, you will need to either hit enter between all of the letters or create a new text box for each letter to get them to go vertically.
Pick your font. I went with Times New Roman. Roughly size it so it fits on the piece of wood using your large rectangle as a guide. My font size is 751.
At this point you'll probably notice that your letters are spaced slightly too far apart. Use the line spacing bar to bring them closer together. You can see that I have adjusted mine down from 100% to 78.5%. I have also centered the text.
TIP: If you're still having trouble with spacing, you can ungroup the letters and manually move them around.
Lay your stencil directly onto the wood and mod podge the edges down just as I showed you how to do in this tutorial. This keeps your stencil in place as well as preventing paint from bleeding under the edges of the stencil.
With your stencil over the wood (unlike in this un-friendly Silhouette version), grab your craft paint and use a foam brush or pouncer to paint the letters. Use an up and down motion rather than back and forth so you don't get paint under the stencil.
Let the paint dry and then peel up the stencil.
I finished up my DIY wood Christmas sign by lightly sanding the letters to give them a distressed finish.
Then I finished off the whole sign with a coat of spray polyurethane to seal it since it will be outside. .
And one more picture of my oversized wood Christmas sign just so you can see the full size...(and my cute little helper elf).
Note: This post may contain affiliate links. By clicking on them and purchasing products through my links, I receive a small commission. That's what helps fund Silhouette School so I can keep buying new Silhouette-related products to show you how to get the most out of your machine!
Thanks for coming to class today at Silhouette School. If you like what you see, I'd love for you to pin it!


.JPG)


.JPG)


.png)


How do you get your contact paper to stick to your different surfaces? I have tried a million different ways and so far I have only been successful once and it was my first time (beginners luck I suppose). Any tips you may have would be GREATLY appreciated!!
ReplyDeleteShe said in the directions-"mod podge the stencil edges"
DeleteI noticed in your pictures that you didn't use the contact paper and actually drew the lettering out. Does it just work easier to do this? Also I have the same questions as the other person, how do you get the contact paper to stick to different surfaces? Ive tried it and the paint bleed a lot. Thank you.
ReplyDeleteI'm totally new at this.. I'm thinking this contact paper does not have a sticky back. Could the sticky back Dollar Store product be used instead?
ReplyDeleteI can't figure out how to get the contact paper to not move around in the machine as it is cutting. Any tips? What am I doing wrong?
ReplyDelete