Ask you and you shall receive...after months of people asking me how to cut embroidery applique patterns with Silhouette, I'm finally giving the people what they want.
This tutorial explains how to cut machine embroidery applique patterns with Silhouette.
Note: An updated version of this tutorial using the Silhouette CAMEO 4 Rotary Blade can be found here.
Anytime I am cutting machine embroidery appliqué -- but especially when I am doing multiples -- I cut on my Cameo!! There are two methods that I use - depending on what embroidery software you have.
Method #1: Since Silhouette Studio won’t open embroidery designs, we have to do a "work around" by saving the appliqué as a jpg and tracing it in Studio.
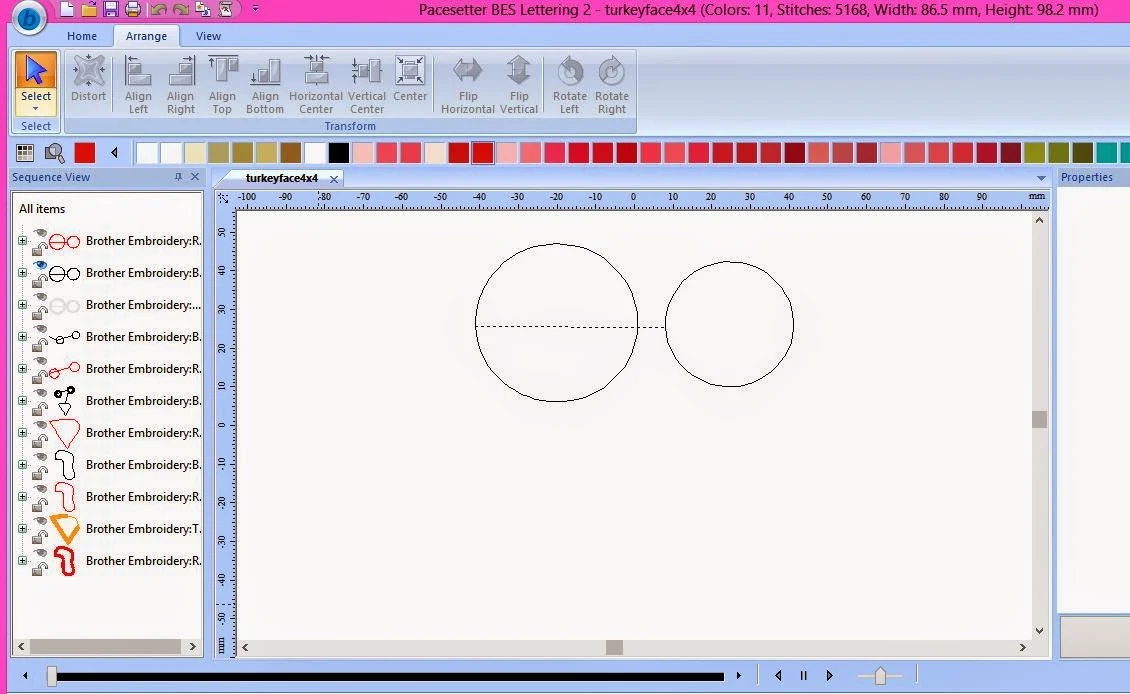
First - you need to open the design in your embroidery software — whatever software you are using! I am using Brother's BES Lettering 2 for this tutorial -- but the technique will work in any embroidery software where you can isolate the color sequence. This cute little design is from Planet Applique.
Then, in your color sequence guide, isolate the first color stop of the applique – the placement stitch: (In BES, you simply click on the placement stitch in the Sequence View, right click & select “Hide Other”). Be sure the Grid is turned off & design deselected.
 |
| Placement Stitch for "Eyes" in the Turkey |
Now — you need to capture this image as a jpeg — and open it in your Silhouette Studio software! So, to do this, open the “Snipping Tool” in Microsoft Windows and draw a box around the image — If you want to learn more about the Snipping tool — just visit this page at Microsoft. Once you’ve “snipped” the placement stitch, just paste it into the Studio software. (Its a little hard to see -- but its there!)
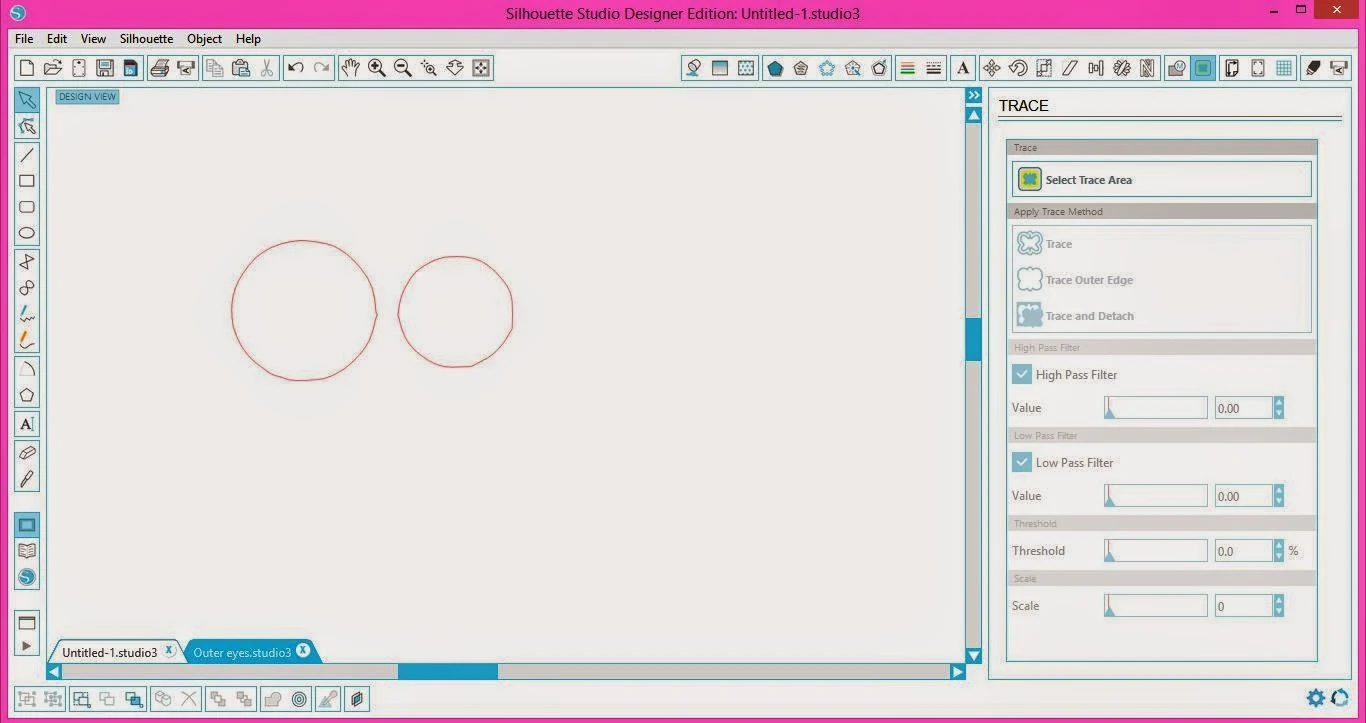
Next, in the Silhouette Studio, open the Trace Window, Select Trace Area, and draw a box around the jpeg file you pasted onto the workspace. You’ll see that the area turns yellow. Uncheck the High Pass Filter, increase the Threshold up to 97% — then click on Trace Outside Edge. You are left with only the Cut file. (Its the red lines).
Now, in this particular file -- you are going to see the Trace of the jump stitches between the eyes. Just "Release Compound Path" in the Studio software, and delete those little lines between the eyes.
At this point, move over the jpeg file — and then delete it! You’re done with it! Now you just have to size it to the correct size to fit into your machine embroidery file. Go back to your embroidery software & be sure to note the size and then size your Silhouette cut file to be 1 mm larger in both width & length – This allows for all edges of the fabric to be caught when embroidering. When its sized — Send to Silhouette!
Fuse either Heat & Bond lite or Silhouette Sewable Interfacing to the back of your fabric, remove the paper backing, stick it on your mat & load the mat into the machine! The Silhouette will cut your fabric & you are all ready to embroider!! The appliques are fused & ready to be placed into your embroidery! No cutting in the hoop!! I love it!! Repeat this process with all of the other pieces in the design & you are ready to embroider.
Method #2: So -- while I love cutting my applique in Silhouette Studio - -there are several steps with this method -- I often hoped that Silhouette would open embroidery files. However, the brilliant folks at "Embrillance Software" have teamed up with the awesome folks at Silhouette America to allow us to save our Machine Embroidery Applique Cut Files as a Studio Cut File - right in the embroidery software!!!! It is awesome!! So, rather than try to explain it with words -- I'm going to share this video with you! Watch it & be amazed!! But that's not all!! This embroidery software runs on a MAC Computer!!!! It is awesome! (Can you tell I'm excited about it??) I've created a little video here for you to see how its done!!
Now -- to make this even better - I have a 10% Promo Code for the Silhouette School! Simply link from this page on my blog - and enter the Promo Code TERRI1214 to receive 10% off this already reasonable Software. But, remember -- you must link from the "Class Promo Page" for the code to work! This code is good until Friday, Dec. 5th
With BOTH methods - you can load all of your files to the workspace, & place the fabric all on the mat to be cut at one time! Be sure to select the cut settings for Fabric - thin like Cotton. If you are cutting more than one (like I am) - you can duplicate this & cut it all at once!
That's it! It's such a time saver!
It's Melissa again popping in to say I'm like super impressed with this and I'm so thankful Terri shared her tutorial on cutting machine embroidery applique patterns using Silhouette CAMEO (and Portrait) with us!
Thanks for coming to class today at Silhouette School. If you like what you see, I'd love for you to pin it!


.png)


For a novice, is there any software that is cheaper that will do this?
ReplyDeleteIt's so fun to see other ideas when it comes to crafting. Hopefully I can find some more ideas like this. My wife has been wanting a new project for the longest time. Hopefully, I can get her something that will take up her spare time. http://www.stitchmine.com
ReplyDeleteI would like to print out the lessons. I am not able to cut and paste them. Can you help?
ReplyDeleteGreat. I never stop learning either. There are often several ways to achieve the same outcome, and it is good to see other peoples methods.
ReplyDeleteOkay so I tried this but I get to the step of pasting the snip in the Brother software and it is not an option to paste. I tried saving the snip then putting it in the library but then it is not the same size.
ReplyDeleteDos and don'ts are exists in every field. But some of them highlight both. Thanks to author for highlighting both. Bass Embroidery Designs
ReplyDeleteSuch gorgeous creations, one of my favourite colour combinations!
ReplyDeletei really like these types of Embroidry
so creative.... love it!
ReplyDeleteThanks so much for this wonderful tutorial. When I use method 2 and save from Embrilliance as an SVG and put it in MTC it is much smaller. What am I doing wrong?
ReplyDeleteThis comment has been removed by the author.
ReplyDeleteThank you for a great explanation. I was looking online for a similar idea and really appreciate it
ReplyDeleteI have been doing machine Embroidery for a long time...this article is a great refresher since there are so many more beautiful thread options out there. Thank you!
ReplyDelete