Today I'm going to share 7 tips for adding vinyl to wine glasses so it's straight.
Tips for Adding Vinyl to Wine Glasses
First things first: pick the right design. You want the Silhouette design to be the right size. If it's too big you will definitely have trouble getting it straight on the glass so I say simple and small-er are best.If you are adding a monogram to a glass I find it easiest to cut each letter separately instead of welding them together for this very reason. Smaller designs are easier to position without wrinkling, bubbling, and warping.
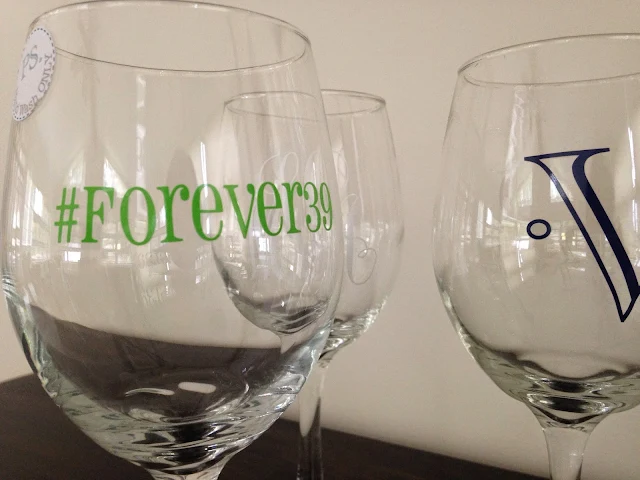
I was making glasses for a friends for a girls' weekend. She originally asked for a multi-line "Keep Calm and Drink Wine with Your Besties" saying on each glass. Her other idea was #Forever39.
I immediately thought the suggestion of the Keep Calm phrase would be too big of a design. Sure it can be done, but I didn't want to set myself up for a disaster knowing that the #Forever39 option she liked just as much and would be a lot less stressful!
Best Vinyl for Wine Glasses
Use the right vinyl. You want to cut on permanent adhesive outdoor vinyl like Oracal 651. This vinyl can withstand washing (by hand). It has a stronger adhesive on the back to give it a better stick which is ideal for smaller designs. I'd recommend either a pack of Oracal 651 vinyl from Amazon or Swing Design - but check the prices!Cut your design, weed, and then get ready to apply the vinyl to the wine glass.
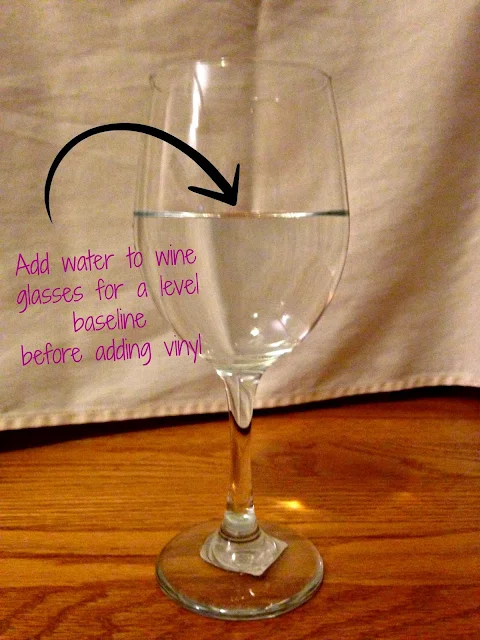
But before you do, fill the wine glass with water. I filled mine about half way...but how much water you use all depends on where you want your design placed. The water line is a guaranteed straight line of reference. I usually use painters tape, but on a wine glass there's risk it would not be level because of the slightly conical shape of the glass.
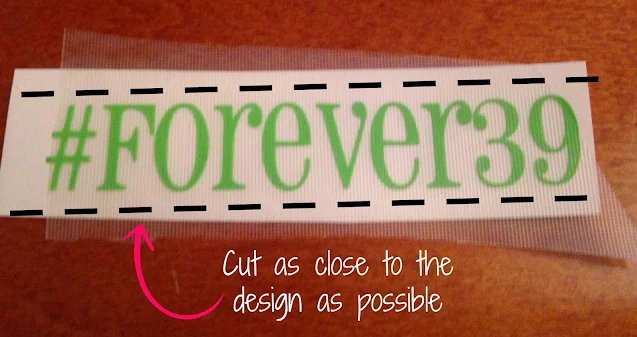
Use clear transfer tape to move your design from the vinyl backing to the glass. Use the least amount of tape as possible. So cut the tape and the backing down as close to the vinyl as you can before peeling off the tape to transfer it to the glass.
If you're having trouble with the design curving up or downwards slightly, use scissors to clip up into the transfer tape being careful not to cut the vinyl. This just gives you a little wiggle room allowing the design to bend slightly back towards the water line.
When the entire design is on the wine glass, carefully remove the transfer tape and burnish the vinyl down again with a Silhouette scraper.
If you are doing more than one wine glass, pour all of the water into the next wine glass. This will ensure that all of the designs on every wine glass are in the same spot (so long as you don't spill any water while pouring)!
And yes, I add my "PS Hand Wash Only" stickers, made with my Silhouette and white sticker paper to all wine glasses with vinyl to remind people they're not dishwasher safe. Read the Silhouette Sticker 101 tutorial
Update: if you just watched my Facebook Live on putting vinyl on wine glasses, you can download the free (Don't) Stop Whinin' Silhouette design here.
Note: This post may contain affiliate links. By clicking on them and purchasing products through my links, I receive a small commission. That's what helps fund Silhouette School so I can keep buying new Silhouette-related products to show you how to get the most out of your machine!
Thanks for coming to class today at Silhouette School. If you like what you see, I'd love for you to pin it!


.png)


I use a hinge method! I take my design and cut around it as close as I can. Then I cut a few slits around the design without cutting the design itself. I take masking tape and tape the design (with backing still on it) halfway vertically to the surface. Then I remove one half of the backing, and press down the design and smooth it with an ID or Credit Card. I remove the tape and do the same for the other side and remove the transfer tape. It works like a charm every time!! I never thought of using the water as a guide though! That's a great idea!
ReplyDeletePlease could you let me know where I can obtain the vinyl for this? would love to make some for Christmas.
DeleteFantastic idea.
ReplyDeleteWhile I am at it can you help me with this. I just did some iron and I don't know how to move it off to keep it straight, as I purchased the vinyl from Ebay. Any tips on how to pull it up. Or using the tradition red sticky paper you buy?
ReplyDeleteThanks for this.! What kind of transfer tape are you using? <3
ReplyDeleteI have been struggling to get names and sayings right on pint glasses. This post is extremely helpful!!!! **Especially the water trick!*** Thank you so much for your brilliant blog!
ReplyDeleteJust brilliant' Thank you
ReplyDeleteJust brilliant' Thank you
ReplyDeletewhat degree of the curve do I need to make to make my image curve to fit the wine glass better?
ReplyDeleteTo help make stencils for angled glasses you can use the template that mimics a truncated cone. Just add the right measurements to the input screen.
ReplyDeleteUse this site to create the right curve image. http://www.templatemaker.nl/index.php?template=cone&lang=en
Then transfer the curve image to your Studio Software. Then create your text and "snap" the text to the top of the curve. Then you can convert your curved text to a graphic, remove the curve image and move the image freely about.
Thanks so much for sharing this! I often find more gems in the comment section than the actual blog post!
DeleteThat is a awesome idea ...
DeleteI admire this article for the well-researched content and excellent wording. I got so involved in this material that I couldn’t stop reading. I am impressed with your work and skill. Thank you so much.
ReplyDeletebest plastic wine glasses reviews
Shared Hosting
ReplyDeleteUnlimited Hosting
Semi Dedicated
Unlimited Hosting
Semi Dedicated
SSL
Domain
Login
Blog Dewabiz.com
TOKO Dewabiz.com
TOKO Dewabiz.com
great post....
ReplyDeleteCheck this out
Adorable and lovely , it's very attractive and creative idea ,
ReplyDeleteit's the best tip and useful ,
I'm really appreciate thanks for your sharing !!!!!
Thanks for sharing this beautiful post.
ReplyDeleteI have tried adding a vinyl design to the best wine glasses as they add that special touch for any occasion.
I'm using more "solid" design, the batman logo. I can get it to lay flat but part of it keeps lifting. How can I get it to stay flat?
ReplyDeleteHello! I am wondering if you use a sealant after you apply the vinyl to the glass? If so which is the best one to purchase?
ReplyDeleteOh my goodness, I love the water tip! Thank you!
ReplyDeleteOh my goodness, I love the water tip! Thank you!
ReplyDeleteOne of the best tips/tutorials out there. Thank you!
ReplyDelete