I can't get enough monograms. I've said it before and I'll say it again: I love monograms. A few weeks ago I made this faux framed monogram wall art for our master bedroom. Last week I remembered I had another monogram font that I had downloaded a few months ago that I thought would make a cool Silhouette cut...and it sure did.
Of course, Silhouette lets you use any font that's already on your computer so if you don't already have Black Oval Monogram, download it here for free. After you have it installed on your computer, open Silhouette Studio.
Now, you will want to refer to the character map to create your circle monogram. The left letter (first initial) is going to be the lower case of that letter, the middle letter (last name initial) will be the upper case, and the right will be a special character. So for me to get MVA I had to type in 'mV1' according to the character map.
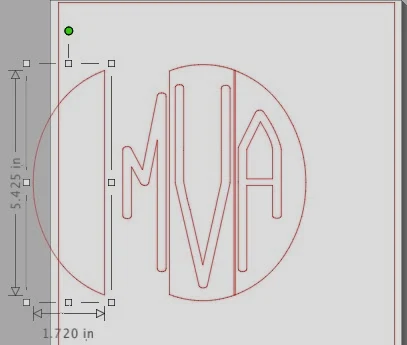
You'll notice however that each piece has a line separating it from the next piece so it doesn't really look like a circle. This is NOT what we want...but we can fix it in a few steps.
Start by ungrouping the circle monogram font. Select the design > right click > ungroup. Now it should look like this in Studio.
Starting with the left initial, highlight it so you get the box around it. You'll notice if you right click you will not get the 'ungroup' option. This is where you'll want select 'Release Compound Path.' After you have released the compound path, drag the third of the circle (without the letter) away from the design and delete it.
Repeat for the other two letters. Now your monogram should look like this.
But you wanted the circle, right?! Right, of course you did. At this point you need to redraw the circle manually. Select the circle drawing tool (aka Draw an Ellipse) on the left side of the Studio work area. Take the cursor into the work area and draw your circle around the monogram font. Once your circle is drawn, remember that to reposition it you'll need to click the 'Select' tool, which looks like an arrow, to move the circle around the work area.
If you leave the design like this it will cut a circle, but it will not be a framed circle. So you want to select the circle>right click> duplicate.
The circles are exactly the same size, which you do not want.
To resize the duplicate, highlight it and drag the corner slightly in to make the circle just a bit smaller than the original.
I would now suggest highlighting the entire design and regrouping it so you can move it around your work space and resize it while it all stays in proportion.
I cut my circle monogram on vinyl and used it to personalize my iPhone case and to make a monogrammed note card.
The great thing is you actually get two circle monograms with this cut...the positive and negative which can each be used to personalize pretty much anything...maybe a phone case or a laptop...a mug or a tumbler. You could even use it as a paint stencil to make some pretty stationary.
What will you be personalizing with your circle monogram? Leave me a comment to share and/or share a photo of your finished product on our Facebook page!
Thanks for coming to class today at Silhouette School. If you like what you see, I'd love for you to pin it!


.png)


This IS SO helpful thank you very much!
ReplyDeleteFound this page via pinterest. Been wanting to do something like this but didn't know how, until now. I have to say it came out great. Thanks so much!
ReplyDeleteI did it LOVE IT! thanx so much
ReplyDeleteThanks for this toutorial. I am a beginner and this really helped me. I do have one question. Is there a way to make sure the letters line up evenly without eyeballing it? I am sure it is something very easy but not sure how to do it. Thanks a bunch!
ReplyDeleteThanks so much for this -- my first monogram so I tried doing the positive and negative, and whew, it was a challenge weeding -- any way, I'm fine with results for first try -- will post on your FB page!
ReplyDelete