Of course, you can weld more than just words and numbers, you can weld pieces of a design so they cut as one unit instead of individual pieces. In today's lesson I'm going to show you the basics of welding and how you can use it for fonts ... then tomorrow we'll talk about welding design elements.
First up on the lesson plan: Welding letters.
Type a word into your work area. If it's a script it may appear to be overlapping already. This doesn't necessarily mean it's all one piece though. If you see those little circles between the letters like in the below example it means they are overlapping, but not welded together.
To weld the letters into one word highlight the entire design > right click > select Weld.
Now your design should look like this....everything is welded together (except the period).
Let's talk numbers...
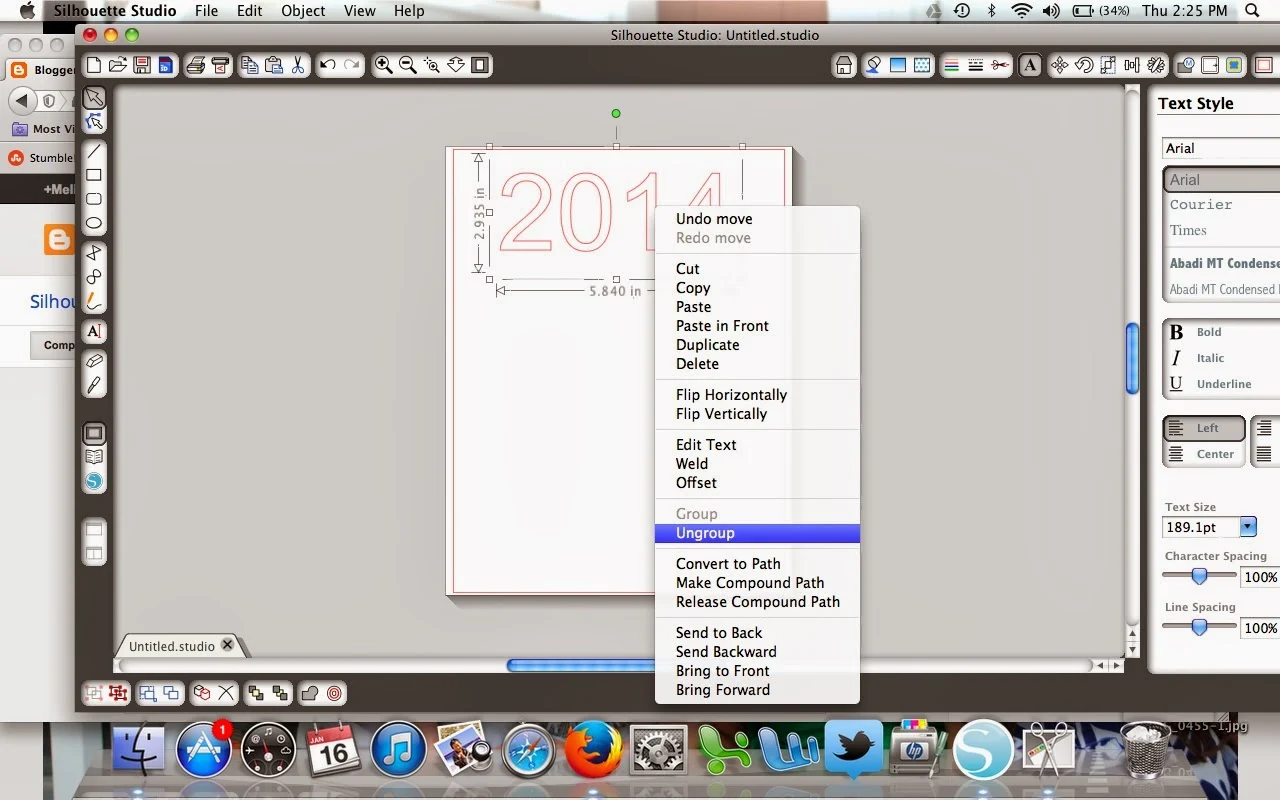
Okay type some numbers into the work area (this would be the same process for non script fonts, as well). When you do this your numbers are all grouped together even though they look like individual numbers. You can tell they are grouped because when you click on the numbers a single large box appears around all of them. To weld them, you need to move the numbers closer together so you first need to ungroup them. Highlight all the numbers > Right click > ungroup.
Now that they are ungrouped you can physically move the numbers closer to each other by dragging the individual digits with you mouse. I'm going to let this next graphic do the talking....
Here's what the welded 2014 looks like when it's cut.
Thanks for coming to class today at Silhouette School. If you like what you see, I'd love for you to pin it!


.png)


I love this very easy to follow description for doing this. I pinned it 👍
ReplyDeleteThank you @Carolyn and glad you found it helpful :)
DeletePerfectly described how to weld. Thanks for sharing with us.
ReplyDeleteWow! Thanks for the detailed instruction. It is really helpful. Love it :)
ReplyDeleteAluminium Welding Gold Coast
Simple but so helpful :)
ReplyDeleteI was wondering if anyone could help me...I need to know how to edit my text once it has been welded. I use my cameo machine to address my client's wedding invitations and it is incredibly time-consuming to have to start from scratch after each envelope because I can't edit my type once I have welded it (and I have tried so many times). Any ideas? Thanks so much!
ReplyDeleteGreat post, thanks for sharing, really helpful indeed !
ReplyDeleteIs it possible to weld together separate lines of text? I'd like to print it's a girl on two lines. Does anyone know of a design like this?
ReplyDeleteHi, just move the lines up so they touch, the same way as side by side, and weld.
DeleteHi i am trying to weld my letters together, however when i do, the inserts of the letters e and g disappear. How can i over come this?
ReplyDeleteHi, A bit late, but here is a youtune link to a very good tutorial on how to do this. https://youtu.be/gAh4VDkHFPA
DeleteI have a quote that I've made curve along a circle. I want the letters welded together, but I can't figure out how. How do I get this done?
ReplyDeleteI have a quote that I have curved along a circle. I'm trying to weld the letters together, but I can't. It seems I can weld, but not get it to curve, or I can curve it, but can't get it to weld. How do I get both done?
ReplyDeleteI just bought the Curio this week, and whenever I have a question, and google it, I seem to very often come across your blog ! Great tuts ! Easy to understand and follow the instructions ! Thanks alot, your blog has been really helpful to me already !
ReplyDeleteI'm having trouble with moving my letters close together to weld. My mouse either overlaps the letter or isn't touching it al all when I move it. It's like I can only move it two directions. Any ideas in what I can do
ReplyDelete