It's so easy...and really helpful when trying to trace!
It's really just two steps to make black and white photos in Silhouette Studio.
First open up Silhouette Studio and go to File > Open.
Navigate to the photo on your computer and click "Ok" to open it in a work area.
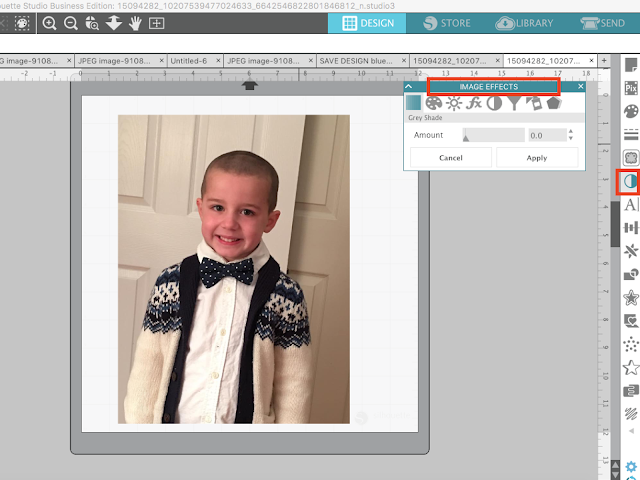
Once the photo is in Silhouette Studio, open the Image Effects panel.
With the photo selected slide the Gray Scale bar on the Image Effects panel all the way to the right.
The photo will go from color to black and white. Click "Apply" to apply the effect.
Since the Silhouette Studio tracing tool works on color contrast, tracing black and white photos images usually results in a better trace.
If you need or want to increase the contrast even more, click the "Contrast, Brightness and Saturation" tab on the Image Effects panel. Adjust as needed and then click "Apply" to set your selections.
Of course you might just want to convert a photo to black and white and the Image Effects tool is perfect for that too.
If you have Silhouette Studio Business Edition you can easily export as a JPEG by selecting the photo and going to File > Save Selection > Save to Hard Drive and changing the format to JPEG.
Note: This post may contain affiliate links. By clicking on them and purchasing products through my links, I receive a small commission. That's what helps fund Silhouette School so I can keep buying new Silhouette-related products to show you how to get the most out of your machine!
Get Silhouette School lessons delivered to your email inbox! Select Once Daily or Weekly.


.png)


No comments
Thanks for leaving a comment! We get several hundred comments a day. While we appreciate every single one of them it's nearly impossible to respond back to all of them, all the time. So... if you could help me by treating these comments like a forum where readers help readers.
In addition, don't forget to look for specific answers by using the Search Box on the blog. If you're still not having any luck, feel free to email me with your question.