 |
| This is a sponsored post but all opinions are my own. |
Designing Stickers in Silhouette Studio
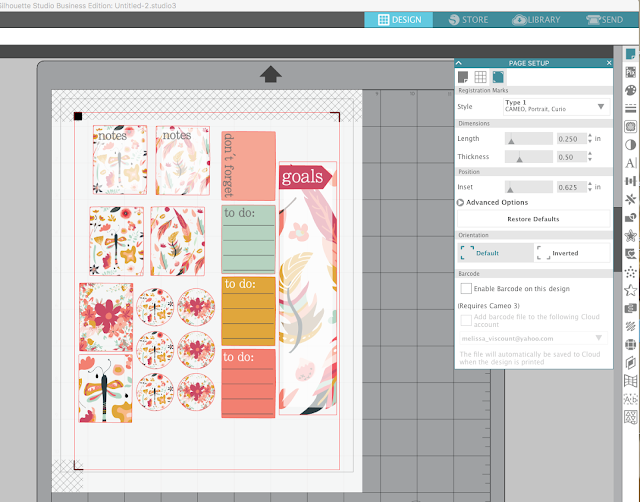
The first thing you're going to want to do to make dry erase stickers is to design the stickers in Silhouette Studio. Or I'll give you a hall pass this one time and you can download this free set of planner stickers for Silhouette Studio.If you decide to take the sticker design challenge and design in Silhouette Studio keep these tips in mind:
- Change the page size to "Current Printer" from the Page Setup panel and turn on the Print Border
- Start simple and use the Draw a Rectangle tool in Silhouette Studio to draw out a rectangle or other basic shapes
- Fill the sticker shapes with a solid color or pattern using the Fill Color tool
- Add text and/or lines as well

- Stickers are print and cut designs
- Text and lines will only show up when printed if they either have a line weight (increase it from the Quick Access tool bar or the Line Style tool) or if they're filled with a color
- The only cut line should be around the edge
Silhouette Print and Cut Stickers
Alright now that we have the sticker designs in Silhouette Studio let's move forward with actually printing and cutting. We're basically going to do a traditional print and cut, but with one added step between the printing and cutting. If you need a beginner Silhouette print and cut tutorial, check out this Silhouette blog post.In Silhouette Studio V4, add the registration marks. You'll find them in the third tab on the top of the Page Setup panel. Once there, click the drop down menu and select "Type 1: CAMEO, Portrait, Curio." You can also use the Silhouette Studio keyboard shortcut of "M" to turn on the registration marks.
Go to the Send panel and makes sure the only cut lines turned on are those around the edge of your stickers. For laminated stickers you want to select Sticker Paper, as your material type, but adjust the number of passes to 1. In other words, recommended Silhouette CAMEO cut settings for dry erase or laminated stickers are: Blade: 3 , Speed 4, Force/Thickness 33, Pass 1.
What we are going to do is make our own dry erase sticker paper by combining two different sticker papers!
Place a sheet of printable white sticker paper from Online Labels into your printer and send it to print. Now you can move forward with printing your design by clicking the Printer icon along the top tool bar.
Remove the printed sheet from the printer.
How to Laminate Stickers to make Dry Erase Stickers
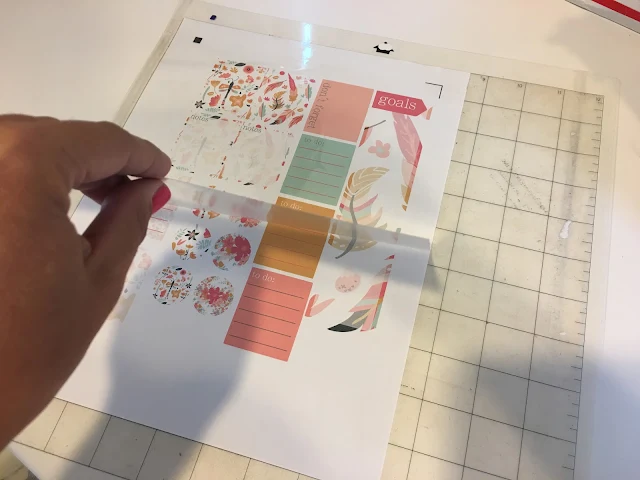
This is where you would normally cut with your Silhouette cutting machine. But we need to add the laminate layer to make laminated stickers. For this you're going to use a sheet of Online Labels' printable clear glossy sticker paper...but you're not going to print on it. You're going to use it as a laminate only for these dry erase stickers.Fold down just the top inch or so of the backing on the clear glossy sticker paper. This will allow you to position the top edge of the glossy sticker paper right along the top edge of the printed sticker sheet.
Once you have the laminate sheet started slowly peel away the backing and roll it down across the rest of the sticker sheet laminating the entire sheet. Try not to wrinkle the laminate layer or get any bubbles.
If you do get bubbles, work them out as best you can with your Silhouette scraper.
Place the entire sheet of uncut laminated stickers on your Silhouette Cutting mat. Back in Silhouette Studio send the design to cut with the recommended cut settings mentioned above.
When they're finished cutting, you should have a perfect kiss cut allowing you to be able to easily pick up the laminated stickers which work perfectly as dry erase stickers.
By laminating with the clear sticker sheet, you've just created yourself a set of dry erase planner stickers! Ta Da.
You can also use this method to make laminated stickers to give stickers an extra shine or extra layer of protection. For example if you were using stickers for bottles that have oils, food, or liquid in them - a laminated sticker is a great idea so you can easily wipe them clean!
Now for that giveaway I promised you...I've teamed up with Online Labels to give one lucky winner a sticker making prize pack valued over $85! The winner will received 100 sheets of Online Labels clear glossy sheets that you can use for printable clear stickers or as the laminate layer, 100 sheets of Online Labels white printable sticker paper, and a copy of my ebook The Ultimate Silhouette Print and Cut Guide.
The giveaway ends Saturday, August 26 at 11:59pm EST so get those entries in!
Note: This post may contain affiliate links. By clicking on them and purchasing products through my links, I receive a small commission. That's what helps fund Silhouette School so I can keep buying new Silhouette-related products to show you how to get the most out of your machine!
Get Silhouette School lessons delivered to your email inbox! Select Once Daily or Weekly.


.png)


No comments
Thanks for leaving a comment! We get several hundred comments a day. While we appreciate every single one of them it's nearly impossible to respond back to all of them, all the time. So... if you could help me by treating these comments like a forum where readers help readers.
In addition, don't forget to look for specific answers by using the Search Box on the blog. If you're still not having any luck, feel free to email me with your question.