My whole goal with Silhouette School is to teach you rather than do for you...but today I'm doing both. I will show you exactly how to create this type of word art and I am going to give you the free Silhouette Studio cut file in hopes you are inspired to work through your own custom design!
I should warn you up front, this is definitely an advanced Silhouette tutorial that will assume you have some Silhouette Studio knowledge. You will also need Silhouette Studio Designer Edition in order to do this as it requires the Nesting tool.
Keep in mind as you work through this tutorial that it can be done with pretty much any shape and any set of word or words. I am using the shape of Christmas light as an example.
The first thing you want to do is open up or create the shape you want your word cloud to form. For me, that's the outline of a Christmas light.
Create a duplicate copy of the design and pull it off to the side of your work area. You won't need the duplicate shape until later in process.
The second step is to type out the words you want to take that shape. Each word should be typed out in its own text box. You can type out as many words as you want. I went with five different words so 5 different text boxes. Using a combination of word lengths is helpful as short words can fill small spaces and really help define the shape in the end.
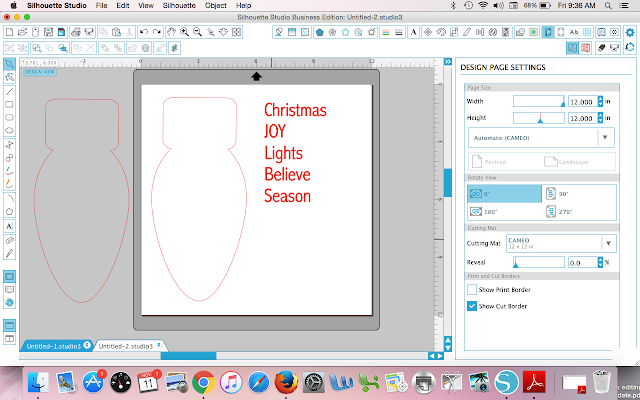
Select all of the words, fill them with a color and pick a font style.
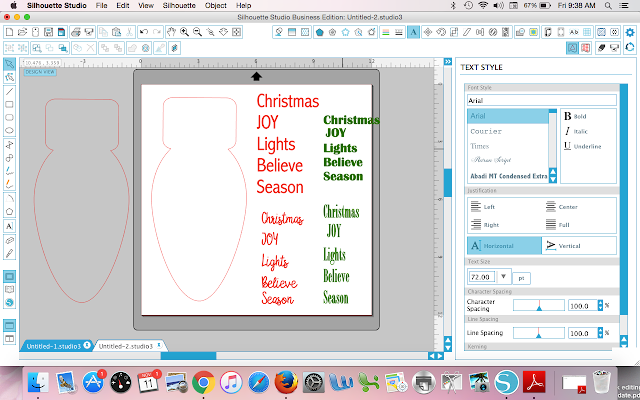
Next select all of the words and replicate them...I would say at least 4-5 times.
Go through each set of words and do the following:
- Change the font fill and line colors (optional)
- Change the font style
- Change the font size
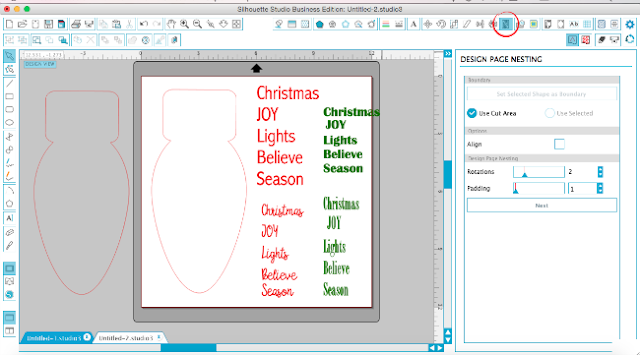
Click on the Nesting tool along the top tool bar. This tool will only be an option if you have Silhouette Studio Designer Edition or higher.
Select the shape that you want the words to nest into...in this case one of the Christmas lights. From the Nesting window click "Set Selected Shape as Boundary" this will put a check in the circle next to "Use Selected."
Increase the Rotations to at least 4. You can adjust the Padding (space between words if you wish).
Click Nest.
The words will fill into the shape...if the entire shape is filled you're good to go.
If you don't have enough words to completely fill the shape, click Undo (circled above in blue).
Copy and paste another set of words to your work area so you have more text to fill the shape.
Click "Nest" again. If not all of your words filled the shape, that's okay. Keep them in the work area as you may want to use them as swaps.
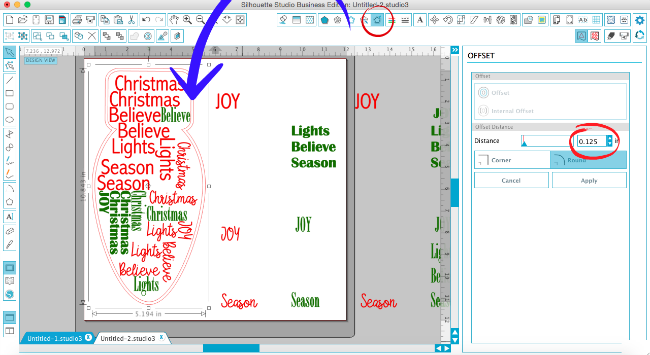
Yay! You're almost there...but there's still work to do. In order to better define the shape, select the duplicate shape outline and drag it around the word cloud.
If you have space that you want to squeeze in an extra word you can use one of the words that didn't make it in while nesting.
Get creative...
Now you have some options as far as how your finished design will look when it's cut.
To Make a Frame Around the Shape
With the shape only selected (not the words), click the Offset tool. The default offset works well...but if you want to increase it you can certainly increase the distance.
To turn the offset into a frame, select both the offset and the original > right click > Make Compound Path.
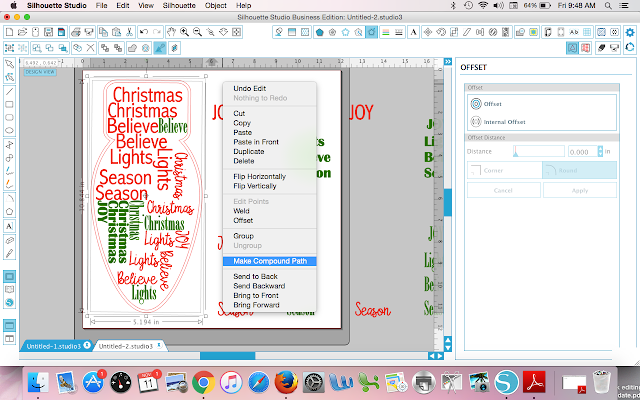
Now you can fill the frame with a solid color.
To Make a Solid Shape
Select all of the words (but not the border shape) and group them together.
Now select just the words and fill them with a contrasting solid color. Change the line color to match.
Cutting and Layering TIP: The easiest way to cut the framed design is to group all of the like colors together and then separate the layers.
For the solid fill design you could make a compound path then weed out the words to let the color of the surface show through rather than layering.
And here's a quick mock up to show you how each of these word cloud designs created in Silhouette Studio would look when cut on heat transfer vinyl with Silhouette CAMEO or Portrait.
Hopefully you've made it this far because now I have the free Silhouette Studio cut file for you to download. This is for personal use only please...also if you want to share, please share the link back to this tutorial, not the direct link to the cut file or the actual file. Thanks, loves!
Click the image below to begin the download process
Get Silhouette School lessons delivered to your email inbox! Select Once Daily or Weekly.






.png)


You are amazing! Thanks for sharing your knowledge.
ReplyDeleteWhy do my words keep coming apart and only 1/2 the word or certain letters are going into my nest?
ReplyDeleteWhenever I click on "nest" it shuts down the silhouette studio. Do you know why this happens? And can you suggest a way to fix it?
ReplyDeleteBtw I have the silhouette designer edition.
Nesting has been buggy in several versions of Silhouette Studio. That is likely what is causing the issue for you.
DeleteHello I am looking to try adding word art to a portrait. Have you tried this? If so do you have a video or step by step on how to do this?
ReplyDeleteThe process would be the same no matter which machine since we all use the same software :)
DeleteI am using this process with a heart shape. The words were created in separate text boxes with different fonts but are the same word. When I select the use shape as boundary, my heart turns blue. When I select the boxes then nest, nothing happens. Help...
ReplyDeleteHi there! Did you convert the text boxes to paths before nesting?
DeleteHey, so I did miss that step. It solved the issue!!!
ReplyDeleteThanks
Hello Melissa, I'm having the problem that Priscilla had. I did convert to path before nesting. It's still turning blue. My "nest" button turned a light gray and could not be used as well. Is there another thing I can try to do to resolve this? Thank you
ReplyDelete