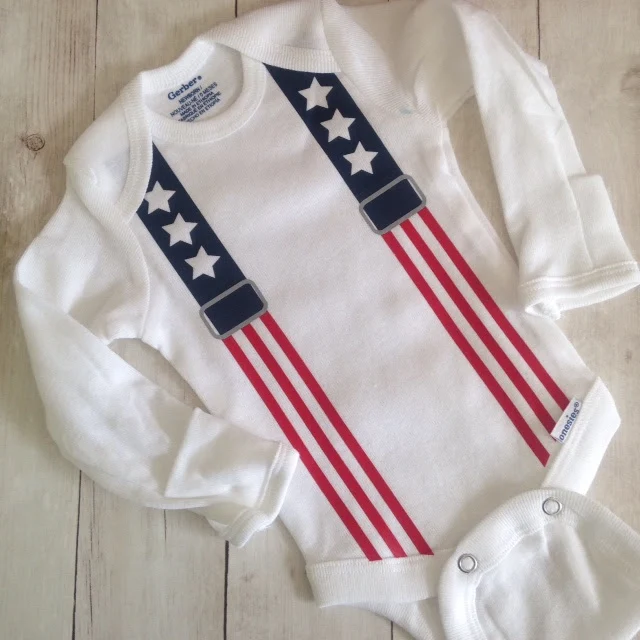
Today I'm sharing a beginner Silhouette CAMEO tutorial on how to design these adorable baby suspenders for Fourth of July. I mean if you're gonna learn to design in Silhouette Studio it may as well be something as adorable as these! Right?! And if you decide you love this process or want to learn more grab a copy of my Ultimate Silhouette Guide to Designing eCourse where you'll be designing like a pro in no time!
Alright so the first thing you want to do is open Silhouette Studio.
You're going to start by using the Draw a Rectangle tool. Simply draw out a long skinny rectangle. The exact size doesn't matter quite yet as we you'll be doing some adjustments later, but just so you know mine is 4.2" x .286".
Now replicate the box four more times...you can either use one of the Silhouette Studio keyboard shortcuts or use the Replicate Tool.
I like to use the Fill Color tool as I design in Silhouette Studio so I can more easily visualize my design so fill rectangles #1, #3, and #5 with red. You can delete rectangles #2 and #4.
Select the stripes and group them all together by selecting around them all > right click > Group. Once grouped, note the size dimensions. (4.21" x 1.43").
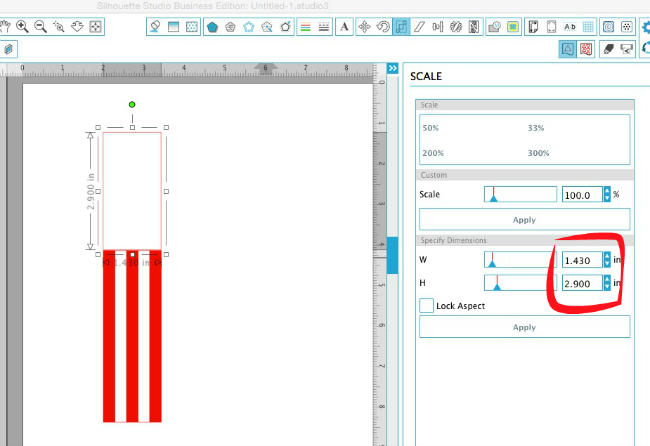
To make the navy part of the suspenders you're going to once again use the Draw a Rectangle tool. This time after you've drawn out the rectangle, select it and click the Scale tool.
Uncheck the "Lock Aspect" box and type 1.43" for the width (W). You want the top and bottom parts of the suspenders to be the same width which is why it was important to note the dimensions of the bottom half.
The height does not need to be the same. I actually wanted the navy part of the baby suspenders to be shorter so I typed 2.9" in the Height box.

Again I used the Fill Color tool to fill in the top section blue....just indicating that's the color HTV I would be cutting on.
For the buckle, you can use the Draw a Rounded Rectangle tool. I wanted the buckle to slightly go over the edge of the suspenders so I drew it out wider than the suspenders...but you can do it however you want.
After you've drawn the initial box, select it and click "Offset" > Internal offset. Adjust the distance as desired and click Apply.
To fill in the buckle as it will appear when it's cut, you need to select both the inner and outer rectangles (careful not to select any of the red, white, or blue pieces) > right click > make compound path.
Select the buckle design and use the Silhouette Studio Fill Color tool to fill to give it a solid fill.
Now it's time to add the stars....this is the hardest part of the entire design.
If you are making the suspenders for personal use only you can cheat and grab a star off another design from your library or trace one.
BUT I really think it's more fun to challenge myself in designing in Silhouette Studio (and it's necessary if selling) so I create my own. The easiest way to do that is to use the Draw a Polygon tool to draw out a 5 sided polygon. (Copy and paste another copy so you have two!) Select one of the polygons right click > convert to path.
If necessary, rotate the polygon so the top side is completely horizontal.
Select the duplicate polygon, and slide the slider bar to the left to 3 to make a triangle. Right click > Convert to Path. Rotate the triangle so the bottom side is horizontal.
Line up the bottom side of the triangle with the top side of the polygon and adjust the size of the triangle. You want the length of the triangle to be slightly longer than the polygon.
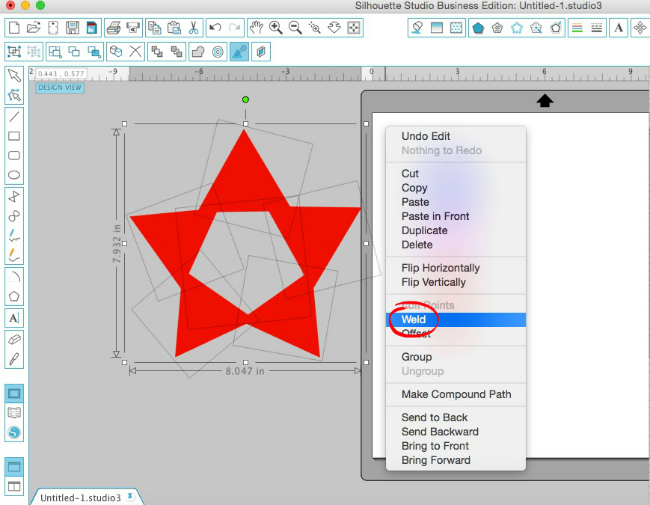
Make four more copies of the triangle, rotating and placing one of the triangles along each of the sides of the polygon. Again it helps to fill your shapes with solid colors so you can more easily see the shape without all the lines. You may need to make a few slight adjustments in the way of rotations, but this will give you a pretty good star!
When you're all done creating the star, select the entire design > right click > Weld....and ta da!!!

Make a total of three copies of the star - but keep them to the side for right now.
Now you want to do your final re-sizing...so grab the onesie and measure the distance from under the top shoulder flap to the leg opening. That should be the total length of your suspenders. For me that was about 10" but when I resized the suspenders to 10" long they were 2" wide which I thought was too wide.
To make it tall and skinny, I grabbed one of the side handles and moved it inward to keep the length the same but adjust the width.
The stars and buckle needed some final sizing adjustments too to make sure they fit appropriately with the rest of the suspenders.
Group the stars and the blue part of the suspenders.
Note: You are not going to cut any of the white elements: stars or stripes! The white areas will be created by the onesie showing through the weeded areas.
The final step in designing the suspenders is to make a duplicate copy before cutting. Even though I cut on heat transfer vinyl I did not mirror the design since it's the same flipped either way!
Separate the pieces by color on the virtual mat and place the same color heat transfer vinyl on the mat covering the same grid boxes on the cutting mat and the virtual mat. I cut Siser Easyweed HTV in navy blue, red, and gray - all from Expressions Vinyl.

Weed out the stars on the navy sections; remove ONLY the second and fourth stripes on the red sections; and weed out the middle of the gray buckle.
Place the blue sections under the top shoulder flaps of the onesies and apply heat and pressure using a heat press or iron. Then add the red stripes. Before applying to the onesie, use scissors to carefully trim the htv/transfer sheet if it overlaps the hem around the leg openings....as you can see mine did in the image below.
Apply the red stripes with heat and remove the carrier sheet before adding the buckle. I covered any bit of gap between the blue area and the red and white stripes with the bottom section of the buckle.
Again, apply the HTV with heat and pressure using a heat press or iron. Flip the onesie inside out and press again.
And you're done with your adorable July 4th baby suspenders!
UPDATE: Short on time? Grab the free Stars and Stripes Suspender Silhouette Studio Design file here. It's free for personal use!
Alright now that I have you in the red, white and blue spirit...how about some other All Star HTV and Vinyl projects?! Check 'em out from some of my favorite crafty bloggers! And...don't forget to scroll down because that's where you'll find the amaze-balls giveaway!
- Patriotic shirt by Pitter and Glink
- Treat boxes from a Kailo Chic Life
- Wall art from Sweet Rose Studio
- Easy Diy shirt from A Crafted Sparrow
- Star vinyl sign from Crafting in the Rain
- America Pillow from Kiki & Company
- Land that I love from 733 blog
- 4th of July Smores kit from A Pumpkin and a Princess
- Firework Tank from Artsy Fartsy Mama
- Festive Popsicle bucket from Doodlecraft
- Polka Dot Mason Jar from MM Scrap Shoppe
- Little Sparkler shirt from Made to be a Momma
- Star Confetti Balloons from Sugar Bee Crafts
- Embroidery Hoop America from A Girl and a Glue Gun
- Suspender Onesie from Silhouette School
Note: This post may contain affiliate links. By clicking on them and purchasing products through my links, I receive a small commission. That's what helps fund Silhouette School so I can keep buying new Silhouette-related products to show you how to get the most out of your machine!
Thanks for coming to class today at Silhouette School. If you like what you see, I'd love for you to pin it!

Get Silhouette School lessons delivered to your email inbox! Select Once Daily or Weekly.


.png)


You are brilliant. Wow!!! Thank you for this design. Don't know if I can do this but will try.
ReplyDeleteMerci Mélissa,
ReplyDeleteBises de France
LOVE LOVE LOVE It! But would like to ask your advice on how to get a good press on the top of the shoulders. (I went back and read your past post about heat presses and onsies), but that was for below the shoulders.
ReplyDeleteThanks!
This is such a great idea and tutorial. I hope you don't mind if I try to duplicate it: LOL!
ReplyDeleteHow can O email you with a question???
ReplyDeleteThis is a great guide and I will definitely use it!
ReplyDelete