The tiles are 24" x 6" and they come in a bunch of different colors and finishes. While they look like wood...they're not wood at all. They're actually 100% ceramic tile...like you'd use on the floor (actually I have used them on the floor...and on my builts-in as decor.) I get them at Home Depot and the great thing is you don't have have to buy a whole box of tiles, you can buy them individually - for about $2.50 each! These are just a few of the fabulous options....
Are you seeing the beauty in this yet: buy faux wood tile + add vinyl. Wham bam thank you ma'am you're donezo!
Now let's talk about designing for these. I've done several several different designs on these tiles, and I always do the designing in Silhouette Studio the same way. Start by making a mock up. This tutorial explains in depth about why mockups are hugely important for designing so if you need a refresher check that out. Otherwise, I'm going to breeze through the mockup design steps.
- Use the Draw a Box tool (circled on left sidebar) to draw a box.
- Size it so it's the exact dimensions of the tile using the Scale tool (it's actually slightly less than 24" to account for the grout if you were using it on the floor, but close enough)
- (Optional) Fill the rectangle with a wood grain pattern from the Fill Pattern tool
- Open up the design from the library (or create a new design) in Silhouette Studio. Using the box representing your tile as a guide, appropriately position and size the design.
My mom loves to ride her bike so I made this Life is Good sign for her and that's the one I'm going to demonstrate this tutorial with. (I created the design by just grabbing a bike I had in my library and typing the text around it...you may need to ungroup the letters to arrange around the bike.) I've also put longitude and latitude coordinates on tiles (see below). You can find the longitude and latitude coordinates of any place by plugging the address in to this website.
Whatever you decide to put on your wood look tile, use the mock up to size the design so it fits on the tile.
It's best to cut on permanent adhesive vinyl because it sticks to the tile easiest. The issue I have run into is that, for this project specifically, I like a matte vinyl (not glossy) and as you probably know most matte is indoor vinyl. BUT....there happens to be this thing called matte 651/permanent/outdoor which comes in only black and white. Seriously, it's like my favorite vinyl ever. Since I think these tiles look best with black or white anyway, I was in luck.

Cut your design and weed it. A 24" cutting mat makes this much easier, but if you don't have one you can cut the vinyl without the mat to avoid cutting it in sections on a smaller mat.
Just remember, since you're cutting longer than the standard 12x12 you'll need to change your Page Settings.
If you're using the 24" mat, change the height to 24" and from the the Cutting Mat drop down menu select 12 x 24 in.
If you're cutting without the mat (or on a Portrait which has no 24" mat), enter the length of the vinyl in the "Height" box and then change the Cutting Mat option to 'No Mat."
To add the vinyl to the tile you want to make sure the tile is at room temperature. A really cold tile makes it very difficult for the vinyl to stick.
It's easiest to use the hinge method to apply the vinyl to ensure it's straight, centered and even. If you're not familiar with the hinge method - your
You can use clear transfer tape or transfer paper for this. Whichever you use, de-sticky it a little by blotting on a clean cotton shirt or the arm of the couch.
Basically what you want to do is put the transfer tape onto the vinyl. Leave the vinyl backing in place. Trim down the edges of the vinyl backing and tape so they're even and so they're close to the vinyl design.
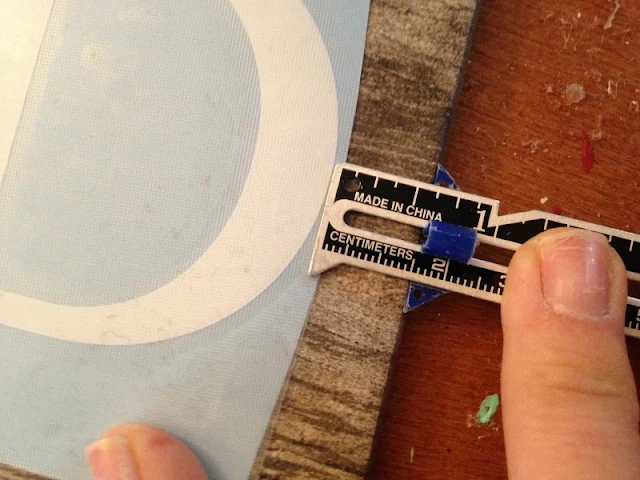
Place the vinyl sandwich (tape on top, vinyl in the middle, vinyl backing on the bottom) onto the tile. Now you're going to grab some painters tape, scissors, and a ruler and keep them nearby. If you have a sewing gauge ruler (my favorite ruler ever) you are golden. Measure in from the sides, top and bottom to perfectly position the design.
I apologize for the odd angle on this....I definitely could have used a third hand.
Use the ruler to double check that the vinyl decal didn't shift at all while you were taping. If it did, life one end up of the tape and slightly nudge the design back so it's even.
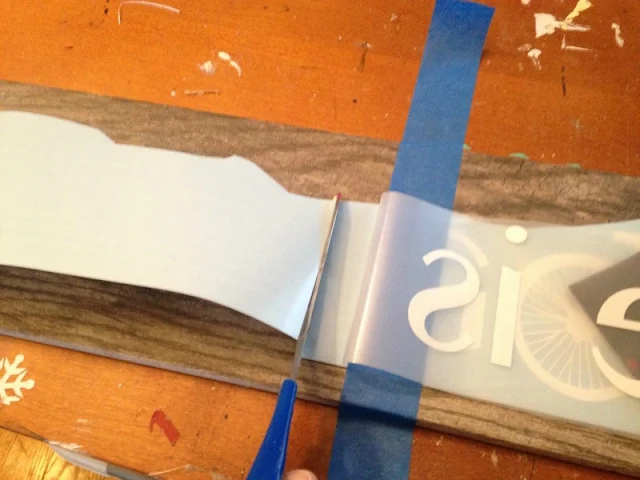
When you get it perfectly in position, peel back the transfer tape on one side of the tape. The tape will stop it about half way across - that's the hinge! The vinyl should peel up with the transfer tape.
Use your scissors to cut the vinyl backing, near the tape hinge. Don't worry if it's not right at the tape line.
Remove the tape hinge. The transfer tape is going to keep everything in place now.
Lift up the other half of the transfer tape, just enough so that you can remove the half sheet of vinyl backing that remains.
Again, lay down the transfer tape with vinyl onto the tile.
Now burnish the entire design onto the tile using the Silhouette Scraper or a credit card.
Starting at one of the corners, slowly peel away the transfer tape or paper. You may need to slightly encourage the vinyl to stick to the tile as you peel back the tape. After the tape is remove, go back and really burnish the vinyl onto the tile so you can slightly see the ridges of the tile through the vinyl. I do this with my finger.
The last thing you want to do - and this is optional - is to put a thin protective layer of cork on the back of the tile. I glue it on with the industrial strength E6000 and then use an Xacto knife to cut the roll away.
 This is it if you're planning on leaning your faux wood tile on a shelf or mantel.
If you'd like to hang your vinyl and fake wood sign, use E6000 glue to attach two D hooks - one on each side. Let them set for at least 24 hours - preferably with a clamp or something really heavy on top. Then add your piece of 1/16th" cork roll to the back to protect against scratches. Flip the tile back over and carefully place something heavy on top for another 24 hours to let the glue dry.
That's it - you're ready to hang your wood look tile!
Note: This post may contain affiliate links. By clicking on them and purchasing products through my links, I receive a small commission. That's what helps fund Silhouette School so I can keep buying new Silhouette-related products to show you how to get the most out of your machine!
Thanks for coming to class today at Silhouette School. If you like what you see, I'd love for you to pin it!

Get Silhouette School lessons delivered to your email inbox! Select Once Daily or Weekly.


.png)


OMGosh. Amazing. I know what I am doing for people for Christmas. Great tutorial and exact step by step instructions make it so even a newbie like me can do this.
ReplyDeleteLove this post!!! You explain everything in detail which helps so much, thanks for all your hard work!!! I would love to put a couple together, to make 12" wide...do you think that would be possible?? THINKING THINKING THINKING how to LOL
ReplyDeleteI would love to know if this were possible. I'm sure it will be very heavy and wouldn't be able to hang on the wall but very cool idea. I wonder if you could paint on these tiles or just use vinyl?
DeleteI would love to know if this were possible. I'm sure it will be very heavy and wouldn't be able to hang on the wall but very cool idea. I wonder if you could paint on these tiles or just use vinyl?
DeleteGreat, detailed instructions - I love these "wood" signs!
ReplyDeleteYou've just changed my life!! I can't wait to make some Thanksgiving and Christmas "wood" projects!
ReplyDeleteThanks, the instructions are very detailed. I love anything that looks like wood.
ReplyDeleteOh this is such a great idea! THANKS for all the detailed instructions - I can't wait to get started on Christmas and wedding gifts doing these!!
ReplyDeleteBefore seeing this, my husband and I went to Lowes to look at pine boards for signs. We found these floor tiles but they wouldn't sell just a few. You had to buy a carton! Darn, should have gone to Home Depot!!! I enjoy and appreciate your time doing the Silhouette School!
ReplyDeleteThese types of factors consist of the sort of flooring to get included, tile wet saw reviews how much targeted visitors the bedroom becomes, precisely how the room is employed, along with the room' position. Tiles range in their shapes, models as well as in their hues.
ReplyDeleteLove it! Where did you get the bike file? I need it for a friend!!
ReplyDeleteHowever, In your search for a good in addition to right tile saw, ensure that to help get in bank account your current tile saw water pump.
ReplyDeleteThis comment has been removed by the author.
ReplyDeleteJust really love it! You shared very useful tips, together with clear pictures. Thanks!
ReplyDeleteAwesome! Arabtec Construction Machinery was incorporated in the year 2010 as a “Construction Equipment” solution provider.Our diversified activities continue to grow to match with the vibrant growth of Global Economy. كسارات
ReplyDeleteThese days, many people are considering designed timber made symptoms as very special especially when placed in houses and companies. An outstanding timber indication at your home's entrance can bring about a traditional sensation.
ReplyDeleteThanks for this - it definitely makes woodwork seem less complicated as it is! I'd probably give this a go as a gift for my parents' anniversary.
ReplyDeleteLove it!! Thanks for all the wonderful tips!
ReplyDeleteYou always have such awesome ideas! I am going to get me some wood tiles (even though I actually love the wood prepping part).
ReplyDeleteGreat sruff
ReplyDeleteThank you for these instructions.I tried it and it worked like a charm. I, also, love inspirational words around my house. I might just go a little overboard with this. Thanks again.
ReplyDeleteI really like your blog, it looks very
ReplyDeleteAs of late, lots of individuals are thinking about specially designed bushes constructed warning signs mainly because rather exceptional especially when set real estate together with agencies. A great bushes warning sign and your living room's top can lead to an authentic impression.
ReplyDeleteVery informative and impressive post you have written, this is quite interesting and i have went through it completely, an upgraded information is shared, keep sharing such valuable information.compact miter saw
ReplyDeleteBest post
ReplyDeleteI have also seen "wood look" vinyl tiles and "marble look" vinyl tiles with adhesive on the back. Essentially you would peel and stick to the floor - but you can just peel/stick to an easel back. Even better than these ceramic tiles because 1) they are lighter 2) don't break if they do fall.
ReplyDelete