I got my glass block and the light (that I decided not to use) at AC Moore - a craft store in my area. Glass blocks in come different sizes, so start by measuring your block. I used the dimenions inside the lip of the block because I didn't want my vinyl on that curved area.
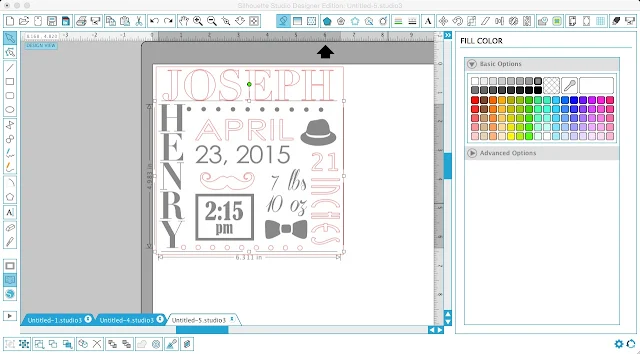
Once you have your dimensions - mine was 6.5 x 6.5" - open up Silhouette Studio.
Use the Draw a Box tool to draw out a box in that same dimension. This is just so you know your restraints while you're designing.
Now create your design. I went with a hipster/little man theme in the subway style for the birth stats - mixing different fonts for the look.
All of the graphics - the hat, mustache, and bow tie - are from a commercial friendly vector pack I purchased on Mighty Deals. They're all free for commercial use too, so I could sell this same design as long as I changed up the fonts to ensure they were commercially available too. Read the in depth tutorial on turning vector images into cut-able files here.
The two lines of polka dots were just straight lines that I changed into rhinestone designs and then spaced out so there was some distance between the dots. Read the tutorial on creating polka dot shapes here.
Once you have the design all ready you can do two things: delete the outer square and decide if you're going to cut on one or more colors of vinyl.
I decided on two. I think the best way to do this is the actually fill in the design elements in Silhouette Studio using the Fill Color and Line Color tools so you can 'see' what the finished design will look like.

This gives you the chance to make adjustments before you cut and realized 'oh wait there are too many blue elements together.'
After you assign each element a color, group the like-color elements together. If you have Designer Edition, you can easily do this with the Select by Color tool. If not manually select all like color designs > right click > group. Repeat with all of the color groups.
Finally, add registration marks (squares above the design in the screen grab above) at the top of the design. Select the registration marks and the first color group > right click > copy > paste > GROUP (reg marks and color A).
Repeat with the rest of the colors.
By the time you're finished you should have something like this....
Now you're ready to cut. You can really use indoor or outdoor vinyl. I prefer matte vinyl when I can use it so that's what I went with. The dark gray and blue are both indoor/matte 631 from Expressions Vinyl.
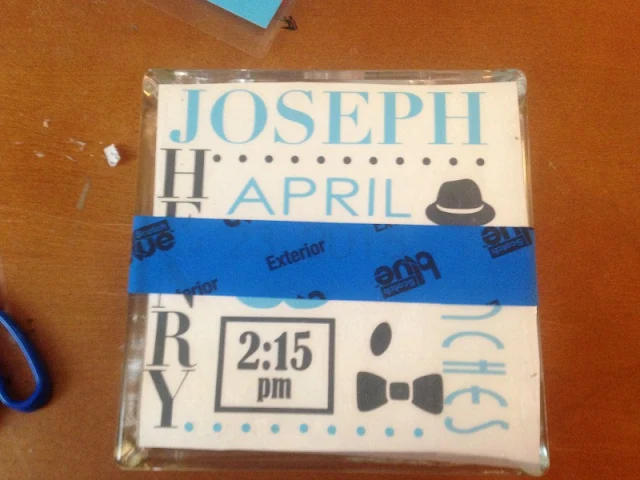
After I cut and weeded this is what I ended up with...

Note I lost the weight while weeding...the font was too thin. I ended up re-cutting just that piece with an offset and added it at the very end after the rest of the vinyl was already on the glass block.
Now you're going to layer the two vinyl colors together using the registration marks. I have explained this method in great detail here and here and here so I'm going to quickly go through it.
- Weed both sections of vinyl including the registration marks
- Use a large piece of transfer tape to pull up one section (I did gray)
- Remove the vinyl backing, but keep it to cover all but the registration marks of the other piece of vinyl to protect it from getting stuck to the top piece before you're ready
- Place the other section of vinyl on the cutting mat so it's not moving around
- Line up the registration marks of both colors of vinyl so they're stacked on top of each other (I turn the designs so the registration marks are closest to me/upside down)

- Remove the vinyl backing protecting the bottom layer
- Lay down transfer tape to pick up the bottom layer and create one design
- Pick up both sections of vinyl (or keep the glass block vinyl decal on the backing until the next step, if you're using the hinge method to apply the vinyl)
- Place the vinyl decal on the block - paying special attention to where the block opening is. I put the opening at the top since I was making a piggy bank (Use the hinge method to apply vinyl if you prefer - using that same piece of vinyl backing)
Remove the transfer tape slowly, starting at a corner, and you're all done!

Note: This post may contain affiliate links. By clicking on them and purchasing products through my links, I receive a small commission. That's what helps fund Silhouette School so I can keep buying new Silhouette-related products to show you how to get the most out of your machine!
Thanks for coming to class today at Silhouette School. If you like what you see, I'd love for you to pin it!

Get Silhouette School lessons delivered to your email inbox! Select Once Daily or Weekly.


.png)


Thank you, Melissa. I have been hesitant to try the Vinyl, but your tutorial is very informative, so I think that I will experiment soon.
ReplyDeleteVery cool idea! Thanks for sharing the layering of vinyl tips. Mind blown! I just struggled with eyeballing an image a few weeks ago! So frustrating! Also, where did you get the piggy bank version of the glass block?
ReplyDeleteWhat font is the word inches?
ReplyDelete