The first thing you need to do to turn your vector graphics into Print and Cuts is to import the vector image into Silhouette Studio. I went over this process in great detail in this tutorial so I will breeze through it here, but if you need a refresher check this Silhouette School tutorial out.
- Download Vector package from Mighty Deals or other location
- Navigate to downloaded file
- Unzip folders
- Find .jpeg version of vectors you want to use
- Drag and drop jpeg image onto desktop
- Drag and Drop jpeg from desktop into Silhouette Studio work space
You can see that all of the July 4 graphic are in one large jpeg image. Not only do we not want that, we only want a small portion of certain squares. So....zoom into the area you want to turn into a print and cut.
NOTE: This tutorial works on other file types as well. The technique works great for any image that needs to be removed from it's background.
Usually we would uncheck the high pass filter box to trace, but in this case we are going to leave it. Move the high pass filter value bar to the right to increase the number. Now you can see the yellow area fills in but it does not turn the background area yellow.
If you selected 'trace' here you'd get a box cutout. That's not what we want. We ONLY want the yellow area so you actually want to select Trace and Detach.
The trace area will disappear and it will look like nothing happened, but if you move the BACKGROUND over the traced area will be left behind. Don't move the traced area because you'll only end up grabbing a piece of it and not the entire design which is all in separate pieces right now.
Now group the design together.
You'll notice that some of the small areas still have the original background color - such as the inside areas (counters) of the letters. We'll get around this in just a second.
Now let's get ready to add the cut lines.
For some images, like this 'Best Summer' design which I traced and detached from it's background, it will work to click "cut edge" at this point. So you can simply move forward like a regular print and cut.
However, for our America design there are too many individual pieces in the design for a print and cut since we need them to be one unified design.
So what I need to do is put an offset around the entire design. Select the design > offset > change the offset distance so it's large enough that it automatically welds together and you get one solid background piece. You'll know it will auto-weld when all areas have overlapping offset areas as indicated by the green arrows. (When you click "apply" all those overlapping lines will be welded together and you'll have one solid background pieces.)
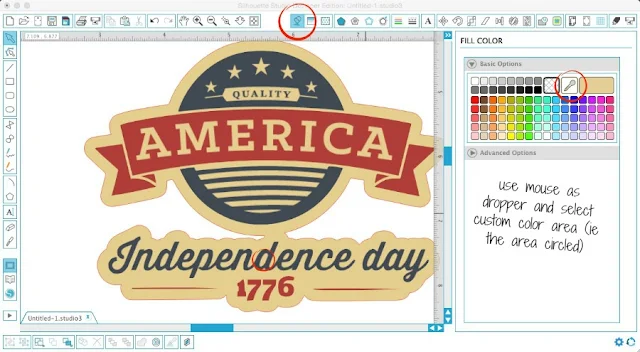
Select the background only and from the Fill Color tool use the dropper to select that little tan area between one of the letters. That color will then fill the entire offset area.
Group the design and the offset together immediately so they don't get moved out of place.
Select the design and go into the Cut Settings window. Select "Cut Edge."
Repeat with all of the vector images you want to turn into print and cuts.
If you have little areas like the 'islands' above the 'g' in 'high' or below 'quality', you can temporarily release the compound path on the offset layer > select the areas by clicking > delete > put the offset back in position > re-group offset and design.
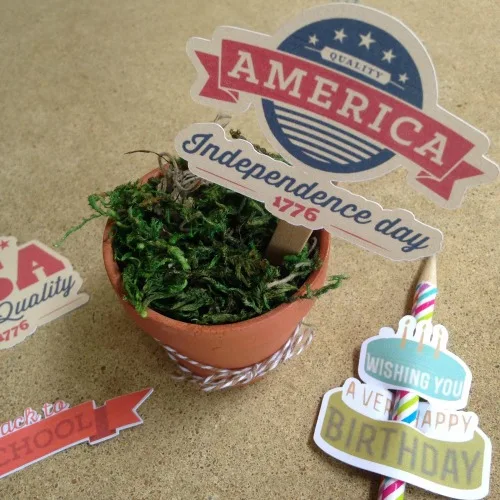
I did a few other designs just so you could see what different vectors from this same Mighty Deals package would look like. Again, not all of the vectors are going to trace or trace perfectly as they are - but I will address that issue in another tutorial.
From here you can move forward like a regular print and cut job: Add the registration marks, adjust the page settings to fit your printer and then print...and cut.
Isn't print and a thing of beauty?
You can use these in so many ways - think table decorations, cupcakes toppers, stickers (print on sticker paper instead of card stock), pencil wraps (add two cut lines in Studio to slide the pencil through)! Get creative...you have a beautiful set of graphics to use (and sell) - use them!!
Note: This post may contain affiliate links. By clicking on them and purchasing products through my links, I receive a small commission. That's what helps fund Silhouette School so I can keep buying new Silhouette-related products to show you how to get the most out of your machine!
Thanks for coming to class today at Silhouette School. If you like what you see, I'd love for you to pin it!

Get Silhouette School lessons delivered to your email inbox! Select Once Daily or Weekly.


.png)


What printer did you use here?
ReplyDelete