Hello, I'm Pam from GetSilvered and it's great to be guest posting here at the Silhouette School Blog while Melissa and her family are on holiday. I hope you're having a fabulous time Melissa and thanks for having me :)
Today, I'm going to show you how to create your own stand-out words with the Designer's Edition of the Silhouette Software.
However, don't worry if you don't have Designer Edition, as I've got you covered too. Read on past the tutorial and follow my links to get Free Silhouette Cut Files for the entire Alphabet and the numbers 0-9.
The benefit of using Designer Edition and following along below to make your own cut files, is that you are not restricted to one font. You can choose any suitable font you like.
Let's get started.....
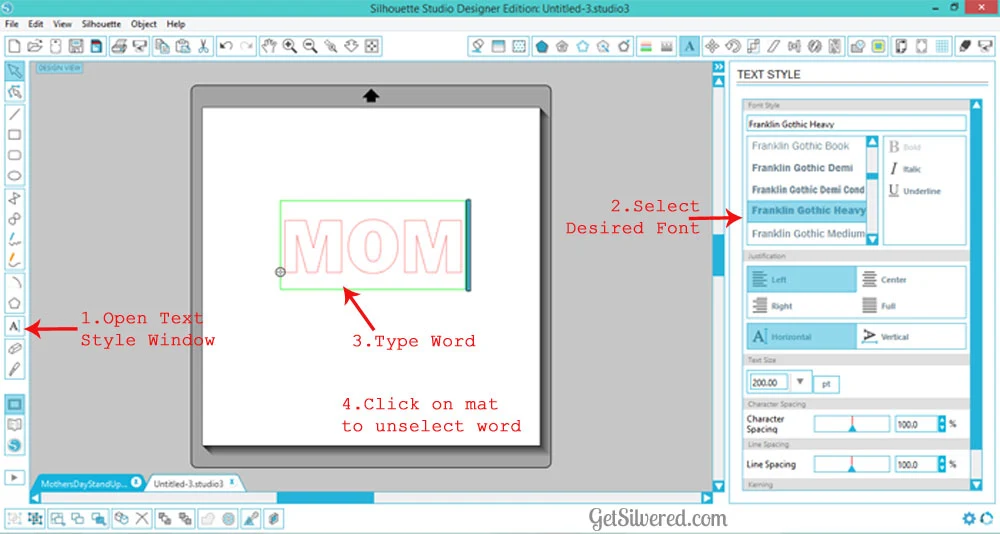
- Open Silhouette Studio and select the Text Style Window
- Select the font you wish to use. Pick one with a bit of weight to it and without any descenders on the letters you wish to use. Upper case letters work really well. {I used Franklin Gothic Heavy}
- Type your word.
- Click somewhere on the background in an empty area, which will deselect the word.
- Optional: If you wish to weld a little shape to a letter (like the heart in my sample photos), do it now.

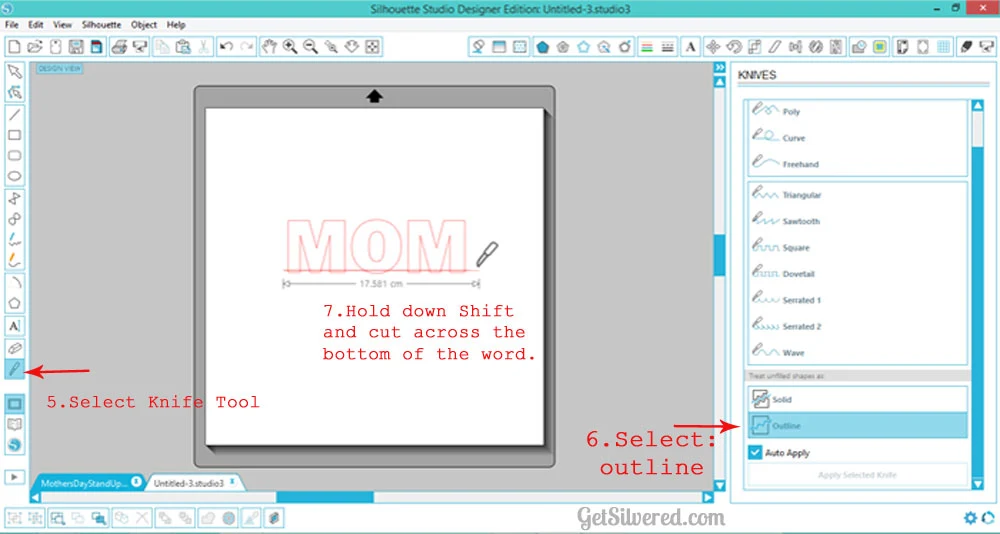
- Select the knife tool
- In the knife tool settings, select: Outline (this is only a DE option)
- Hold the Shift Key down, and slice off the very bottom of the word. The shift key keeps the line straight.

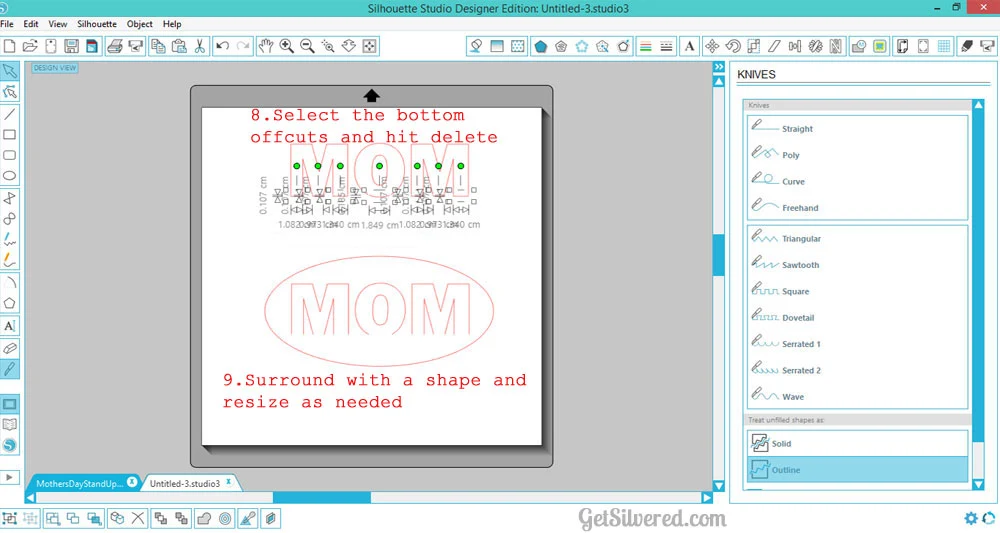
- Select the "offcuts" and hit delete.
- Surround the word with a shape from your library or draw one with the drawing tools.
- Align, group together and resize to suit your project.

When you've cut out your shape, just fold the letters up from the background to form a crease, so they stand up.
Options
Your word is ready to decorate your Gift wrap or other projects as it is - I added the weeded cut out from the letter "O" to the background to finish off the negative space.For added interest, you could pop a contrast color paper to the underside of the shape so it peeks out through the negative spaces. I left mine with just the plain pink wrapping paper showing through.
Here's a bird's eye view:
I've decorated gift wrap but these would make fun table place name cards too or use the numbers to decorate for birthdays and anniversaries. I'm sure you'll find plenty of uses for this technique.
No Designer Edition?
No worries ........ I'm sharing my cutting files which use the Franklin Gothic Heavy font: follow the links to download the complete Stand Up alphabet. If you're after numbers instead - here they are.Once you have the files, copy and paste the letters or numbers into a new file to make up your word, then group and align everything, surround it with a shape, resize and cut! Easy :)
I hope you enjoyed my tutorial today and do drop by and visit me at any of the links below.
Thanks again Melissa, it's been fun sharing this "How to" with your readers.

Note: This post may contain affiliate links. By clicking on them and purchasing products through my links, I receive a small commission. That's what helps fund Silhouette School so I can keep buying new Silhouette-related products to show you how to get the most out of your machine!
Thanks for coming to class today at Silhouette School. If you like what you see, I'd love for you to pin it!


.png)


Beautiful....but what I don't understand is what part of it is DE specific. The knife tool with the outline option cutting a straight line is in the basic edition also. Pls enlighten me if I'm missing something here. Thanx
ReplyDeleteHi Mint.
ReplyDeleteThanks for your comment.
I don't have the basic edition anymore but when I switched over from basic to DE (admittedly a long while back) I remember thinking what a great "new" tool feature the outline option was.
If the outline knife tool is available in the basic software then that's great news as this tutorial will apply to everyone not just DE owners :)
Cheers
Pam
http://www.getsilvered.com
yes its there in basic edition too...thanx for this. cheers
DeleteLove this tutorial and have already made some things!!
ReplyDeleteThat's awesome hooviedoovie, Glad you could use it!
DeleteCheers
Pam www.getsilvered.com
Thank you cant wait to try this i can see this as place markers
ReplyDeleteGreat use for it Mary May :)
DeleteCheers
Pam
www.getsilvered.com
This comment has been removed by the author.
ReplyDeleteI am missing something my letters cut out
ReplyDeleteGot it I was filling my letters
ReplyDeleteGlad you got it sorted Mary May :)
DeleteCheers
Pam
www.getsilvered.com
Love this! Where did you get the Franklin Gothic Heavy font from?
ReplyDeleteSue
Hi Sue, The Franklin Gothic Heavy has always just been one of the default fonts on my computer. Hopefully it'll be on yours too!
DeleteCheers
Pam
www.getsilvered.com
Thanks Pam--unfortunately my computer has only the medium Franklin Gothic but that's ok--I am searching on Dafont.com for one close to the look.
DeleteThis comment has been removed by the author.
ReplyDeleteThis comment has been removed by the author.
ReplyDeleteI'm doing something wrong. I get as far as highlighting the "offcut" but when I hit delete - nothing happens!! I tried and tired but was not able to delete the portion I cut with the knife. What am I doing wrong?????
ReplyDeleteHi Gerry,
ReplyDeleteSorry for the delay in replying.
Not sure why it isn't working for you but I'm assuming you are using the Designer's Edition - right? The knife tool must be set to "outline" before you cut. If it is, are you cutting completely through the letters in one knife stroke? That's all I can think of off hand. If that doesn't help feel free to send a screenshot via my site and I'll see if I can work it out from that. Cheers Pam
Thanks for the tutorial. Great idea. I wanted to first fill my letters with color so I could see them better but that made it where it didn't cut the lines. It took me a while to figure out that I had to leave the letters as just red lines.
ReplyDelete