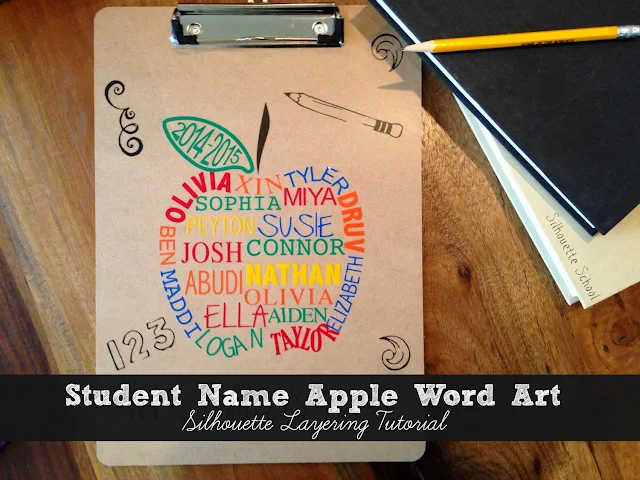
I previously showed you how to design a custom apple word art with students' names in Silhouette Studio...and today I'm going to show you how to cut and layer that design.
The same process applies to any layered adhesive vinyl design, so don't worry if you don't have an apple. If you're a beginner, don't be scared by the number of steps here - you know me: I just break everything down into simple easy to follow steps!
This is one of those cases where filling the design elements with the color vinyl you are going to cut on is not only helpful, but necessary. In this method of layering vinyl, we're going to use layering registration marks and the Cut By Fill color.
This is one of those cases where filling the design elements with the color vinyl you are going to cut on is not only helpful, but necessary. In this method of layering vinyl, we're going to use layering registration marks and the Cut By Fill color.
In the work area, start by creating the registration marks - not the kind for print and cut - the square kind that will allow you to line up the design perfectly. Use the Draw a Square tool to draw out two squares above the design.
Fill the registration marks with a color that's NOT in the rest of the design. In this case, I used a black fill
for the registration marks.
Each color will be cut separately, but every layer will be cut with the registration marks. This ensures the registration marks will be in the same relative location on every layer....as long as the design nor the registration marks are moved during the cutting process.
I'm going to warn you..there's some wasted vinyl involved here. It's mostly due to the placement of the registration marks. There's no easy way around it if you want to assemble this multi color vinyl decal perfectly.
How to Cut By Fill Color in Silhouette Studio
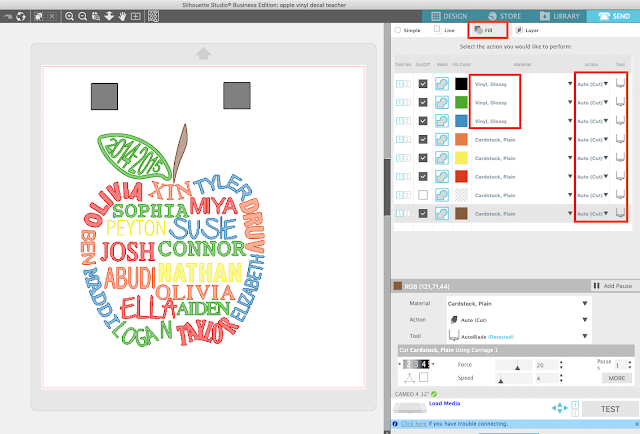
Move to the Send panel in Silhouette Studio. Instead of cutting in Simple mode, which is the default, click "Fill."
Every color swatch you see here matches a color you used to fill a portion of your design.
Make sure the cutting machine is plugged in, powered on, the blade is in the carriage, and the correct machine has been selected from the Machine List in the Send panel. If you are using a CAMEO 4 or Portrait 3, by connecting the machine now the Tool and Action should be automatically selected.
Now you need to make a few adjustments to this list:
- Change the Material to match the type of material you are cutting on - in this case "Vinyl, Glossy"
- If you are using a machine other than a CAMEO 4 or Portrait 3 you will need to also manually adjust the Tool and Action
You'll also need to uncheck or turn OFF all color boxes except those you want to cut immediately.
The black layer is the registration marks and needs to be cut with every single layer so you want to always keep that box checked. The other boxes will be toggled on and off as you move through cutting the layers.
Since we are starting with yellow, you want to uncheck (turn Off) all boxes in the list with the exception of Yellow and Black. Keeping those boxes checked keeps those cut lines On.
Load the mat with the yellow vinyl into the machine and click Send to cut.
When the yellow layer is finished cutting, return to the Send panel and uncheck the Yellow box.
Now check any other box to cut another layer - here I'm going to cut green. Don't forget to keep the black box checked so the registration marks cut with the green layer too.
Load the coordinating vinyl sheet into the Silhouette CAMEO and send it to cut.
Repeat until all the layers are cut.
How to Assemble a Multi Colored Vinyl Decal
Weed all of the cut vinyl after every layer is cut.
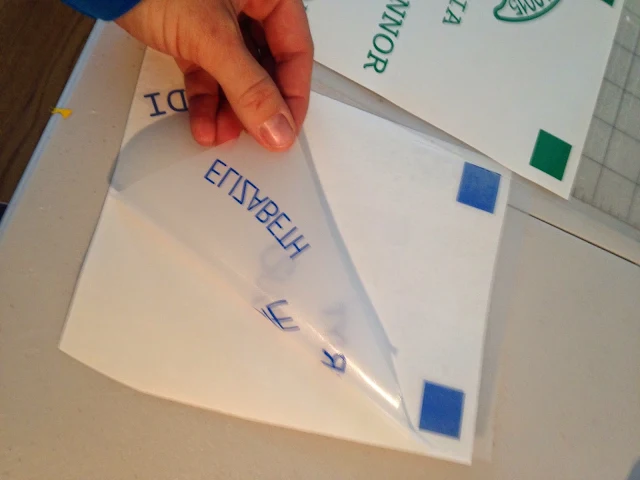
Cut a piece of clear transfer tape that's larger than the fully assembled decal (or larger than the largest piece plus the registration marks). Working with just one layer/color, lay the transfer tape down nice and flat so it covers the names and the registration marks, as I did on the blue piece below.
Grab another one of your weeded vinyl designs and place it on your mat just to keep it in place (green).
Take the leftover backing from the first piece of vinyl (blue) and lay it over the second piece of vinyl (green) - with the waxy side up. Cover everything except the the registration marks. This piece helps prevent the vinyl designs from sticking together before you're ready.
Next, take the transfer paper with the vinyl stuck to it (blue) and line up the registration marks on it with the registration marks that are on the vinyl piece (green) that's on the mat.
I find it easiest to work if the registration marks are closest to me so I turn my pieces upside down. The registration marks should be "stacked" on top of the first set.
When you get them exactly right, slide out the vinyl backing protective piece and lay down the registration tape/vinyl on top of the second color of vinyl. See how the blue and green names go right into place?
Use that piece of transfer tape to pull the two colors of vinyl up off the backing.
Now put the third color vinyl piece on the mat and repeat the process continuing to pick up the different color vinyl sections onto the same piece of transfer tape as you go.
Keep doing this until you have all of the vinyl layered into one design. When it's all done, you can peel or cut the registration marks off the transfer tape and place the design onto the surface where you are placing it.
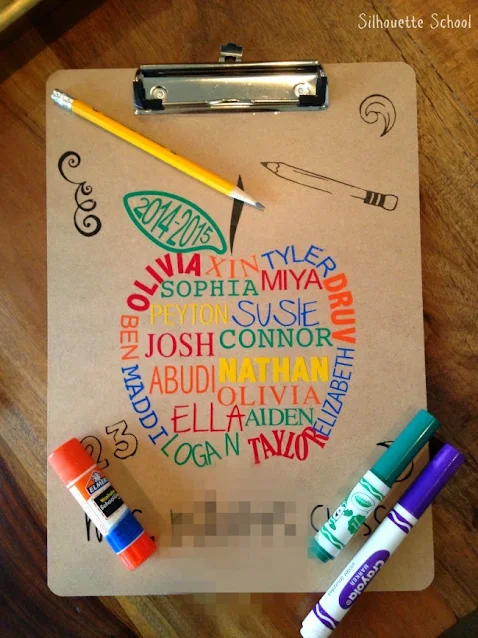
You can place this decal on so many different surfaces. I went with clipboard because I figured it would be cute both hanging on the wall and be useful for my daughter's teacher!
I also added some vinyl doodles and the teacher's name to complete it!

Note: This post may contain affiliate links. By clicking on them and purchasing products through my links, I receive a small commission. That's what helps fund Silhouette School so I can keep buying new Silhouette-related products to show you how to get the most out of your machine!
Thanks for coming to class today at Silhouette School. If you like what you see, I'd love for you to pin it!
Use that piece of transfer tape to pull the two colors of vinyl up off the backing.
Now put the third color vinyl piece on the mat and repeat the process continuing to pick up the different color vinyl sections onto the same piece of transfer tape as you go.
Keep doing this until you have all of the vinyl layered into one design. When it's all done, you can peel or cut the registration marks off the transfer tape and place the design onto the surface where you are placing it.
You can place this decal on so many different surfaces. I went with clipboard because I figured it would be cute both hanging on the wall and be useful for my daughter's teacher!

Note: This post may contain affiliate links. By clicking on them and purchasing products through my links, I receive a small commission. That's what helps fund Silhouette School so I can keep buying new Silhouette-related products to show you how to get the most out of your machine!
Thanks for coming to class today at Silhouette School. If you like what you see, I'd love for you to pin it!


.png)


The rafflecopter is not asking for our instagram names to confirm that we actually followed all of the bloggers. Just to confirm to cover my butt, my instagram name is @krafteezkreationz and I followed everyone listed in the contest. Thanks for the giveaway!!
ReplyDeleteWonderful gift idea! Thank you for sharing the tutorial!! Instagram name is @txtwigrl. Thank you for the chance to win!
ReplyDeleteWould love to win this.
ReplyDeleteJust finished my first one....one more to go! It was tedious, but the finished project looks AWESOME!!! I'm @hollydaycreations on Instagram, but it stopped letting me follow people. :(
ReplyDeletewhat if I don't want to use the decal right away? Is there an alternate backing I can place it on to save and use later?
ReplyDeletein this example, what are the dimensions of your apple?
ReplyDeleteDoesn't this waste a lot of vinyl?
ReplyDeleteYes it can, depending on the design.
DeleteThank you for the amazing tutorials! I followed these to make a heart shape with names - it was a lot of work but it looks great!
ReplyDelete