Did you ever purchase a design from the Silhouette Design Store and when it comes into Silhouette Studio it looks absolutely NOTHING like the preview image in the store? First off - it's not in color, but instead a bunch of cut lines and secondly it's about 18 different pieces and who knows what goes where.
Being able to look at that preview image while working in Silhouette Studio is extremely helpful. Unfortunately there's no easy way to do this without flipping back and forth between windows....until now.
There are a few steps involved here so just follow along and soon you'll be able to get a preview right into your work area. If you'd prefer a video tutorial, you'll find that at the bottom of the written instructions.
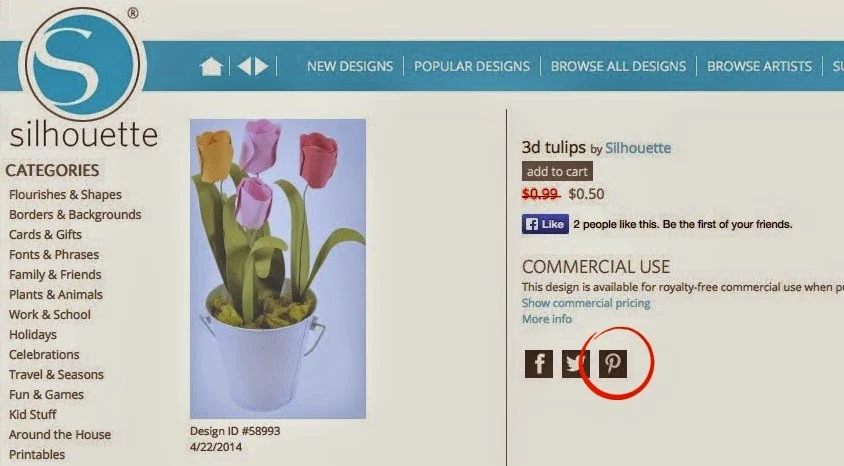
Let's take this 3d Tulip design, for example. This is the preview you see in the Silhouette Design Store (as well as in your library after purchase and download).
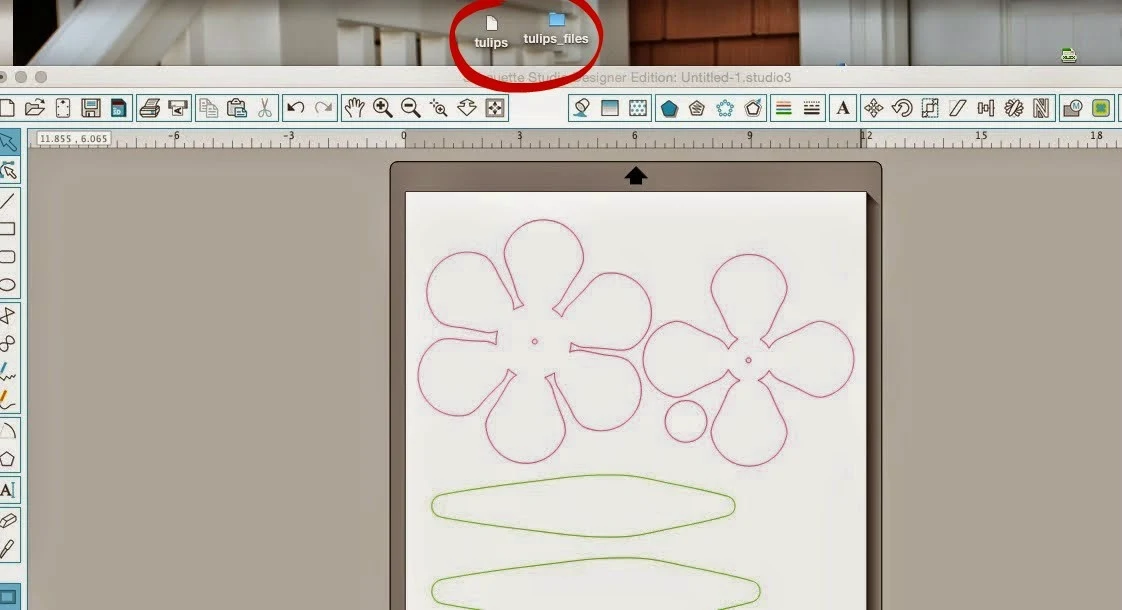
But when you double click the file to get it to open in Silhouette Studio it comes in like this...
The problem is if you want to go back and see what the finished project is supposed to look like you're constantly flipping back and fourth between windows. So...this is where this little trick comes in handy.
If you're on a MAC follow these steps. If you're on Windows (or if this method won't work for you for some reason)...see below at the *
Go back to the Silhouette Design Store and find the design again. Double click it so it opens up like you're going to download.
Select the image...you won't be able to right click, but you should be able to draw a box around the image to select it. It will turn a shade of blue.
Two things will be saved a file and a folder.
Double click the folder to open it.
There's a whole bunch of junk in there...but among them will be a .gif image of the thumbnail preview. Select it and drag and drop the image into Silhouette Studio.
Method 2
(You must have a Pinterest account to do this)
Go to the Silhouette Design Store and double click the design so it opens to the preview. Click on the "Pinterest" icon to the right of the preview image.Pin the image to a board.
Once you've pinned it, click the red "See It Now" bottom.
Drag and drop the image onto your desktop.
Now from the Desktop drag and drop the image into the work area in Silhouette Studio.
Once it's in Studio you can use the preview image several different ways:
- To help determine what color paper pieces should be cut (definitely a plus for designs with lots of pieces)
- By using the color picker within the Fill Color window, you can get exact color matches for print and cuts
And if you'd prefer to watch a video tutorial of how to add a design preview to Silhouette Studio...here you are!
Also of note: MAC users can also use the Grab tool and Windows users the Snip It tool to take a screen grab of the image, save and drag and drop into Silhouette Studio.
Note: This post may contain affiliate links. By clicking on them and purchasing products through my links, I receive a small commission.
That's what helps fund Silhouette School so I can keep buying new Silhouette-related products to show you how to get the most out of your machine! Thanks for coming to class today at Silhouette School. If you like what you see, I'd love for you to pin it!


.png)


Such a useful tutorial, thank you!
ReplyDeleteYAY! thank you so much, I was waiting so impatiently for this tut!
ReplyDeleteYou can also do a screen shot. Very fast and efficient.
ReplyDeleteAlso, if you have an iPad, just tap and hold on the photo. Save photo. It will be in your library. You can email it to yourself.
ReplyDeleteThanks so much for this. It is so very helpful.
ReplyDeleteTina
aurathentic@gmail.com
I usually save the image to my computer then add it to the program. Not fun to try to create when you cannot see what you are working o!
ReplyDeleteLooks good but since I have windows, I can't find the directions for that. Is there a way to do it with windows?
ReplyDeletepegphilliphs, If you see my post below I posted how to use the snipping tool in windows. I was not aware of this wonderful tool. To find the tool, click on the windows Icon on the bottom left of your screen. Then type in the search programs and files box the word snipping tool and it will come up.
DeleteLove your tips, thought I would give you one back. If using windows, you can use a program called Snipping Tool and get the photo of the finished design so you know what it is supposed to look like. I use this all the time, I just did a blog on it here is my blog address so you can see what I do. http://nelliebee133.blogspot.com/
ReplyDeleteMy blog is not for selling or for teaching like you, my blog is to just share what I make and how I make them.
I have a PC, but I found when I save page as I can go into the file and click the photo copy then copy it and paste it into OneNote or the file itself in my Silhouette Library. I also can just pin it from the Silhouette Site and then copy image from my pins and paste it into OneNote or the file in my Silhouette Library. However, I had not tried this until I was trying to figure out how to do this buy reading your instructions. Thanks for all Silhouette School has taught me.
ReplyDeleteThis is SO useful! Thank you. I always think Silhouette's own cutting files are poor compared to other brands, due to the lack of instructions, clear pictures etc, but this will certainly help.
ReplyDeleteFrom a complete newbie to Silhouette, THANK YOU
ReplyDeleteBuenisimo. Muchas Gracias
ReplyDeleteSuch a helpful hint but oh so long winded! Like others before me have said, it's much easier to use the snipping tool or to take a screen shot then copy and paste into Silhouette Studio.
ReplyDeleteI have always used the Pin It Button and added to my Pinterest Board, but my daughter was using my PC and went to her Pinterest Page and now my silhouette defaults to her Pinterest Page! How do I change it back to mine. I tried logging her out and logging me in, but still defaults to hers? Help anyone?
ReplyDeleteWay too many steps. I just right click with my MAC on the image in the store and chose copy image. Then I go back to design screen and click paste. But yes, having the image helps a lot!
ReplyDelete