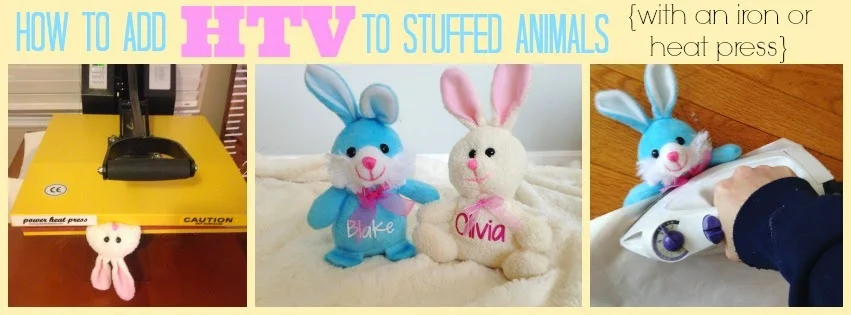
And when I shared it on my local Facebook business page the crowd went wild. So while you may not need another stuffed animal, your kids or grandkids are gonna love it - especially when you add their name to it and put it in their Easter basket.
First things first: stock up on these cute little guys. They're from Dollar Tree. Yes, they're a buck. I may be off base here, but the cream colored bunnies are the cutest of the bunch.
I think what works best about them is that the fur is short which allows the HTV to really stuck on there. Plus they're not overly stuffed so the heat press and iron are able to get a nice tight seal.
 Open up Silhouette Studio and type out the name. I made sure the name was about 2" to fit on the stuffed animal's belly. Obviously if you have a larger stuffed animal, you can adjust the size.
If you're working with a thin font, it's a good idea to put an offset (.010-.025 depending on the font/font size) around it to thicken it up a little bit and give the HTV a better chance of getting a good stuck. Here's a more detailed tutorial on thickening up thin fonts in Studio.
Mirror the text and send it to cut.
Have your heat press or iron warming up and remove the tags from the stuffed animal.
After you've weeded the HTV, stick it right on the little guy's belly.
How to Heat Press Stuffed Animals: (310 degree, 20 seconds)
Place the animal so the head is sticking out the top or the sides of the press. You don't want the head in there for a few reasons: the heat will melt the eyes and the head will prevent you from getting a good stick.
Place the teflon sheet over the stuffed animal like a blanket and close the top of the heat press. When the 20 seconds is up open it up and remove the clear backing.
If you feel like the HTV needs a little bit better stick, flip the animal over and press again.
How to Add HTV to Stuffed Animals with an Iron: (Medium-High Heat, 30 seconds)
iron near the floor) and put a thin sheet of fabric over it. Then place your iron on top of the sheet and press down firmly.
You are doing this on the floor so you can put a lot of pressure into the iron - getting resistance from the floor. I'm always afraid my iron will give-way if I put too much pressure on it. Keep the iron on there for 30 seconds.
Then peel up a corner of the clear HTV backing ensuring the HTV is sticking to the stuffed animal. If it's not, repeat with more heat and more pressure.
That's all there is to adding HTV to stuffed animals!
These seriously can't get much easier - or cuter!
Note: This post may contain affiliate links. By clicking on them and purchasing products through my links, I receive a small commission. That's what helps fund Silhouette School so I can keep buying new Silhouette-related products to show you how to get the most out of your machine!
Get Silhouette School lessons delivered to your email inbox! Select Once Daily or Weekly.


.png)


Did you adjust the pressure setting on the press? And the photo of the bunny's head sticking out of the press had me smiling. I see another trip to the dollar store in the immediate future.
ReplyDeleteThanks for another novel idea.
John
I bought some of these plushies for my daycare kids for our Easter party!!! I just got my heat press last week but don't have much HTV colors to choose from. Will have to get creative!! Thanks for the tutorial!
ReplyDeleteJust finished some...they are adorable! Thanks for the great idea!
ReplyDeleteI just bought the same cream colored bunnies today for my daughters! Thanks for the tutorial. I can't wait to try this!
ReplyDeleteHave you tried toys on long haired animals?
ReplyDeleteCan they be washed?
Any particular type of iron on work best?
Have you tried toys on long haired animals?
ReplyDeleteCan they be washed?
Any particular type of iron on work best?
Is there any chance you could tell me the brand of the little bunny. My little one had one and she lost it. I am trying to find her a replacement. I came across this picture by searching on google. I will really appreciate any information on the tag that might lead me to finding a new one. Thanks.
ReplyDeleteI just found this bunny at The Dollar Tree.
DeleteHave not tried this yet, but planning to for Easter. I have read blogs where they have been said to sell like hot cakes! An awesome tip that I will also be doing, is saving my scrap pieces for projects like this.
ReplyDeleteWhat temp with a regular iron or did I miss this?
ReplyDeleteYou missed it. 310 degrees for 20 seconds.
DeleteHi, thank you so much for your tutorials, they are incredibly helpful to newbies like myself! Do you have any sources you'd mind sharing for purchasing small stuffed animals like these for different holidays? I cannot seem to locate a reasonably priced source! Thank you!
ReplyDelete