So today I am sharing a tutorial on how to make Print and Cut conversation-heart inspired magnets and I'm taking it up a notch by making them 3D! Oh just you wait for this magic!
For this project you'll need:
Wax Paper
Cookie Sheet
Alright so let's start off in Silhouette Studio by designing.
I'm going to zoom through this part since you likely won't be making the EXACT same project...or maybe you are. Even if you are I will link to tutorials so you can find more info if you need it.
- I found a conversation-heart style heart (is that such a thing?) and traced it. (How to trace a jpeg tutorial)
- I then typed one of the children's names in it and filled the name with red.
- In a separate text box I typed out "Made by" > filled it with black > made the line black > and put that on a path by double clicking to get the green box and dragging using the directional arrow in the bottom left corner. Text to Path Under the Shape Tutorial
- When I put it on the top of the heart it went on the outside so I had to use the slider bar to pull it down and then the character spacing bar to adjust the letters.
- Select the curved text > right click > convert to path.
Then I simply duplicated the heart so I had a total of 12. It's easy to change the name by clicking on the text and retyping. I filled the hearts with four different colors by selecting a few hearts a time and then picking the color from the fill tool.
It's best to group each heart and the text together so you can easily move them around...and you'll see why this is important when I add the registration marks.
so you get the basics down
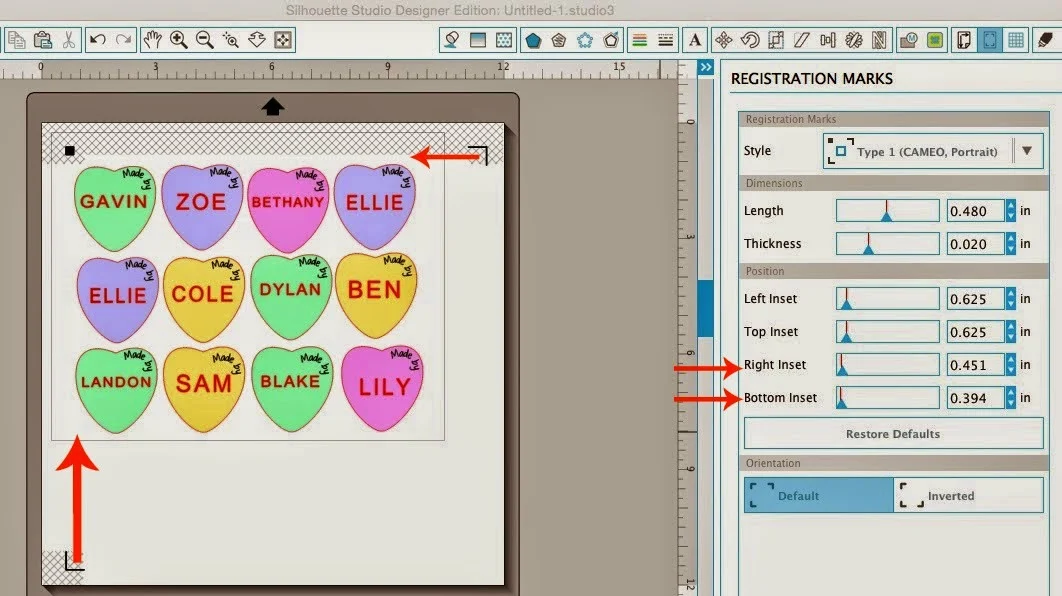
Now before I had my CAMEO and I was using the Portrait it was add registration marks and wham bam thank you ma'am print. But I find there are a few extra steps with my CAMEO since the print area on my 8.5x11" printer is smaller than the 12x12 cutting mat and Studio work area.
So before I add the registration marks I like to turn on the print border from the Page Settings window.
Then I add the registration marks. I don't know if it's just me and my computer that are wonky or what, but I always have to turn the print border box so it's horizontal and not portrait. I then use the slider bars on the Add Registration Marks window to pull the registration marks within the print border area.

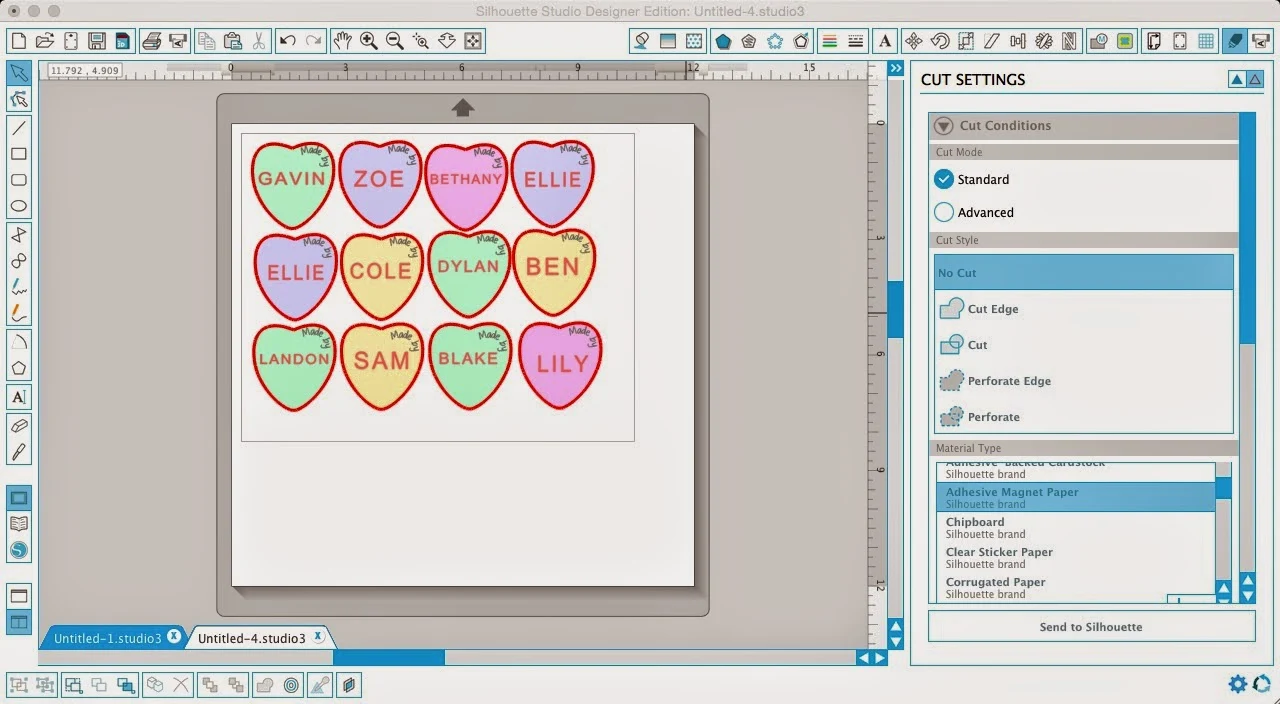
While the hearts were printing, I put a sheet of adhesive magnet paper on my mat with the white side up. In Studio I made a copy of my entire design (sans reg marks) and put it in another work area. This is not necessary, but I found it to be the easiest way. I selected everything and from the Cut Style window selected "Cut Edge"...see how only the heart is outlined in red?! I only wanted the hearts to cut (not the text) because I will be putting the print and cut cardstock pieces on top of the adhesive magnet sheets.
Be sure to select Adhesive Magnet Paper from the material list and adjust the blade to a 4.
When the magnets were finished printing I swapped them out for the cardstock. I put the cardstock down on the mat making sure to position the paper on the mat the EXACT same way it is in Studio. (If you were working in two different Studio areas go back to your original with the reg marks). Again change the Cut Settings to "Cut Edge" and select Cardstock from the material list. Adjust the blade according to the recommended settings. And send that puppy to cut.


While the paper hearts are cutting, remove the white paper to expose the adhesive side of magnet hearts.
When the paper hearts are finished cutting you're going to put the printed hearts onto the adhesive magnet paper. Now you can stop here...but if you want the 3D effect you need to go one step further.
This is where I ran into trouble with the Printable Magnet sheets so while you may be wondering why I didn't just print and cut on printable magnet sheets and save a bunch of steps - that's actually what I did initially. But when I added the Dimensional Magic the printable magnets curled and the stuff all ran off. So don't try to take a shortcut.
The adhesive magnet material is thicker which is why I'm suggesting to cut it and the paper separately and put them together. And to be extra sure the magnets don't curl, grab a cookie sheet. Flip it over and put a piece of wax paper down. Now stick your magnets to it and NOW add the Mod Podge Dimensional Magic. Oh yes, I'm tricky like that..not gonna curl, now are ya, magnets!
Let the Dimensional Magic dry for several hours - even as long as overnight. Then they're all ready to hold your kiddo's masterpieces!
And now that you've realized how totally awesome Print and Cut is - here are a bunch more Silhouette Print and Cut projects from my friends in the Silhouette Challenge group. We're all sharing on our blogs today so peruse the projects below for a wealth of Silhouette inspiration!

1. Clever Someday // 2. TitiCrafty // 3. GingerSnapCrafts.com // 4. My Paper Craze // 5. Simply Kelly Designs // 6. Little Blue's Room // 7. Mama Sonshine // 8. Small Stuff Counts // 9. Dragonfly & Lily Pads // 10. GiveMeAPaintbrush // 11. Please Excuse My Craftermath... // 12. Barb's Life // 13. GetSilvered // 14. Lil' Mrs. Tori // 15. Minted Strawberry // 16. unOriginal Mom // 17. Where The Smiles Have Been // 18. Persia Lou // 19. Silhouette School // 20. From Whine to Whine // 21. DailyDwelling // 22. Creative Ramblings // 23. Paper Garden Projects // 24. It Happens in a Blink // 25. Perfectly Fabulous // 26. Adventures in All Things Food // 27. Create & Babble
Note: This post may contain affiliate links. By clicking on them and purchasing products through my links, I receive a small commission. That's what helps fund Silhouette School so I can keep buying new Silhouette-related products to show you how to get the most out of your machine!
Thanks for coming to class today at Silhouette School. If you like what you see, I'd love for you to pin it!


.png)


These are so cute! I love adding dimension to print projects, but don't often have the patience.
ReplyDeleteJust set your paper size to letter or "use printer settings" on the page panel and you can avoid all those extra steps.
What a great idea and a wonderful alternative to candy! Thanks for sharing your idea.
ReplyDeleteYou can sentence structure check here. It will be easy for you to check online. The great ideas I found here.
ReplyDeleteWonderful post. Thanks for sharing such a useful post.
ReplyDeletenon woven bags making machine
This is actually an avoidable problem. As a matter of fact, some new computer programs and developed technology have made it simple for designers and manufacturers like you to see their designs up close and in 3D. 3d printer
ReplyDelete