Well, I've heard your pleas...you want to know how to layer vinyl! I must give the people what they want and so today we're going to talk about the easiest, no-fail, pretty much 100% guarantee way to perfectly layer vinyl...on the first try! You're in, aren't you?
I needed a way to better organize my vinyl and of course, I needed to make a label. For this project, I wanted to make a text label with an outline aka offset...let's get started!
Open up Silhouette Studio.
Type out your word or bring in your design. For this tutorial, I'm going to be referring to a text design, but know this method will work for layering image designs, too.
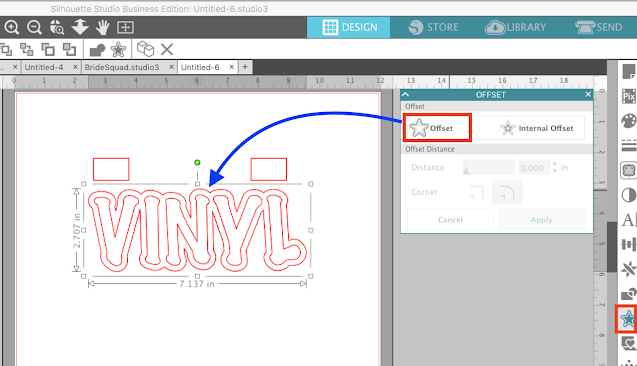
Back to our offset though... the offset will be the bottom layer of our design. To get the offset click back on the text, then click the "Offset" icon. Select "Offset" and adjust the distance to your liking use the up and down arrows or the slide bar. Click apply.
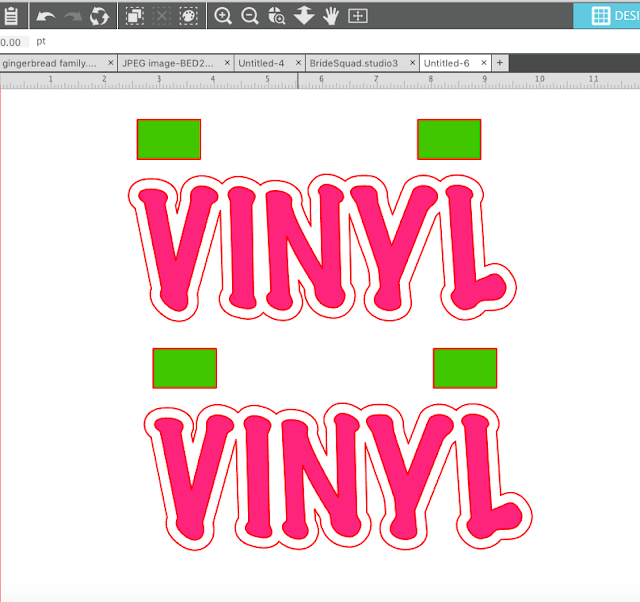
Now open the Fill Color panel. The Offset layer and the original with the colors of vinyl in which they'll be cut on. Fill the registration marks with a totally different color.
Select everything - the offset, registration marks, and original design - and make a duplicate. You can copy/paste or you you can right click > Duplicate.
Keeping the registration marks with each copy, delete the alternating layers on the two copies. You should have something that looks like this.
Group the registration marks with each layer so they don't get moved out of place. To group, select the registration marks and the design at the same time > right click > Group. Repeat for the second layer.
At this point, my design is all ready to be cut. Let's start with the white layer. Move the pink layer (along with the grouped registration marks off the virtual cutting mat). Open the Send panel
and make sure to pick "Vinyl, Glossy" or "Vinyl, Matte" as the material type depending on what you're cutting.
Also make sure the cut lines are on by pressing "Cut."
Go back into Silhouette Studio and move the white layer off the virtual mat. Move the pink layer on and repeat the steps to cut the pink layer.
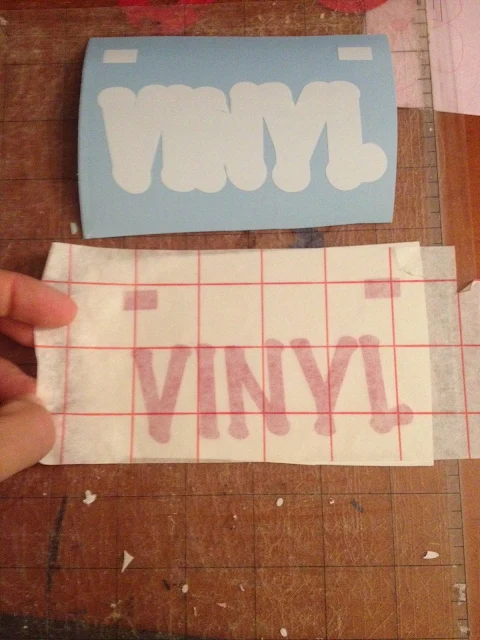
Weed both portions of your design like you normally would. Be sure the rectangles stay in place, too! Here's how my two cuts looked after I weeded them.
Now we want to move the top layer (pink) on top of the bottom layer. Cut a piece of transfer tape that is large enough to cover the largest layer. Remove the backing of the transfer tape and lay it down over the top layer (for me that's the pink vinyl) like you normally would to transfer vinyl to another surface.
Peel it up like you normally would - catching both the rectangles and the design. Don't throw out that piece of vinyl backing just yet! You'll need it.
Place that scrap piece of vinyl backing lightly over the text you just peeled up, but leave the rectangles exposed.
Flip it over so the sticky side of the transfer tape is facing down and line up the rectangles on the top and bottom layers. By putting that piece of paper there you are just making sure the top layer of vinyl and transfer tape don't start sticking to the bottom layer until you are absolutely ready.
So go ahead and place the top layer rectangles (pink) directly on top of the bottom layer rectangles (white). I like to line up the bottom edges of the rectangles and then kind of fold up.
You can't see the white rectangles in the photo below because they are completely covered by the pink top layer rectangles. That's what's going to guarantee your image is layered exactly right!
...then slowly lower down the top layer so it's on top of the bottom layer.
Keep the transfer tape in place and press the two layers together. Peel the transfer tape up again bringing both layers of the design with it.
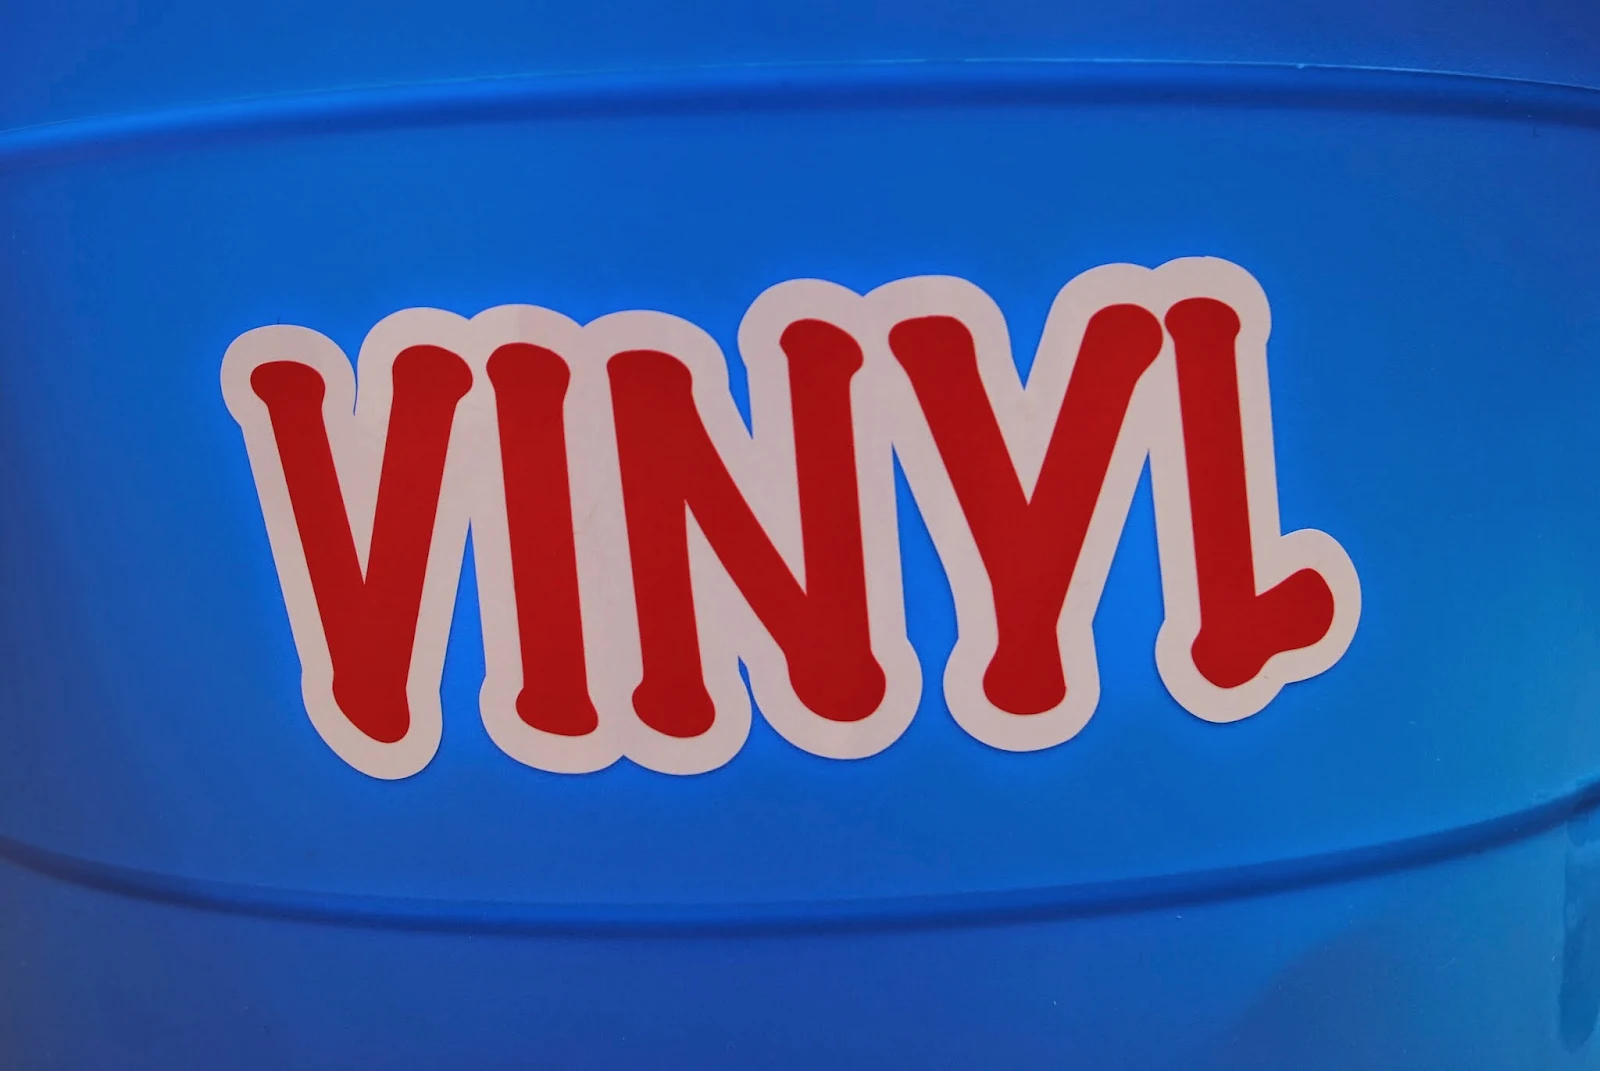
Now you can place the entire two layer design onto the surface where you want it!
This sounds like a lot of steps, but it's actually fairly easy to do and if you want to avoid wasting your vinyl over failed attempts at "eyeballing it" than this is definitely the way to go!
Note: This post may contain affiliate links. By clicking on them and purchasing products through my links, I received a small commission. That's what helps fund Silhouette School so I can keep buying new Silhouette-related products to show you how to get the most out of your machine!
Thanks for coming to class today at Silhouette School. If you like what you see, I'd love for you to pin it!






.JPG)
.JPG)




.png)


HI. Thank you for all you do! What is the name of the font you used for this tutorial?
ReplyDeleteI can't wait to try this! I'm trying to put my name on my water bottle. I also wanted to find out what font you used? I love it!
ReplyDeleteThis tutorial was an absolute miracle today. I found it at just the right time. I went on to pinterest, trying to find a tutorial for how to outline words so something I was making would show up better. I had no idea it was called "offsetting" the image. I had JUST opened Pinterest, and it was at the very top of my feed. I used it for heat transfer vinyl, so I omitted the rectangle part, but this was just what I needed! Thank you so much for sharing your information so freely.
ReplyDeleteThis is a fabulous tutorial! Thank you for being so thorough!
ReplyDeleteThank you again! As always I learn so much for you. Today's project will be photographed and the name of the tutorial along with date will be noted in my ever growing "manual" ..... aka my printed and bound copy of your E-book. Love the way you describe how to do things .... always learn from you!
ReplyDeleteYour instructions says to highlight both rectangular and then align. Please explain how to highlight two objects. Each attempt, I can only select the first rectangular. Please advise. Thanks, T
ReplyDeleteI had the same issue as well. If you click next to the 1st rectangle and drag the mouse over the other rectangle, still holding the click, it should highlight both.
DeleteYour instructions says to highlight both rectangular and then align. Please explain how to highlight two objects. Each attempt, I can only select the first rectangular. Please advise. Thanks, T
ReplyDeleteHi click on the first object you want to select, hold the control button on your keyboard and click in the second object you want to select while holding control. You can release the button after you selected any objects you want to include in your selection.
DeleteDont click again after you selected then it will deselect all, and you will have to redo your selection again.
Great stuff! Clear instructions! Thanks a lot!
ReplyDeleteThanks for the great tip! Now I have the courage to layer vinyl. Can't wait to try it!
ReplyDeletewhat font is this?
ReplyDeleteI never thought of adding that top rectangle block, cool idea
ReplyDeleteI need to start looking at your blog BEFORE I start projects. I wasted so much vinyl today trying to layer ladybug parts. This block idea rules!
ReplyDeletethis is really cool tip
ReplyDeleteDo you ever have trouble with the top layer of the vinyl peeling off?
ReplyDeleteHow do you manipulate or mirror the image so you can place the vinyl decal on the inside of a window?
ReplyDeleteRight click on the image and select Flip Horizontal for a mirrored image.
DeleteI have had my Cameo for 3 years and I am constantly learning new things. This is just one additional asset to have to help line up vinyl items for layering. Great tutorial!
ReplyDeleteI have a question. Instead of laying directly on top of another vinyl, I kind of do it like HTV. I Subtract the to top layer from the bottom layer, then offset the top layer to make it slightly bigger and delete the original top layer. Then I layer them. Is it recommended to do it this way, directly over top instead? I'm just trying to figure out the best method? Thanks!
ReplyDeleteWow it worked great so happy with the results. Thank You sooooo much.
ReplyDeleteJust wow, I will definitely try this.
ReplyDelete