I'll be using the same design as I did in the original tutorial. If you haven't read through the basic 101 lesson on HTV, I highly suggest you do that before going any further. This tutorial will assume you know the basics. Go on...I'll wait.
Back already? Great, let's go!
Okay so once you've laid out your design in Silhouette Studio you want to decide which pieces of the design will be which color. You can see that in my example the face and the hand were cut on pink heat transfer and the snowflakes and bracelet were teal.
Here's how my design in Silhouette Studio looked as I was about to send it to the machine to cut. If I wanted all of these pieces to be the same color I would just cut the HTV like a regular cut file with smooth heat transfer vinyl settings. But since I wanted to cut on multiple colors of vinyl, I needed to tell the machine which lines to cut and when.
First let's work on cutting the pink pieces (I'll call it 'Color A')- the face and the hand.
The snowflakes and bracelet - which will be cut on blue - will be 'Color B'.
To prepare the file, first move all the Color B pieces so they are in a bunch and not spread out all over the design area and not overlapping any other designs. This will minimize the amount of teal heat transfer vinyl you use and cut down on waste. I put all of my B pieces towards the top.
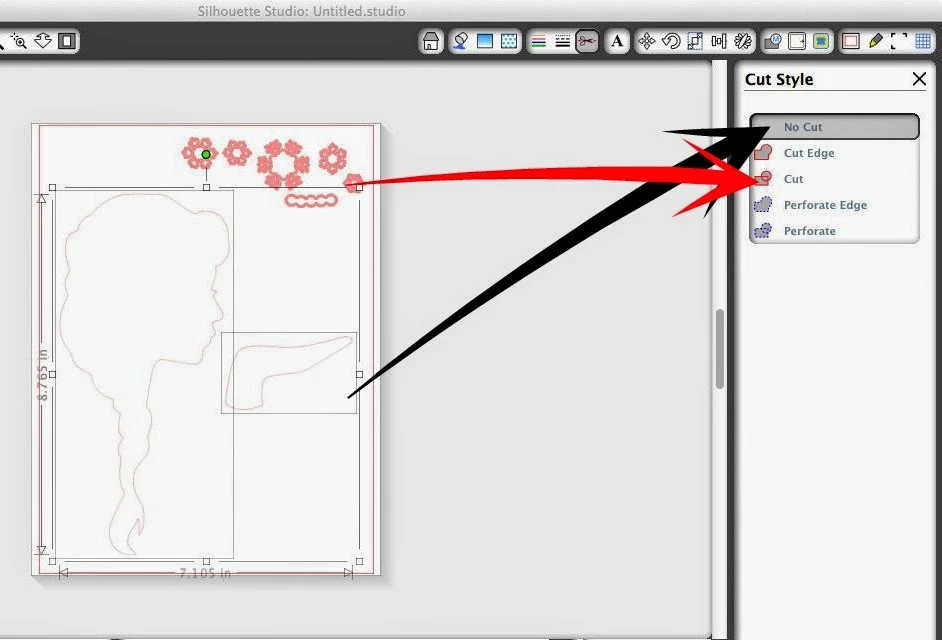
Now select all of your Color B pieces and mark them as 'no cut' since you ONLY want the Color A pieces to cut in this first go-round. Highlight > Click 'Open the Cut Style Window' > No Cut.
Make sure the pieces you want to to cut out of 'Color A' are marked as 'Cut' as indicated by the thick red outline. Highlight > Click 'Open the Cut Style Window' > Cut.
Now you're set to cut your Color A designs. Once they have cut, you can position them on your shirt and iron them on as directed in the beginner tutorial on Heat Transfer Vinyl.
When you're ready to move onto cutting the Color B pieces, go back into your file in Silhouette Studio. Click the 'Open the Cut Style Window' highlight the 'Color B' pieces - in my case the snowflakes and bracelet' and mark them as 'Cut'. If you need to reposition them you can.
At the same time, select the 'Color A' pieces - the face and the hand - and mark them now as 'No Cut'.
Since my 'Color B' designs were small, I put them all near the top of the gridded cutting area and then revealed the cutting mat so I knew how big of a piece of heat transfer vinyl I needed. I cut a piece of the teal HTV that was about 2 inches long and put it on my cutting mat with the shiny side down.
Then I cut as I normally would for HTV.
After they cut, I cut I weeded them and cut one of the snowflakes apart from the other to use in Elsa's hair and I cut the bracelet piece off so I could position it, as well.
Now simply place them on the shirt where you want them to be ironed on. It's okay if they are overlapping other HTV pieces that are already on the shirt - as you can see the bracelet and hair piece overlap the pink pieces slightly.
Use your cloth and iron the second color of heat transfer vinyl on in the same manner as you would for a single color design.
Could my pretty girl look any happier to have a new Else shirt to go with her favorite Frozen doll?
Note: This post may contain affiliate links. By clicking on them and purchasing products through my links, I received a small commission. That's what helps fund Silhouette School so I can keep buying new Silhouette-related products to show you how to get the most out of your machine!
Thanks for coming to class today at Silhouette School. If you like what you see, I'd love for you to pin it!
Recommended Products for Beginners:


.png)


Im looking for the No Cut button but it seems the top of our studio has different buttons.
ReplyDeleteHow do you prevent the bottom layer, already ironed on, from sticking to the material (I use a handerchief or pillowcase) between it and the iron, as it's not all covered with the plastic backing?
ReplyDelete