Since PicMonkey is free to use the designs are free, as well, for personal use. Today I'm going to show you how to turn a basic PicMonkey design into a cut file.
Go to PicMonkey.com. Click Design at the top.
On the left side click the butterfly icon to open up the overlays (designs).
Scroll through until you find a design you like. I am desperately wishing for spring so I'm going to make three flowers. I pulled over my flower designs from the bursting blossoms set and then added stems from leafy greens set. I resized and got my design all ready in PicMonkey.
Now save your design by clicking 'Save' in the gray toolbar at the top. Name the file and make sure it saves as .jpeg.
Open up Silhouette Studio and at the same time navigate to the folder where your PicMonkey design saved. Click the name of the file and drag it into Silhouette Studio. For more help on importing a JPEG into Silhouette Studio click here. It's going to come in looking enormous so use the corner squares to make it small enough to fit in your Studio work area.
Click the 'Open the Trace Window' icon (circled) at the top. Then click 'Select Trace Area'.
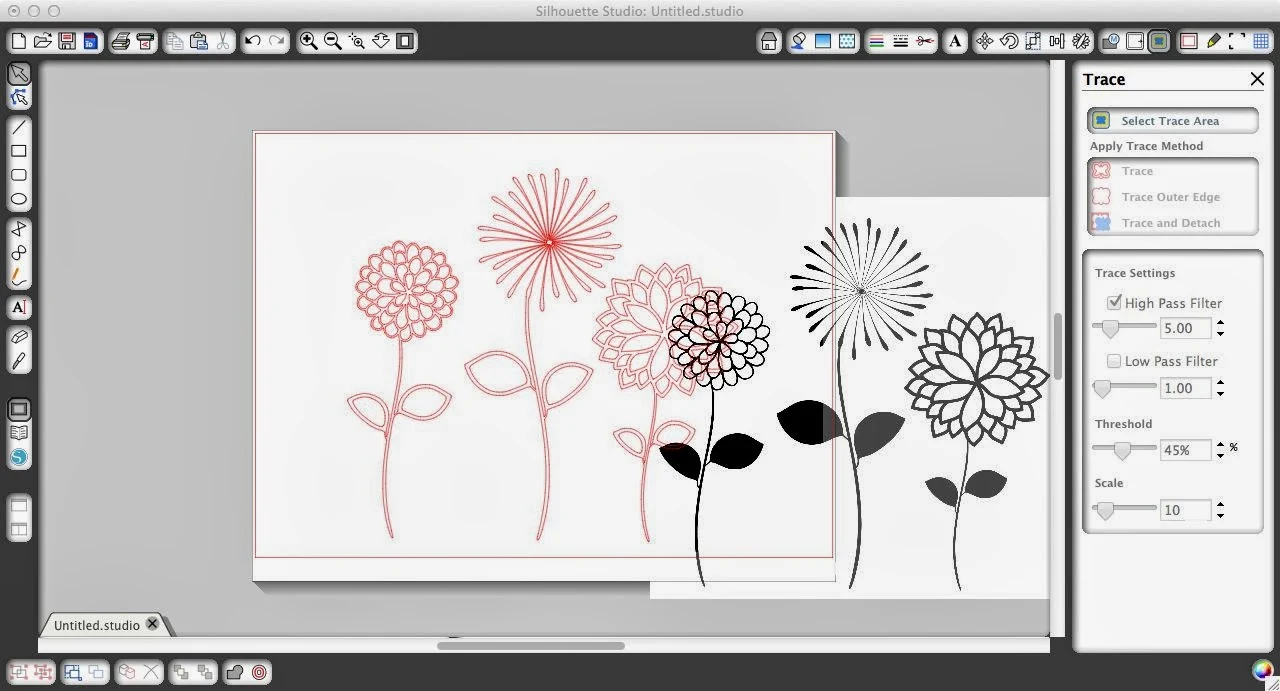
Now use your mouse to draw a box around your design. A yellow highlight will now appear around your entire design. From the trace area menu click the 'trace' button. If you only want only the outline of your design then you would choose 'Trace Edge' instead.
A thin red outline now appears around your design. You can now grab your original design and pull it out of the way to delete it.
You can cut now if you're ready or you may need to do a little bit of cleaning up on the design. You can see that the leaves have a double line. I don't like when my designs cut that way so I'm going to fix it by right clicking > release compound path. Now I can move the inner part of that leaf out of the design and delete it so I get a cleaner cut that's easier to work with. I also want to make sure that the flower petals on the middle flower cut as one big line so I weld them together. (Click here for a basic welding tutorial.)
And when I'm ready, I can send the design to cut.
Here's how my flower designs cut on card stock. Of course, you can cut on any medium you'd like...and the possibilities of use are endless! It's always nice to have an extra free source of designs, isn't it?
Next week I'll be sharing a few more fun spring craft I made with some of these flowers. Here's a sneak peek at how I used one...the tutorial is up now on our sister site Two It Yourself.
Also, be on the lookout for a tutorial on how to turn PicMonkey design into print and cut files.
By the way, if you decide you're a PicMonkey luvah, like I am, there is a paid upgraded version that unlocks more designs and fonts. I think I paid about $33 for the year...totally worth it!
Thanks for coming to class today at Silhouette School. If you like what you see, I'd love for you to pin it!


.JPG)


.png)


ExpressPassPics is part of the Harlequin Display Group of companies. We have won lots awards for our printing over the years and are proud to say that we have built a reputation for great quality. Harlequin Display Group has a history of producing all sorts of display products for some of the world's greatest retail brands.
ReplyDelete