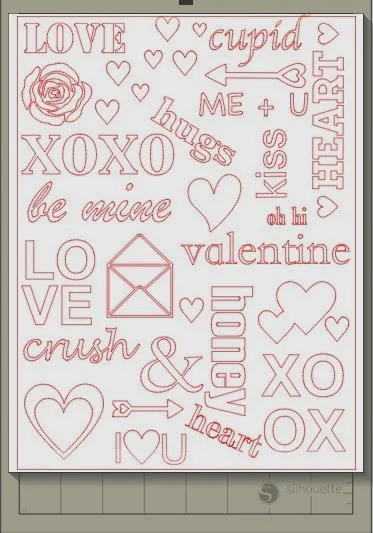
The first thing I did was open up Silhouette Studio to create the subway art. For this project I used the following free designs from the Silhouette Library including:
Envelope with Hearts
Heart Banner
Home Quote (I only used the heart)
Rose
I also purchased:
Hearts & Arrows (Design ID #37522)
The first thing I did was pull all of these design into my work area.
Then I ungrouped the designs. By ungrouping them (get box around design by clicking it > right click > ungroup) I was able to use the separate elements in my subway art. For instance I did not use the actual banner, but just the heart from the Heart Banner design.
Many of the hearts in my final cut file are actually the same, just sized differently. For the Hearts and Arrows I made sure to delete the two cut vertical lines inside the hearts. I move the items around the page and then filled in the holes with Valentines-themed phrases in various fonts and sizes. Just get creative with it. Note: Normally I would share this .studio file with you for free, but because the Hearts & Arrows design was purchased, I can not distribute this design for free.
I sent the subway art design to cut and make a freezer paper stencil and then used the stencil to paint my banner.
The stencil was able to be ironed directly onto a piece of drop cloth before painting. From here you could make this Valentine's Subway art into a pillow, a framed piece or a banner. (You could even make the design smaller than the 9x11 size and make cards.)
I turned mine into a banner. If you're interested in how I did it, head over to our sister DIY site, Two It Yourself, for that tutorial.
Thanks for coming to class today at Silhouette School. If you like what you see, I'd love for you to pin it!


.png)


How do you work with the free-floating pieces of stencil, like the circle in the letter O, for example? Do you have to place those by hand, or can you use transfer paper?
ReplyDelete