Making text wrap or warp is actually very easy and in this 3 step Silhouette Studio tutorial I'll explain how to do it!
Draw Circle and Type Out Text in Silhouette Studio
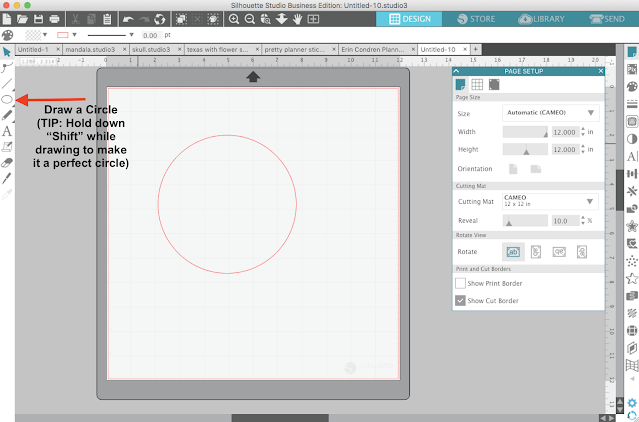
Open Silhouette Studio and select the 'Draw an Ellipse' (Circle) tool on the left side. In the work area draw a circle.
Double click the text box so you get the bright green box around it.
Curve Text in Silhouette Studio
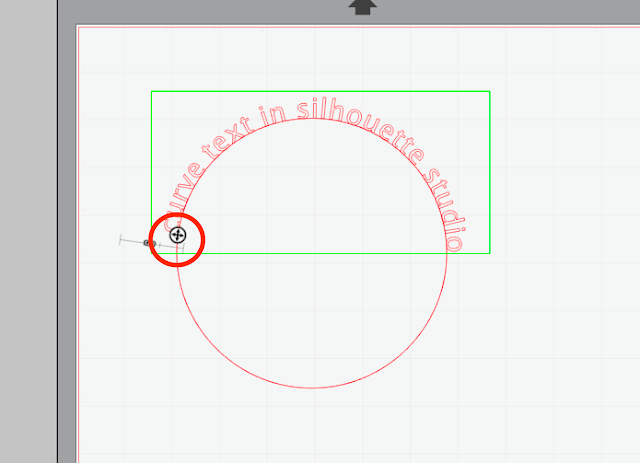
On the left side of the box, a little circle with directional arrows will appear. Grab it and drag it over to the circle you drew. The text will wrap around the circle.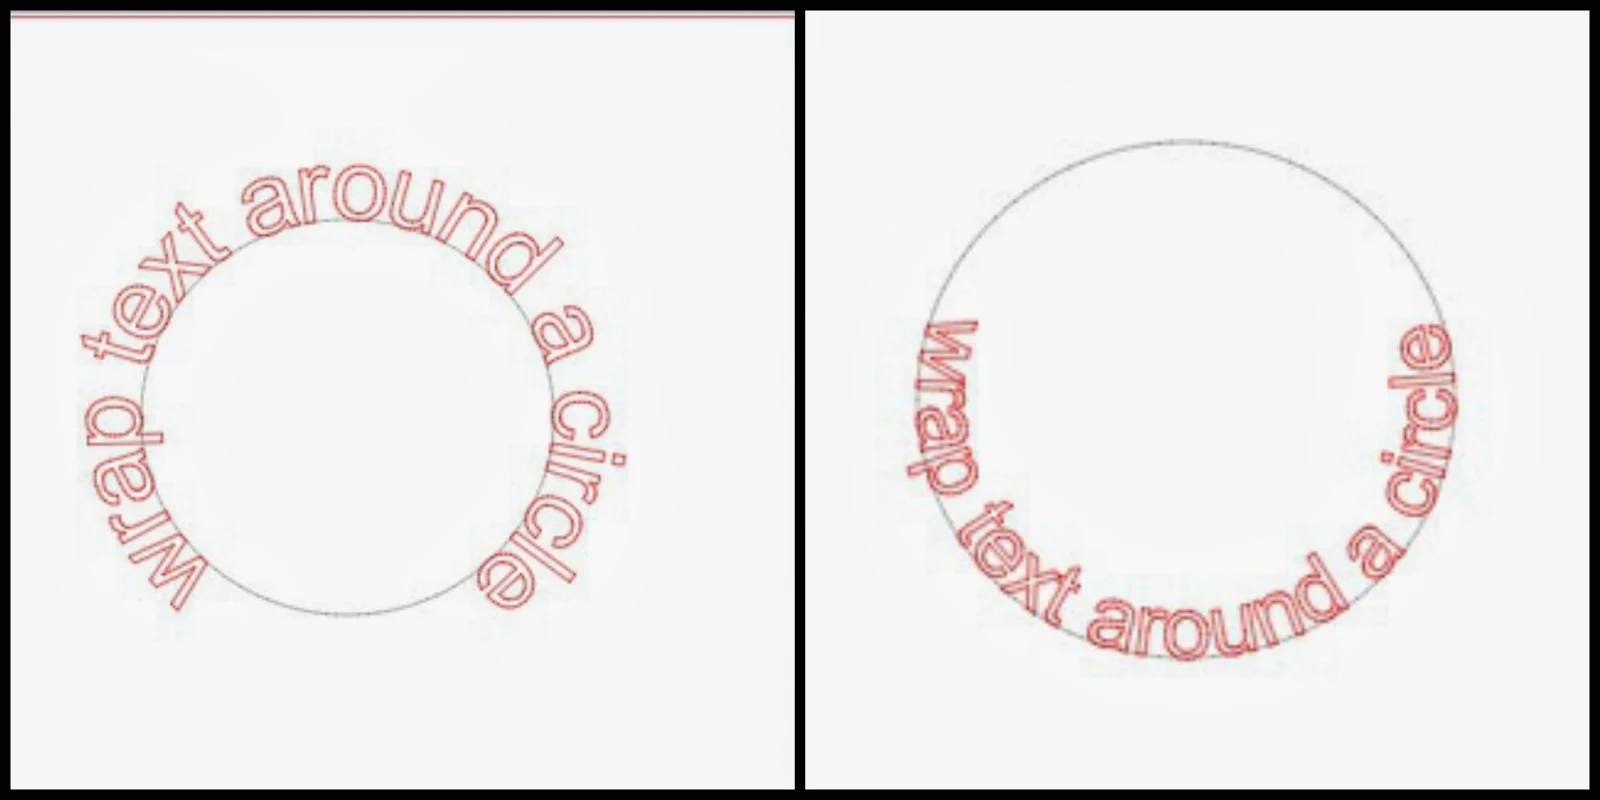
You can move the text to position it exactly where you want it on the circle by dragging that little circle with the arrows around the circle.
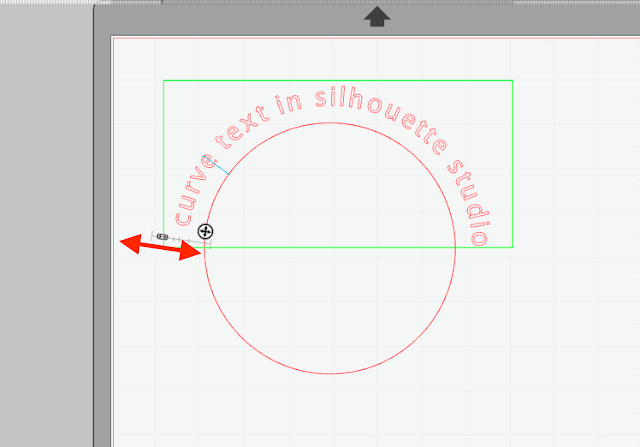
If you want the text above or below the circle, use the lever bar to pull the text in or out.
Silhouette Studio Convert to Path
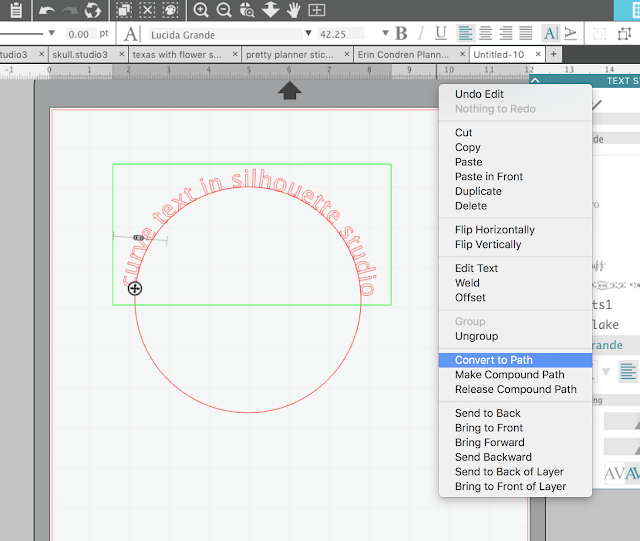
Once you get the text where you want it on and around the circle, you need to convert it to path so it stays in that shape when you move the circle away. With the text selected > right click > Convert to Path. This freezes the curved text and allows you to delete the circle. Actually what it does it converts the text into a shape...a shape is path hence Convert to Path.Curving Text Under a Circle in Silhouette Studio
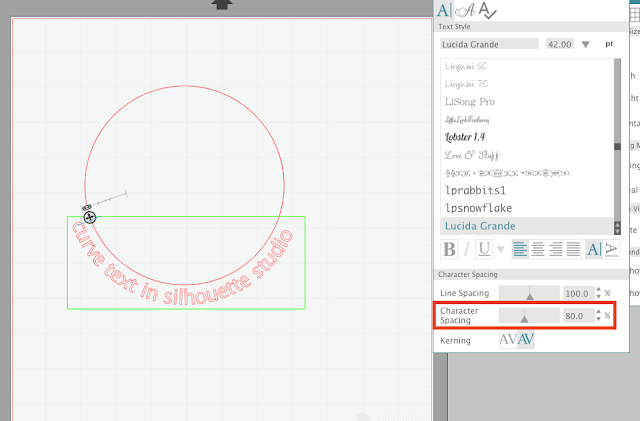
To wrap text under a circle in Silhouette Studio, type out the text, grab the the text by the little circle, and snap the text to the bottom inside of the circle. This puts the text on the inside bottom of the circle.Use the lever bar to pull the text below the circle.
If you need to adjust the spacing of the letters, use the Character Spacing bar on the Font Style panel to bring them closer together.
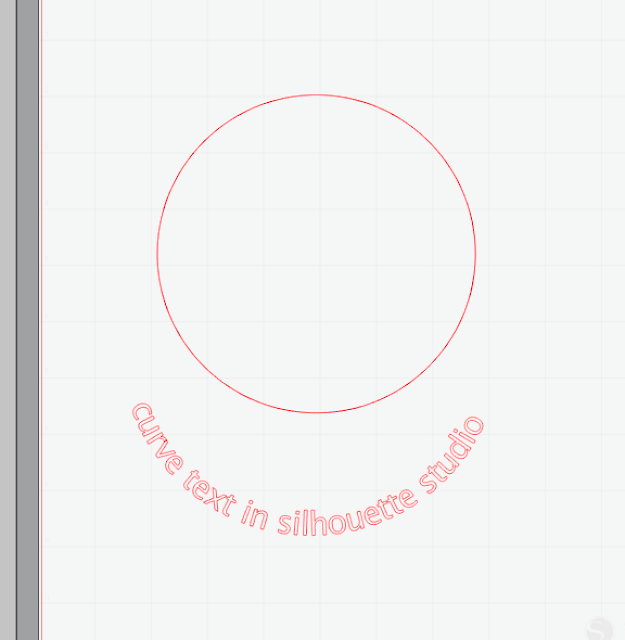
Finally, freeze the text curved around the bottom of the circle by right clicking > Convert to Path.
Now it's safe to pull the circle away and delete it.
That's all there is to curving text around the top or wrapping text under a circle in Silhouette Studio!
Thanks for coming to class today at Silhouette School. If you like what you see, I'd love for you to pin it!
Looking for more beginner Silhouette Tutorials? The best Silhouette tutorials for beginners can all be found on this page.








.png)


Can you do this using the Samantha front?
ReplyDeleteFantastic, so easy to follow, thanks!!
ReplyDeleteI want to use this for heat press vinyl but...I can not flip the letters after I get them in the position I want them in. What am I not doing?????
ReplyDeleteRight click on the text and scroll down to flip horizontally
DeleteYou mirror the image with the printer setting before printing.
Deletehaving same problem as above. When I mirror text it moves....any ideas??
ReplyDeletehaving same problem as above. When I mirror text it moves....any ideas??
ReplyDeletemake it a compound path and then mirror it
DeleteAt what point can you size the letters? I can get it wrapped with no problem at all. But once I loose the green box, I can never seem to get it back. Whether to size first and then wrap or wrap and then size. The green box disappears once I click off the test. (either to size or wrap)
ReplyDeleteI would like to cut an actual circle/ring. Here is an example:
ReplyDeletehttps://www.simonsaysstamp.com/product.aspx?id=326864
I love this - I made the circle and did as I wished, brilliant.
ReplyDeletelast week I managed to do this with a triangle shape - fantastic, text with side with the separately cut triangle in the middle. This week I can't get the text to go either side of the triangle! Any ideas please?
I am officially a dozy owd bat (don;t worry I often call myself that)
DeleteI have just tried one last time and realised, I used the polygon shape tool to draw the triangle, rather than straight lines. Therefore it is a shape rather than a number of straight lines put into a shape
Problem solved and I can now stop tearing my hair out!
Is there a way to curve just the top or just the bottom of the word? and leave the rest of the word not curved?
ReplyDeleteI am wondering how to do this too....
DeleteHi, In Silhouette Designer edition you also find a special warp button on the right of your screen. With this you can curve the words the way you want them to. Curved at the top or at the bottom or only left or only right side of the word, everything is possibly. This special "warp button is not for the basis Silhouette studio, only for designer or bussines version. Hope this helps for you.
DeleteEverytime I need help figuring something out with the Silhouette Studio, google directs me here. And its always a huge help! Thank you so much!
ReplyDeleteI can get the text on TOP of my circle Outside of the line, but when it is on the inside it reads backwards and I don't want it like that. I want the top to read Pink lemonade pie on the inside and the bottom to read when life hands you lemons make pie at the bottom of the circle. How do I get the Pink Lemonade Pie part to read right?
ReplyDeleteI had the same problem. I'm making a round stencil with some text at the top and some at the bottom. I ended up using two circles to make it. First I made an 8" circle and dragged the first part of my text to the inside top of it. Then I made a smaller circle (7") inside of the first one and dragged the second part of my text to the outside bottom of it. Just make sure the space between the circles is the same size as your text, and it will line up properly. When I finished, I grouped everything together so that I could resize the whole thing if needed. Hope this helps!
Deletehi I haven't update my silhouette program to design edition yet.Can I still do the wrap text? I'm trying but I'm not getting it to wrap
ReplyDeleteI am trying to curve a text using this method. I want to cut HTV. When I design my image I can delete the line. However, when I send the image to cut it brings the line back and it cuts it. How do I eliminate the lines?
ReplyDeleteThank you! I wanted to use round stickers and didn't know how to curve the text!
ReplyDeleteAlways a breeze with your instructions .. your just awesome.
ReplyDeleteAlways a breeze with your instructions .. your just awesome.
ReplyDeletewhen ive got my curved words, i cant find the emblem to click on on the top right side, before the letter A
ReplyDeletewhen ive got my curved words, i cant find the emblem to click on on the top right side, before the letter A
ReplyDeletewhen ive got my curved words, i cant find the emblem to click on on the top right side, before the letter A
ReplyDeleteWOW! Googled instructions today and your site came up first - SUPER SIMPLE! Thank you.
ReplyDeleteVery Helpful! Thank You!
ReplyDeleteI was just wondering if there is a way to do a curved font on the bottom of a circle and still right side up, but not the inside of the circle? I'm not sure that makes sense. I am trying to put my sons names on over and under a baseball but I can't get them to look similar because when I do the bottom name it's all bunched up (7 letters).
ReplyDeleteHello I have managed to create the curved text but when I duplicate the circle and text it doesn't duplicate properly and mis aligns everything!
ReplyDeleteI can get my text to the bottom inside of my circle with little problem. When I try to use the slider the mouse only shows the hand or what looks like a capital I. I move up and down the lever. Zoom in to see if I'm missing something. I uninstalled the program and reinstalled it. I just don't know how to fix it. Any ideas?
ReplyDeleteWhen I enter the word GIANTS on the curve my letter spacing is not correct. The NTS is spaced wider than the GIA. How do I correct the spacing?
ReplyDeleteI am not able to use the slider no matter where I try to put my mouse. please help
ReplyDeleteHey there I made the curve texted and amazing help thank you, now I need to fix one letter in my curved text to a capital. Is that possible or do I have to start all over?
ReplyDeleteHey there, if your letters are converted to path, you could ungroup and replace that one letter.
Delete